Tuesday, July 26, 2016

SIP Challenge #58 - Sketch!!

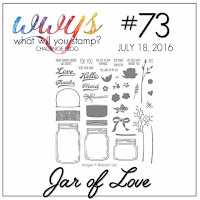
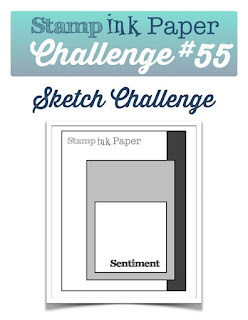
Hello and Happy Tuesday!  This week's Stamp, Ink, Paper Challenge is a sketch and I love sketches!
http://stampinkpaper.com/?p=1628

I combined some fun Paper that I bought at Old Time Pottery with some Stampin' Up! Cardstock and a beautiful stamp from the Stampin' Up! Watercolor Wishes Kit.   I just love the font in the sentiment stamps in that kit!  Here's my card..


The Floral top layer on my A2 Crumb Cake card base is from a Printed Cardstock called the Fiesta Forever Stack from Old Time Pottery.  It has a lot of pretty, color patterns and paired perfectly with this Tangerine Tango Cardstock.  The tag was also front the same Printed Cardstock Stack.  I stamped the flourish from the retired Stampin' Up! set, Everything Eleanor in Wild Wasabi Ink.  I heat embossed this awesome sentiment from the Watercolor Wishes Kit in White and added an adorable little orange flower from FSJ Beauty Blooms.  I thought it matched perfectly as well.  The seam binding that I used between the layers I think is in Wild Wasabi.  I got it in a share probably two years ago and still haven't used all of the gorgeous colors!  I love seam binding so why haven't I used it all??  lol  Last but not least I added three white enamel dots in the lower right corner to finish this one off! 

The below list is for the Stampin' Up! Products.  Thanks for stopping by!    Blessings, Tina


Product List

Tuesday, July 19, 2016

WWYS #73 - Jar of Love!


Hello!  I'm back on my blog.. wow, twice in one day!  lol  I saw this awesome challenge over at What Will You Stamp? Challenge Blog using the new Jar of Love Stamp Set and couldn't help myself.  Oh and I needed to make a Bridal Shower Card and I thought this would work perfectly! 


So here is my card... I'm LOVING this stamp set!


This one started off with an 11" x 4 1/4" piece of Crumb Cake Cardstock that was scored at 5 1/2".  I added a piece of 4" x 5 1/4" Pool Party Cardstock that was dry embossed with my Woodgrain embossing folder.  After embossing I ran a White Craft Ink stamp pad over the raised area for a little extra dimension.  My tag was a My Favorite Things Stitched Tag Die cut out in Whisper White.  I used a 1/4" circle punch to punch a hole in the top of the tag.  I stamped my Jar on the tag in Pool Party Ink.  I stamped the water in Pool Party as well.  I cut a piece of a sticky note to mask the threaded section of the jar so I could stamp the stems and leaves directly  on the jar in Old Olive Ink.  I stamped the flowers in Daffodil Delight Ink onto Whisper White Cardstock.  I added the detail in Crushed Curry Ink and then cut them out with the coordinationing Jar Framelits.  I attached them to my tag with glue dots and added small pearls in the center.  My burlap layer was stamped with Tip Top Taupe Ink onto Crumb Cake Cardstock and then handcut.  I ran some Linen Thread around the Faux Burlap layer three times and made a messy bow for the front of it.  I then attached it to the front of the jar with Fast Fuse.  The "congrats" sentiment is from the Thoughtful Banners stamp set and was stamped in Soft Suede onto Whisper White Cardstock.  I banner cut the end and adhered it to my Pool Party layer with Fast Fuse.  I ran some yellow seam binding through the tag and then tied a piece of Linen thread into a bow on it.  I attached my tag at an angle with Dimensionals.  Last but not least I added three white sequins to the card front.  

Thanks so much for stopping by!  Blessings!  Tina

Product List

SIP Challenge #57 - Black and White!


Hello and Happy Tuesday!  Hope your week is off to a great start!  I'm back over at Stamp, Ink, Paper this week with my Black & White design team card.  I knew this would be a fun challenge but it mostly became just a challenge.. not sure why???  For some reason I struggled this week and constantly wanted to add a pop of color but keeping with the challenge guidelines, I fought off my inner rebel and went with just Black and White!
http://stampinkpaper.com/2016/07/sip-challenge-57-black-white/

Here's what I came up with this week!


I LOVE the black and white prints in the Pop Of Pink Specialty DSP so I used those on my Thick Whisper White A2 Card base but I mounted both DSP layers on a thin layer of Basic Black cardstock.  Once again I went with one of new favorite Stamp Sets, Grateful Bunch that coordinates with the Blossom Bunch Punch.  The sentiment, butterflies and flowers are all from this awesome set!  I used my Lots of Labels Framelits Dies to cut out my sentiment and stamped butterflies.  I stamped in Black Archival Ink all of the flowers of Whisper White Cardstock and punched them out and then layered using dimensionals in between the layers.  

Thanks so much for stopping by!   Blessings!  Tina


Product List

Thursday, July 14, 2016

OSAT Shabby Chic Blog Hop


Hello and Welcome to the July 2016 One Stamp At A Time Blog Hop!  If you've already been hopping then you landed here from my sweet friend, Megan Thompson's blog and you should know that we have a Shabby Chic theme this month!  I can tell you that this is my very first Shabby Chic card and project but I had a lot of fun making it so let's take a look and see what you think....


Here's a better look at the card..


I used an A2 Crumb Cake cardbase.  I added a 4 1/8" x 5 3/8" piece of Chocolate Chip Cardstock on that for a thin layer.  The top layer is a 4" x 5 1/4" piece of Blushing Bride cardstock that was embossed with a Woodgrain Embossing folder and sponged with Crumb Cake ink.  I added some Crumb Cake splatters as well and then I distressed some of the edges by peeling them back.  I added a Brown piece of Seam Binding along the left side of the top layer before adhering it to the other layers.  I attached a Brown Seam Binding bow and some Linen Thread loops to the bowl.  I used my Lots of Label Framelit Dies to cut a Crumb Cake Label and a larger Chocolate Chip Label.  I stamped the Crumb Cake Label with the leave stamp from the Grateful Bunch in Crumb Cake and then added the sentiment "You are loved (A LOT)" stamped in Chocolate Chip Ink.  I sponged the edges of the labels Tone-on-Tone.  I glued the labels down and then added flowers stamped with the Grateful Bunch stamp set in Soft Suede onto Very Vanilla and Blushing Bride Cardstock.  I sponged all of the edges and then used my Bone Folder to curl the edges up.  I layered them using glue dots and adhered them with glue dots as well.  I added basic pearl jewels in the middle of the flowers and even scattered a few on the card front.

Here is the inside of my card.. I decided to keep the inside simple.  


The inside was a 4 x 5 1/4" piece of Very Vanilla Cardstock.  I stamped two of the leaves in Crumb Cake Ink and added the butterfly in Blushing Bride.  Both of these images are from the Grateful Bunch Stamp Set as well.


The frame was just a $1.00 craft frame from Michael's and I love the way it turned out.  I will probably add a picture of my new little granddaughter, Blakely Addison Rose!


I  used Modge Podge to cover the craft frame with Tip Top Taupe DSP from the 2015-2017 In Color Designer Series Paper Stack.  After the glue had dried I sponged the edges and distressed it some with Soft Suede Ink.  I used some Brown Seam Binding along the left side with a bow and some loops of Linen thread.  My flowers from the Grateful Bunch were stamped in Soft Suede Ink and punched from Very Vanilla and Blushing Bride Cardstock.  I also added a Pansy Punch cardstock layer behind some of the flowers and sponged it as well as the other flowers.  I also used my Bone Folder to curl up the edges of all of the flowers before assembling with Dimensionals.   The leaves from the Botanical Blooms stamp set were stamped Tone-on-Tone with Mint Macaron Ink and Cardstock and sponged with Soft Suede Ink.  The flowers were added onto the frame with Foam tape and the leaves were adhered with glue dots.  I finished off the flowers by adding more Pearl basic jewels in the center!

Next up on the hop is the Amazing Melissa Davies!  Just click the next button and you'll be there!


http://rubberfunatics.blogspot.com/2016/07/osat-blog-hop-shabby-chic.html

Here's a list of all of our fabulous bloggers in case you've lost your way!

Tuesday, July 12, 2016

SIP Challenge #56 Christmas in July!

Hello and Happy Tuesday1  I'm pretty excited about this week's Christmas in July theme at Stamp, Ink, Paper!  Last year I became sick in December and wasn't able to finish my Christmas Cards so I knew that this theme would get me thinking about them early this year!  So now, 1 down, and about 74 more to go!  lol

http://stampinkpaper.com/2016/07/sip-challenge-56-christmas-in-july/

I had a couple of ideas floating around in my brain but here's where they ended up..


I knew I wanted to use the Window Framelit so I decided to use the Wonderous Wreath stamp set and Wonderful Wreath framelits as well.  I can tell you that I have still after a year NOT mastered stamping and die cutting that wreath out correctly.  I cut leaves off that shouldn't have been cut off, etc.  I'm trying to distract you with the Gina Marie bird dies!  LOL  All that being said.. I still love the card.  My hubby and I love birds and especially cardinals so I had to cute the birds out in Red.  I know cardinals have black on them too but I really felt like I could be a bit whimsical with this one!

Here's how I finished up the inside..


The sentiments on the inside are also from the Wonderous Wreath Stamp Set. As you can see I had to use two more of the adorable little bird die cuts on the inside! 


Thanks so much for stopping by!  Blessings,  Tina

Here are the Stampin' Up! products I used today:

Hearth & Home Thinlits Dies
Wonderous Wreath Stamp Set
Wonderful Wreath Framelits Dies
Soft Sky Cardstock
Real Red Cardstock
Early Espresso Cardstock
Pear Pizzazz Ink
Garden Green Ink
Real Red Ink
Tea Lace Doilies (retired)
Silver Cording (retired)

Non-Stampin' Up!

Gina Marie Bird Dies
Darice Woodgrain Embossing folder

Wednesday, July 6, 2016

ICS Blog Hop Introducing 2016-2018 In Colors!


Hello and Welcome to the July Inspire, Create, & Share Blog Hop!  I hope you are ready for some fabulous color inspiration!  If you arrived from the awesome blog of Nichole Smith, thank you for continuing on!  If you started this hop at my blog, please make sure you check out all of this month's projects to inspire you!  This month's theme is the 2016-2018 Stampin' Up! In Colors and they are absolutely Fabulous!!!  In case you've been out of commission and somehow missed them, here are the colors ... 


I seriously LOVE everyone of these colors.. I don't know how to choose a favorite!  So for my card, I used them all!


I started with an 11" x 4-1/4" piece of Dapper Denim Cardstock, scored at 5-1/2" and then added a 4-1/8" x 5-5/8" piece of Sweet Sugarplum for a thin border.  Next was the fun part.  I cut 1/2" strips of all of the new In colors and using a piece of 4" x 5-1/4" piece of scrap cardstock for my base, I added the strips diagonally.  I cut my stray ends off as I went to keep things a little neater.  Once I had all of the strips adhered, I embossed it with my Polka Dot Textured Embossing Folder and attached to my Sweet Sugarplum layer.  I attached some loops of Silver Metallic Thread with Stampin' Dimensionals and then added a Silver Foil Doily.  I heat embossed the sentiment from Grateful Bunch onto a 2" circle of Sweet Sugarplum with Silver Embossing Powder.  I used Tear Tape to attach the Circle to the front of the Silver Doily.  I then glued 5 silver sequins onto the front and added a folded strip of Silver Sequin Trim to the left side with glue dots.  I think it turned out super cute!


For the inside of my card, I used a piece of Flirty Flamingo cardstock that measured 3-1/4" x 4-1/2".  I attached some strips to the lower right corner and stamped the sentiment in Dapper Denim.

I hope you've enjoyed my card and are ready to head over to the fabulous blog of Terri Takashige!  Just click the next button and you'll be there!


Here is a list of all of the Stampin' Up! Products used today:

Grateful Bunch Stamp Set
Dapper Denim Cardstock
Sweet Sugarplum Cardstock
Peekaboo Peach Cardstock
Emerald Envy Cardstock
Flirty Flamingo Cardstock
Metallic Foil Doilies
Silver Metallic Thread
Silver Sequin Trim
Versamark Ink
Silver Embossing Powder
Dimensionals
Dapper Denim Ink


Tuesday, July 5, 2016

SIP Challenge #55 - Sketch Challenge!

Hello and Happy Tuesday!  I hope your week is fabulous!  I enjoyed a really nice long and relaxing weekend with my Hubby.  Sometimes it's nice to just do a lot of nothing!  lol  We did grill out and watch some Cardinals baseball!  Jeff and I usually go to a Cardinals game or two each year but last year came and went without a trip to St. Louis at all.  We did manage to make a Spring Training game in Florida over the summer though!  

So since it is Tuesday, I'm back over at Stamp, Ink, Paper with my take on a fun sketch!

http://stampinkpaper.com/2016/07/sip-challenge-55-a-sketch-from-sandy/

Here is my card.. of course I had to skew it just a bit.. lol


I started with an 11" x 4 1/4" piece of Basic Black Cardstock that was scored at 5 1/2".  I added a strip of retired floral DSP that measured 5 1/2" x 3 1/4".  I ran a piece of Black Stitched Satin ribbon across the front and knotted it on the left side.  I cut two MFT Stitched Rounded Rectangles Stax.. The larger in Old Olive and the smaller in Calypso Coral.  I also cut out the Medium Jar shape out of the Calypso Coral layer with my new Everyday Jars Framelits Dies.  I stamped the sentiment from the Jars of Love Stamp Set onto the front of a piece of Acetate with Jet Black Stazon Ink.  The jar image was stamped on Whisper White Cardstock.  I used the new Foam Adhesive Strips to adhere the Acetate to the back of the Calypso Coral layer.  I added some light pink and clear heart confetti to the inside of the shaker jar.  I then used the heart strip that comes with the Everyday Jars Framelits Dies to cut a strip of Old Olive and Calypso Coral hearts to add to the front jar and card.  I think it turned out really cute.  I was super excited to get this bundle yesterday so yes, of course, I had to use it!  I have a pretty extensive list of "must haves" from the new Stampin' Up! Catalog!  lol  

Thanks so much for stopping by!  Blessings, Tina