Tuesday, April 26, 2016

SIP Challenge #45 - Welcome Baby!

Hello and Happy Tuesday!  I hope your week is off to an awesome start!  Since today is Tuesday, it's time for another Stamp, Ink, Paper Challenge!
Today's Challenge is all about Welcoming Baby!  Since I have a new grandbaby scheduled to make it's arrival the end of May, this is a super fun challenge card for me to make.  What are we having?? We will be having our 6th granddaughter, Blakely Addison Rose.  Every one of them are a precious gifts from God! 


So here's my super adorable card using the new to me, Stampin' Up! Stamp set "Made with Love" and coordinating "Baby's First Framelits Dies".  My sweet friend Andrea recently told me that every cardmaker needs one good baby set so I took her advice and ordered these and I am so happy I did!


Aren't these sentiments just adorable??  I love them!

Here are the Stampin' Up! Products that I used:

Made with Love stamp set
Baby's First Framelits Dies
Mint Macaron Cardstock
Blushing Bride Cardstock
Whisper White Cardstock
Birthday Bouquet Designer Series Paper
Mint Macaron Ink
Blushing Bride Ink
Versamark Ink
White Embossing Powder
1/8" circle punch 
Dimensionals
Dotted 1" Lace Trim - Mint Macaron
Linen Thread

Non-Stampin' Up! Products:

My Favorite Things Zig Zag Circle Dies

Thanks so much for stopping by!  Blessings!  Tina

Sunday, April 24, 2016

Mother's Day Grateful Bunch Screen Card

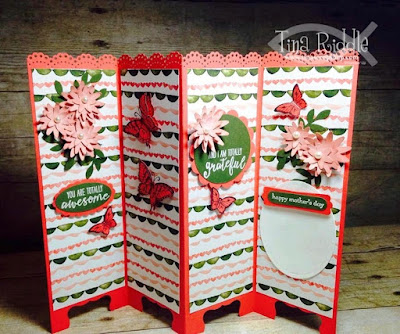
Hello!  Hope you are having a wonderful Sunday!  I've been working on some Mother's Day cards the last couple of days and wanted to share one that I made with the Grateful Bunch stamp set and coordinating Blossom Bunch Punch. 


The Screen Card base is Watermelon Wonder cardstock.  It was scored at 2 3/4", 5 1/2" and 8 1/4" .  I used a Martha Steward scalloped border punch on the top of the card and used one of my retired Stampin' Up! punches to punch the bottom to make the screen look like it had legs.  The DSP that I used is from the gorgeous Birthday Bouquet DSP pack.  The flowers were punched using the Blossom Bunch Punch in Blushing Bride Cardstock.  I sponged the edges of the punched flowers to give them more depth and added a pearl jewel in the center of each.  I heat embossed the sentiments in White on Mossy Meadow cardstock (I am not giving this color up, even if it is retiring.. I love it!)
The butterflies were stamped in Memento Tuxedo Black on Watercolor Wonder cardstock and punched out with my Elegant Butterfly and Bitty Butterfly punches.  

Here are some of the other cards I have made.  I had been asked about selling my cards so I decided to start a facebook group just for that!


Thanks for stopping by!  If you have any questions about directions for any of these cards, just let me know.    Blessings!  Tina

Tuesday, April 19, 2016

SIP #44 Inspiration with Land and Sea

Hello and Happy Tuesday!  I hope you're week is going good so far!  I always feel once I survive Monday, I'm good to go! lol  Well since today is Tuesday, I'm sure you know it's time for another Stamp, Ink, Paper Challenge!  This week we have a Fabulous Inspiration Photo!


I love my nautical cards so I was all about this one!  I wanted to try something a little different this time.  Here's what I came up with!


Yep, I decided to make it a window card and why not make a shaker if you have a window, right?? lol

Tip:  For the Chair Rail, I used a strip of Whisper White Cardstock and scored it on my Score Board to make it look like wooden trim.

Here are the Stampin' Up! products I used:

From Land to Sea stamp Set
A Dozen Thoughts Stamp Set
Hearth & Home Framelits Dies
Night of Navy Cardstock
Coastal Cabana Cardstock (retired)
Real Red Cardstock
Whisper White Cardstock
Nautical Striped DSP (retired)
Memento Tuxedo Black Ink
Marina Mist Ink
Real Red Ink
Crushed Curry Ink
Mossy Meadow Ink
Metallic Button

Other Products used:

Pretty Pink Posh Sequins
Foam Tape

Thanks so much for stopping by!  Blessings!  Tina


Thursday, April 14, 2016

OSAT Blog Hop - Tic Tac Toe


Hello!  Hope your April is awesome and if it hasn't been, I hope it gets that way soon!  I know a lot of folks around the Northern part of the United States have been having snow!  That seems crazy here in Mid April!  Let the Spring begin!!!

Well as I'm sure you've seen from the header, it's time for another One Stamp At A Time Blog Hop!  This month we're hopping around for some Tic-Tac-Toe Inspiration!  If you've already been hopping you should have landed here from the fabulous blog of Alisa Tilsner!  If you missed it, believe me you'll want to make sure you check it out!  She is awesome!  So before I show you my card and project I'll let you take a look at this fabulous Tic-Tac-Toe Board!


I went straight across the center with Glitter Pen, Dies, and Sequins.  Here's my card and project:


Here's a closer look at my card..


For my background I did a super fun technique that I learned from the crazy amazing Dena Rekow!  Dena shared that you can make stamps from your dies by cutting fun foam!  She totally rocked this technique in her video!  To watch it and believe me you WANT to watch it, just click here!

So now that you've watched the video.. you did watch it, right??  Here's how I made my card.. I started off with a 11" x 4 1/4" piece of Mint Macaron cardstock that was scored at 5 1/2".  My next layer was a thin layer of Soft Suede cardstock that measured 4 1/8" x 5 3/8".  The top layer was a 4 x 5 1/4" piece of Sahara Sand cardstock.  I cut a piece of fun foam out with the mug die cut from the Cups and Kettle Framelit Dies and stamped it tone on tone with Sahara Sand Ink.  I put a white Tea Lace Doily onto the left side of my card, letting a portion hang off the layer and wrapping it around the back.  I adhered the doily with Snail adhesive.  Next I cut out the same mug in Mint Macaron cardstock and sponged the edges tone on tone.  The sentiment on the mug was from the Balloon Celebration Stamp Set and was stamped with Early Espresso Ink.  After stamping the sentiment, I adhered the mug with stamping dimensionals.  I cut out the heart shaped steam out in Soft Suede.  I used a clear Wink of Stella glitter pen to add some shine to it!  I used the Fine Tip Glue Pin to adhere the steam.  If you haven't tried that adhesive out, you should!   The spoon was cut out in Smoky Slate and sponged tone on tone on the edges.  I also used some of the Wink of Stella glitter pen on it.  I adhered the bottom of the spoon with a Dimensional and the top part with a glue dot.

Here you can get a closer look at the shine from the Wink of Stella glitter pen...


I added some gold Pretty Pink Posh sequins to finish this one off!  

For the inside, well if you know me at all, you know I LOVE coffee!  And most of my friends love it just about as much as I do.  What else do we love?? Well take a look ...


Yep, I love coffee and along with it just add cookies or cake, or pie for that matter! :)  

I thought this card would be super sweet for a come on over and drink coffee and eat cookies card and believe me I could give that to many of my friends!  lol  And wouldn't a cookie look super cute in the little treat bag??


The Treat Bag is from the Stampin' Up! Mini Treat Bag Thinlits Dies.  I cut out the bag using the Stampin' Up! 2015-2016 New In Color Collection Background Stack in Mint Macaron.  I used the heart strip that comes in the Treat Bag Dies to cut a strip along the front. The bag was glued using Stampin' Up! Fast Fuse.  It is a super strong adhesive and great for adhering boxes and treat holders! After assembling the treat holder,  I ran some Mint Macaron and Black twine through the hearts and added a strip of Stampin' Up! Gold Sequin Trim before making the bow.  I adhered a white Tea Lace Doily onto the front of the bag.  I punched a 2" circle from Mint Macaron cardstock and sponged the edges tone on tone.  I adhered it to the middle of the Tea Lace Doily with Stampin' Up! Fast Fuse.  The "enjoy" sentiment is another die that is part of the Treat Bag Thinlits.  I cut it out in Soft Suede Cardstock and used my Wink of Stella Glue Pen on it prior to adhering it with my Fine Tip Glue Pen.  I added three Pretty Pink Posh gold sequins and put some white tissue paper inside the bag and that was it!  I was super happy with how cute it turned out!  

Hope you've enjoyed my projects and are ready to hop over to the next blog of the Super Talented Stampin' Up Artisan Marisa Gunn!  She is soooo fabulous!  Just click the next button!


If you happen to get lost along the way here is a list of all of our awesome OSAT bloggers!

  1. Martie Pollard
  2. Anna Smith
  3. Melissa Davies
  4. Elizabeth Jeanne
  5. Lea Denton
  6. Wynne Grob
  7. Alisa Tilsner
  8. Tina Riddle - That's me!!
  9. Marisa Gunn
  10. Lori Mueller
  11. Sara Levin
  12. Pam Tetreault
  13. Renee Ondrajka
  14. Andrea Tracy-Tucker
  15. Dena Rekow
  16. Justin Krieger
  17. Jeanna Bohanon
  18. Maria Willis
  19. Kim Smith
  20. Edna Marie
Here is a list of the products that I used:

Stampin' Up! Cups and Kettle Framelits Dies
Stampin' Up! Balloon Celebration Stamp Set
Stampin' Up! Mini Treat Bag Thinlits Dies
2" Circle Punch
Fun Foam (I purchased mine at Amazon)
SU Mint Macaron Cardstock
SU Soft Suede Cardstock
SU Sahara Sand Cardstock
SU Smoky Slate Cardstock (for spoon)
SU 2015 - 2016 In Colors Paper Stack (Mint Macaron)
SU Mint Macaron Ink
SU Sahara Sand Ink
SU Early Espresso Ink
SU Tea Lace Doilies
Pretty Pink Posh sequins
Wink of Stella Clear Glitter Pen
SU Mint Macaron and Black Baker's Twine
SU Gold Sequin Trim
Tombow Multipurpose Adhesive
SU Fine Tip Glue Pin
SU Dimensionals
SU Snail Adhesive
SU Stampin' Sponges

Thanks so much for stopping by! Blessings, Tina

Tuesday, April 12, 2016

SIP #43 Sketch Challenge By The Tide

Hello and Happy Tuesday! Hopefully your week is off to an awesome start and you had a wonderful weekend!  I had a super fun weekend with my daughter and two of our granddaughters!   Two of her friends gave her a wonderful baby shower!  In just about two months I should be waiting patiently for little Blakely Addison Rose to make her appearance into the world! 

The week over at Stamp, Ink, Paper we have an awesome sketch for you!  I hope you'll head over and check out all of the inspiration we have for you and then link up a card of your own!

I know you must be crazy tired of my nautical cards but I have one more for you....lol
I was going through some of my stamps today and ran across an awesome Fishing Net Background Stamp from Our Daily Bread that I had NEVER used!  Well I love this stamp and I was itching to use it.. so I did.  I paired it with a couple of images from the Stampin' Up! By The Tide stamp set.  I also used some of a splatter stamp from Gorgeous Grunge and then a Gina Marie Fishing Sentiment.  


My card base was an 11" x 4 1/4" piece of Bermuda Bay Cardstock that was scored at 5 1/2".  I added a 4 1/8" x 5 3/8" piece of Early Espresso.  Next on a piece of 4" x 5 1/4" piece of Coastal Cabana cardstock ( I know it's retired.. I'm hoarding it!), I stamped the Fishing Net Background stamp in Soft Suede Ink.  I sponged some Tim Holtz weathered wood distress ink on the edges of the Fishing net image.  I also stamped some of the splatters from the Gorgeous Grunge stamp set with Weathered Wood onto the Net background.  I then attached it to the Early Espresso layer with Tombow Multipurpose Glue.  Next I stamped the Coral image with Calypso Coral onto a piece of  2 x 3 1/4" piece of Coastal Cabana cardstock.  I also stamped some of the splatters from Gorgeous Grunge ink onto it using more of the Tim Holtz Weathered Wood Distress Ink.  I sponged the edges of that piece with Weathered Wood as well.  I stamped the fish with Early Espresso once in the center of the cardstock and once on the left side stamping partly off the cardstock.    I attached this panel onto a piece of 2 1/8" x 3 3/8" Early Espresso Cardstock.  These were then attached onto the Fishing Net layer at an angle (like the sketch) with more Tombow multipurpose glue.  I attached a few Pretty Pink Posh dew drops with Alene's adhesive.   I added the Early Espresso strip with foam tape.  The sentiment from the Gina Marie Fishing Stamp set was stamped in Early Espresso ink onto Coastal Cabana and added with Foam tape as well.  I threaded some Linen Thread into a metallic button and attached it with glue dots and called this one done! 

Here are the products used:

Stampin' Up! By the Tide Stamp Set
Stampin' Up! Gorgeous Grunge Stamp Set
Our Daily Bread Fishing Net Background Stamp
Gina Marie Fishing Stamp Set (for sentiment)
Bermuda Bay Stampin' Up! Cardstock
Coastal Cabana Stampin' Up! Cardstock (retired)
Early Espresso Stampin' Up!  Cardstock
Early Espresso Stampin' Up! Ink
Soft Suede Stampin' Up! Ink
Calypso Coral Stampin' Up! Ink
Tim Holtz Weathered Wood Distress Ink
Pretty Pink Posh Dew Drops

Thanks so much for stopping by!  Blessings, Tina

Wednesday, April 6, 2016

ICS Blog Hop #imbringingbirthdaysback


Hello! It's ICS blog hop time! Our theme is #‎imbringingbirthdays‬back inspired by Shannon West, one of the trainers at Stampin' Up! She posted on her facebook page in January that social media had ruined the good old fashioned birthday card and she was bringing them back this year!  Shannon also carved out a stamp to use on her cards. Well let me tell you the idea really caught on.  I'm sure the post office is loving her! Stampin' Up! took that carved stamp and made one we could all have too!  I'm stamping the back of my envelopes with that stamp for all of my birthday cards! :)  Well, I'm so glad you stopped by today!  I am totally on board with bringing birthdays back and so excited to be working on my stash of birthday cards so they are ready to send out!  If you have already been hopping you should have landed here from my friend Megan's blog!  If you missed it, make sure you hop through and check it out!!

Today's card is for my sweet friend, Suzi!  She and I LOVE coffee and any chance to go for coffee, is a good day so of course I had to make a coffee themed card for her, right??  


For my card, I started off with an A2 Melon Mambo card base.  Next I stamped the bottom of a 5 1/4" x 4" piece of Whisper White cardstock with the woodgrain looking stamp from the "Timeless Textures" stamp set in Sahara Sand ink. This stamp set is quickly becoming one of my favorites!  I used Early Espresso ink to stamp the coffee rings and the splatters (also from the Timeless Textures stamp set).  Some of the splatters and rings were stamped off on scrap paper prior to stamping on the bottom of my cardstock.  I added a 4" x 4 1/4" piece of the "Have a cuppa DSP stack" to the top portion of my card.  I cut a piece of the tea lace doily and attached to the "table" with snail.  Then I ran a piece of 1/8" Bermuda Bay stitched ribbon along the edge seperating the table from the wall.  I used more of the "Have a cuppa DSP stack" to cut out my cups with the Cups and Kettle Framelits Dies.  I adhered the top one first with snail, the middle with snail and glue dots, and the bottom one with dimensionals.  The spoon was cut out in Smoky Slate cardstock and sponged on the edges with Sahara Sand Ink and it was attached with glue dots.   The sentiment from the "Balloon Celebration" stamp set was stamped in Melon Mambo onto Whisper White cardstock and then cut apart and glued onto the card front randomly.  on the left side of the cups.  The "coffee" sentiment had a banner end cut with the Triple Banner Punch and a few splatters were stamped onto the Whisper White with Sahara Sand Ink for a subtle look.  Last but not least I added three white Enamel Dots randomly on the front.

Here is the inside of my card


I stamped the inside sentiment from the "Balloon Celebration" stamp set also in Melon Mambo onto Whisper White Cardstock.  You can't have coffee without cake, right??  The coffee ring and splatters were stamped on the lower left side with Sahara Sand Ink.

We can't forget the envelope, right?


I stamped more of the coffee rings and splatters on the front of the envelope on the bottom left in Sahara Sand Ink


I used the Envelope Liner Framelits dies to cut out a liner with more of the Have a Cuppa DSP.  And of course.. I stamped the back with my #imbringingbirthdaysback stamp in Melon Mambo Ink. 


Next up is the fabulous Joni Metras so make sure you click the Next button and check out her #imbringingbirthdaysback inspiration!


Here are the Stampin' Up! Products Used:

Cups and Kettle Framelit Dies
Balloon Celebration Stamp Set
Timeless Textures Stamp Set
#imbringingbirthdaysback Stamp
Have a Cuppa Designer Series Paper Stack
Envelope Liner Framelit Dies
Enamel Dots
Melon Mambo Cardstock
Whisper White Cardstock
Melon Mambo Ink
Sahara Sand Ink
Early Espresso Ink
1/8" Bermuda Bay Stitched Ribbon
Tea Lace Doilies

Thanks so much for stopping by!!  Blessings, Tina

Tuesday, April 5, 2016

SIP #42 Color Challenge!

Wow!  Can you believe Stamp, Ink, Paper has alredy had 42 challenges now??  It seems like the time has flown by!  This week is probably my favorite color challenge we've had!  


I absolutely LOVE the color combination of Soft Sky, Bermuda Bay and Night of Navy!  This week's card is a very special birthday card for my sweet friend Nikki who has a birthday on the 10th!  


This is the Joseph Coat Technique that is a emboss resist on top of sponged color.  My friend and co-design team member Ginger Pelfrey showed me this technique a few months ago.  The only change I made for this one was that the final coat of Night of Navy was sponged instead of using a brayer.  This is only because for the life of me, I could not find my brayer!  lol

 For the emboss resist panel I started with a 3 1/4" x 5" piece of Shimmery White Cardstock.  I began sponging Soft Sky and Bermuda Bay Ink randomly. 


After my sponging was completed, I stamped the feather stamp with Versamark from the "Lovely Amazing You" stamp set in different directions onto the sponged cardstock.  I then sprinkled clear embossing powder over the feathers.  


I embossed the feathers until they were completely shiny.  Next I clear embossed some of the splatters from the "Awesomly Artistic" stamp set.  Once those were also shiny and completely embossed and then cooled down, I began sponging the Night of Navy Ink over the entire piece.


Once I had the Navy over it all, I  used a paper towel to remove the traces of Night of Navy that were over the embossed feathers and splatters.  

I layered the panel onto Soft Sky Cardstock.  I stamped the sentiment "good wishes your way" in Night of Navy ink onto a Bermuda Bay stitched circle.  The good wishes your way sentiment is also from the Lovely Amazing You stamp set.  I added a Night of Navy and Soft Sky Banner with "Happy Birthday" from the Balloon Celebration Stamp Set.  I also added a Brights Collection button in Bermuda Bay threaded with some linen thread and tied in a bow.  Last but not least I added some Doodle Bug Sequins.

For the inside I stamped a Soft Sky piece of cardstock tone-on-tone with the same splatters and then added a Bermuda Bay Feather.  I adhered it to Bermuda Bay cardstock to bring all of those fabulous colors together!  Did I mention I love these colors?? lol


Here are the Stampin' Up! Products Used:

Lovely Amazing You stamp Set
Awesomely Artistic Stamp Set
Balloon Celebration Stamp Set
Night of Navy Cardstock
Bermuda Bay Cardstock
Soft Sky Cardstock
Versamark Ink
Soft Sky Ink
Bermuda Bay Ink
Night of Navy Ink
Triple Banner Punch
Bright Collection Buttons
Linen Thread
Stampin' Sponges

Non-Stampin' Up! Products:

MFT Dienamics Stitched Circles
Doodlebug Sequins

Thanks so much for stopping by!  Blessings, Tina