Showing posts with label Shaker Card. Show all posts

Tuesday, April 23, 2019

SIP #196 Shaker Card Challenge

Hi Friends!  You know how I love a good shaker card and if you do too then head over to Stamp, Ink, Paper this week for our Shaker Card Challenge!

Here's what I came up with......


I combined some Stampin' Up! Rectangle Dies, Stampin' Up! Stamps and Concord & 9th Fabulous Phrases Dies to come up with this  beauty.   Add some window sheet, foam tape, and sequins and there you have it.  This one is really pretty.  The stamp set is Painted Seasons and was one of the freebie bundles from the recent Sale-a-bration promotion that ended a few weeks ago.  The frame was from the coordinating DSP that came in the bundle.  

Thanks so much for stopping by!  Blessings, Tina

Tuesday, June 26, 2018

SIP #156 Shaker Card Challenge

Hello and Happy Tuesday!  Hope you've had a wonderful weekend and that your week is off to a great start!  It's time for another Stamp, Ink, Paper challenge and this week it's all about shaker cards!


I have to be honest in that my card was soooo super easy!  I used some awesome 6x6" patterned paper from Altenew called Reflection that is just beautiful and made for a quick and easy card!


Never underestimate the value of beautiful patterned paper!  It really did most of the work for me!  I added a sentiment from Altenew (Best Buds Stamp Set) and some sequins and then built a frame with square framelits, window sheet and  foam strips.  So simple yet really pretty!  

Thanks so much for stopping by!  Blessings, Tina

Thursday, May 3, 2018

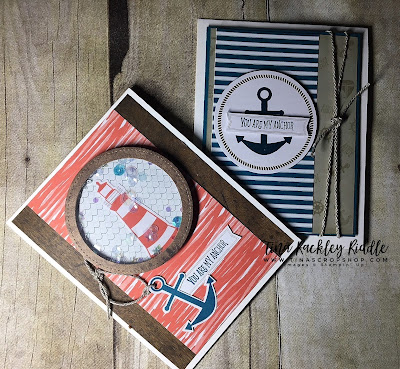
A Paper Pumpkin Thing Blog Hop - You Are My Anchor


Hello!  I hope you are having a fabulous week!  I'm so happy to join all of the fabulous Stampin' Up! Demonstrator's for this You Are My Anchor Paper Pumpkin Blog Hop!    If you are already a Paper Pumpkin subscriber then I'm sure you know exactly what I'm talking about!  I think this is my all time favorite PP Kit!  Of course, anything Nautical is my thing! :)  


For some reason Nautical theme cards draws me to shaker cards so I had to throw at least one shaker card into the mix with the help of some window sheets, stitched shape framelits dies, woodgrain DSP and some foam adhesive strips! 


I ran my bone folder over the score line on the 6" x 3" card base and cut the 6" side off a 5 1/4".  I adhered it to the front of a piece of 5 1/4" x 4" Wood Grain DSP that I had first cut a stitched circle out of.  (The Patterned Cardstock covered up the hole so no one is the wiser, right??) I used a smaller stitched circle to cut the larger one into a frame.  Window Sheet was adhered to the inside of the circle frame with Tombow Multipurpose Glue.  I also cut a circle out of one of the envelopes included in the kit so that I could use the blue wave DSP on the inside of the envelope for the back of my shaker.  The lighthouse die cut was glued onto the  blue wave DSP and another window sheet die cut circle was adhered over that.  I added some random clear and blue sequins in the middle (that I had (probably left over from a previous PP kit!).  Some foam adhesive strips were added behind the wood grain frame and then adhered to the light house scene with the sequins to complete my shaker.    I added the anchor at the bottom with the roping through it and next to the sentiment that was stamped in Island Indigo to complete this one.  

Of course, I had to throw a little tone on tone stamping in on the below card.  


I used the smaller stamps from the stamp set to stamp in Sahara Sand on Sahara Sand Cardstock. The large Anchor on the circle was stamped in Island Indigo Ink onto the circle die cut from the kit.  This was a simple but super cute alternative to use the 3 x 3" card opened flat as a DSP accent on your card panel.  I attached the matted front panel with dimensionals onto a Thick Whisper White top folding card base since the cording in the kit is pretty thick.  

Thanks so much for stopping by!  The next stop on the hop is Rachel Tessman.  Just click on her name on the below blog roll.


Blog Roll..

Wednesday, April 26, 2017

PCC241 Paper Craft Crew Sketch Challenge - Lil' Inker Designs Apple of My Eye Shaker Card

Hello and Happy Wednesday!   I love stamps, and dies, and anything crafty!  I know that probably will not come as a shock to many of you. lol  It just so happens that I have some new stamps and dies from Lil' Inker that I just had to break out for the new Paper Craft Crew Sketch Challenge!


So let me show you my super adorable card!


Isn't that Lil' Inker Designs Apple Shaker Die  just as cute as can be?? I also love The Apple of My Eye Stamp Set that coordinates with it!  The  Teacher Word Die is awesome too!  With 4 granddaughters already in school and 1 that will be starting next year, I'm sure I'll get plenty of use from these products!

Here's how I finished out the inside...


Thanks so much for stopping by!  Blessings, Tina


Wednesday, March 22, 2017

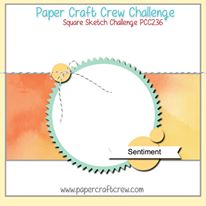
PCC 236 Shaker Card You're Nauti-Cool!

Hello!  Hope you're having a fabulous week!  I was beginning to think I would never get this post up!  There were some wicked storms that came through earlier today and the power was flickering off and on.  All three of our dogs were hiding in my craft room while I was finishing up my card.  My big 105 lb baby... Monty, is still in there.  He's my be a huge dog but he's a baby when there's a storm and wants near his Momma! lol

Of course, since it is Wednesday, it's time for another Paper Craft Crew and this week we have another fun sketch. 


I can tell you that pretty much anytime we have a sketch with a circle in the middle of it, it will end up either a shaker card or nautical themed card.  Well this time I ended up combining them!  lol


I just received the fun new Fun Stamper's Journey Stamp Set "Under The Sea" so I had to make a shaker card with an under the water scene!  I stamped and colored all of the images from this fabulous stamp set so look out.. there will be more cards.  These images were heat embossed with Gold Embossing Powder and colored with Kuretake Zig Clean Color Markers and an aqua brush.  My background for the under water scene was a piece of Neenah Crest Solar White 80# cardstock that had Broken China and Peacock Feathers Distress Ink blended onto it.  I spritzed it with water once done so get some pitting in the color and add some interest.  It looks super cool up close.  The sentiment You're Nauti-Cool is from the Avery Elle "Knotty" Stamp Set.  It has some awesome nautical sentiments that I love to use.  

Thanks so much for stopping by!  Blessings, Tina


Tuesday, March 14, 2017

SIP Challenge #90 - Shaker Card - Elphie Selfie Again!

Hello!  I know I talk about the weather a lot but what in the world.. it was crazy this past week.  It was in the high 60's most of the week and then Saturday we ended up with a little more than an inch of snow.  By Sunday, it was sunny, the snow melted and it was about 50 degrees!  I'm hoping that is the end of the white stuff.  It's pretty but I've seen enough of it.  Looking at the 5 day forecast, it looks like we'll have a few morning cold evenings but up to at least high 40's or 50's during the day.  I'm so ready for Spring!   Since today is Tuesday, it is of course time for another Stamp, Ink, Paper Challenge!  This week is a Shaker Card challenge!  I love shakers so this was right up my alley!


So I know I'm wearing you out on my Lawn Fawn Plaid but here I go again with the Perfectly Plaid paper stack and the adorable Elphie Selfie Stamp and Die Sets!  


This time I picked up on the orange in the plaid and used that for my card front.  My dies for the window and the scallop card front are from Mama Elephant and are called "All Prettied Up".  

Here's a list of the products Used:

Neenah 110# Crest Solar White Card Stock
Stampin' Up! Pumpkin Pie Card Stock
Bristol Smooth Cardstock
Kuretake Zig Clean Color Markers
Mama Elephant All Prettied Up Creative Cuts Dies
Stampin' Up! Foam Strips
Pretty Pink Posh Sequins and Seed Beads
Clear Acetate Window Sheet 
Versamark Ink
Stampin' Up! Pumpkin Pie Ink
Clear Embossing Powder
Embossing Buddy
Stampin' Up! Fast Fuse Adhesive
Green Seam Binding

Thanks so much for stopping by!  Blessings, Tina


Tuesday, January 31, 2017

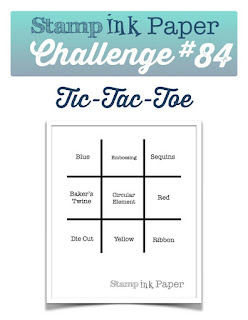
SIP Challenge #84 Tic-Tac-Toe - Otterly Love You!

Hello and Happy Tuesday!  I'm super excited today because I was able to use this week's Stamp, Ink, Paper Challenge Tic-Tac-Toe with my brand new MFT Otterly Love You stamp set from the Stamp, Ink, Paper Store!  I ordered this set last Friday and received it Monday!  I call that great service!!!  So for my tic-tac-toe, I went straight across the top row with Blue, Embossing and Sequins!

If you know me at all, you know I love shaker cards!  Well how could I not turn this adorable little otter set into a shaker!  


This was super fun to make!  For my water I sponged Broken China and Peacock Feather Distress Ink onto Bristol Smooth Cardstock and then spritzed with water and dabbed it with a paper towel.  For my otters, first I stamped them with MFT Hybrid Black Ink onto Bistol Smooth Cardstock and then clear embossed them. I used Antique Linen an Vintage Photo Distress Inks to watercolor them.  I'm really beginning to enjoy watercoloring with my distress inks! 

Thanks so much for stopping by!  Blessings, Tina

Here's a list of the products used!

Neenah Crest Solar White 110# Cardstock
Bristol Smooth Cardstock
Mama Elephant All Prettied Up Dies
MFT Otterly Love You Stamp Set
MFT Otterly Love You Dies
Stampin' Up! White Embossing Powder
Stampin' Up! Clear Embossing Powder
Versamark Embossing Ink
MFT Hybrid Black Ink
Tim Holtz Broken China Distress Ink
Tim Holtz Peacock Feathers Distress Ink
Tim Holtz Vintage Photo Distress Ink
Tim Holtz Antique Linen Distress Ink
Doodlebug Swimming Pool Sequins
Clear Glass Sead Beads 
Stampin' Up! Foam Strips
Ranger Fine Tip Aqua Painter
Ranger Multi Medium Matte
Scrap of Black Shimmer Cardstock
Stampin' Up! Red Glimmer Paper Heart

Tuesday, January 3, 2017

SIP Challenge #80 Card Maker's Choice - Hero Arts Color Layering Deer

Hello and Happy New Year!  I hope you are having a wonderful start to both your week and your year!
Since today is Tuesday, I'm back over designing for Stamp, Ink, Paper for our Card Maker's Choice Challenge this week!  How fun!  I hope you'll head over and link up a card of your own!


So for my card I decided to make an Anniversary Card for my Hubby.  I've been continuing to have fun playing with the Hero Arts Color Layering Deer that I bought from the Stamp, Ink, Paper Store so that's what I used for this card!  There's a hidden meaning in the Deer that I'll tell you later!


So for this Deer, I used the following color layering combination all with Stampin' Up! Inks.   The 1st layer was Sahara Sand, the second layer was Crumb Cake, and for the 3rd layer I inked the stamp with Cajun Craze that was stamped off and then reinked with Crumb Cake.  The outline of the legs and head were both inked up in Soft Suede.  The sentiment was inked up in Soft Suede as well.  The background of the shaker window was a piece of Soft Sky Cardstock that was stamped with the retired Stampin' Up! Wonderland Stamp Set.  I used my Misti to stamp the trees in Old Olive first and then inked the outside edges with the retired SU Mossy Meadow Ink for some dimension.  I added a little bit of white stickles and allowed to dry before I put it in my shaker window.  I used Stampin' Up! Oval Framelits to cut my background, acetate, and window.  I added some Doodlebug White Sequins to the inside of the shaker and used Stampin' Up! Adhesive Foam Strips to layer it up.  I added my Deer with the same adhesive strips so it would as high as the shaker since they are thicker than foam tape or dimensionals.  I used Fast Fuse to adhere the antlers.  I decided to add some greenery to his antlers and stamped those in Old Olive and used the coordinating dies to cut them out.  Finally I added a few Doodlebug White Sequins to the front of the card and some Fun Stamper's Journey Candy Apple Sparkle Elements on the leaves as berries.  They aren't exactly round but I thought they were close enough.  I really wish I had some small Red Jewels.  I'll look for some on my next trip to the craft store!  All in all, I think it turned out super cute!

Ok, so I mentioned that the "Deer" has a secret meaning.  Well we have a neighborhood Deer named Bonnaroo.  He was caught in a fence when he was little and rescued by our neighbors.  His mom was no where to be found so they feed him from a baby.  Since it is illegal here to fence in a Deer to keep as a pet he has free reign of the area but stays mostly right around his rescuers home.  He thinks they are his parents I guess :)  So one day on my way home from work, Jeff called to tell me that Bonnaroo had run into a car.  Notice he ran into the car and the car did not run into him.  It happened just up the street from us and when I got home Bonnaroo was laying in my landscaping right outside our window.  There was some blood around his antlers and he was obviously thrown for a loop but he was alive.  After resting, he finally got up and although a little wobbly he seemed fine.  He was a little disoriented so I told Jeff I was going to walk him home.  I  walked him half way home and he decided to take a short cut through a field and since it was dark I declined. lol  I walked back to my car, and drove around the block to find that he had made it home just fine.  Ever since then Jeff has called me the Deer Whisper!  So after stamping the inside with Happy Anniversary, I'll sign it love, Tina (The Deer Whisperer) lol  Jeff will love it!

Thanks so much for stopping by!  Blessings, Tina

Wednesday, December 14, 2016

PCC223 Paper Craft Crew Sketch Challenge!

Don't kill me.. seriously I know, I know, I know... that I said I was done with my Christmas cards.  I lied!  Sorry.  I forgot to make Jeff a card and you know I had to do that!  I used this week's fun Paper Craft Crew Sketch to create what is I promise... my LAST Christmas card!


I decided to turn the sketch on it's side to come up with my shaker card for Jeff!


I started with an A2 Neenah Crest Solar White card base and used my DCWV  Winter In the Woods Paper Stack to create the card front and shaker sentiment.  After layering up acetate, and circle windows, I filled the shaker with some white and silver sequins and snowflakes.  I finished it off with three silver sequins and a double strand of silver cording tied on the left side.  Super, duper easy and yes, I promise, it is my very LAST Christmas card!  LOL

Thanks for stopping by!  Blessings, Tina

Wednesday, September 21, 2016

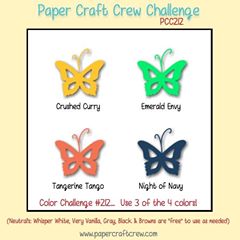
Paper Craft Crew Color Challenge #212

I have some super exciting news!  I have the honor of joining the Paper Craft Crew Design Team!  I'm thrilled to join such an amazing group of Paper Crafters!  I hope you'll check out the PCC challenge and link up a card of your own!  Just pick any 3 of the 4 colors for your card!


http://www.papercraftcrew.com/pcc-212-bold-color-challenge/

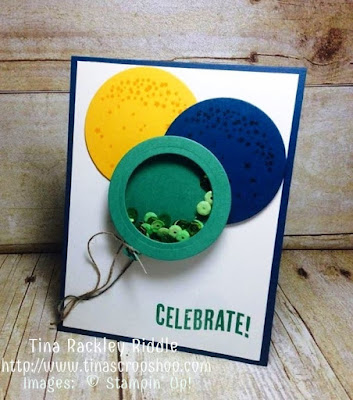
I decided to go with Crushed Curry, Emerald Envy and Night of Navy for a simple Celebrate Today Balloon Shaker Card.


For my card I started with an 11" x 4 1/4" piece of Night of Navy Cardstock, scored at 5 1/2".  On a piece of Whisper White Cardstock that measured 4" x 5 1/4", I stamped in Emerald Envy the Celebrate sentiment from the Celebrate Today Stamp Set on the lower right side.  I then cut out Balloons with the Balloon Framelit Dies in Emerald Envy, Crushed Curry, and Night of Navy.  I stamped the Balloon bubbles tone on tone on the Crushed Curry and Night of Navy Balloons.. seriously I have no idea what you call the stamp I used but I call it balloon bubbles. LOL  I glued my Crushed Curry Balloon directly onto the White Cardstock layer.  I attached the Night of Navy Balloon with dimensionals on the right side to layer onto the Crushed Curry Balloon.  In the Emerald Envy balloon, I used one of the layering circle framelit dies to cut a hole inside of it.  I then used another of the layering circle framelits to cut a back that was bigger than the opening, in the Emerald Envy for the back of the shaker.  I cut out another circle in between the two sizes in a Window Sheet.  I used foam adhesive strips to attach my window sheet to the back of the balloon front.  I doubled up another layer of foam strips on top of that to give my Doodlebug Limeade sequins plenty of room to shake around.  Next I added my sequins to the balloon shaker and then attached my balloon back.  I then used Multipurpose glue to layer over my other two balloons.  I attached the twine to the bottom of all of the balloons by tying a little knot and then used some Ranger Multi Medium Matte to attach the twine where they met at the side of the card layer.  The great thing about the Multi Medium Matte is that it glues matte so it isn't shiny or sticky once it is dry. 

Thanks so much for stopping by!  Blessings, Tina


Product List

Tuesday, June 21, 2016

SIP Challenge #53 CASE The Designer

Hello and Happy Tuesday!   This week's challenge at  Stamp, Ink, Paper challenge is going to be so much fun!!  The theme is CASE the Designer.. just pick one of the design team cards and CASE it!  How awesome is that!


So here's my card for this week.  I hope you aren't tired of the Playful Palette DSP yet!  I had to use it again to pair with the Easel in the Painter's Palette stamp set to make a shaker card!


I started with a Basic Black 5 1/2" x 8 1/2" cardbase scored at 4 1/4".  I added a 5 1/4" x 4" layer of Emerald Envy cardstock and then a 5 1/8" x 3 7/8" piece of the Playful Palette DSP.  I stamped the easel in Archival Black Ink onto Very Vanilla cardstock and then fussy cut the outside of it.  I used one of the Layering Square Framelits to cut out the inside.  I used a larger size of the Square Framelits to cut out the window sheet and the piece of Very Vanilla that I stamped on.  The new thin foam strips are perfect for making shaker cards!  I added a few black seed beads and some small black Pretty Pink Posh sequins!  I layered my Washi Tape on Very Vanilla and fussy cut them out to use as my base for the easel.  I popped the two strips of Washi up with foam tape since the Shaker Easel had dimension from the foam strips.

I think I love the inside as much as the outside! 


Thanks so much for stopping by!  Blessings,  Tina

Sunday, June 12, 2016

Layering Love Watercolor Wash for CYCI #124

Hello!  Hope you are having a wonderful Sunday!  I love watercolor and I love sketches so today's CYCi #124 sketch was the perfect distraction for me today.


Here's my take on the sketch..


I started with a base of one of the new In Colors Sweet Sugarplum.  Layered on that is a piece of the Playful Palette DSP.. I absolutely LOVE this fun paper!  Next is a layer of watercolor paper that has a wash of Sweet Sugarplum and Peekaboo Peach.  Once dried with my Heat Tool.. I can never just wait on something to dry!  I stamped the sentiment from Layering Love in Basic Black Archival Ink.  I also used Gorgeous Grunge to add to stamped splatters of Sweet Sugarplum, Peekaboo Peach and Black.  I adhered this layer with Fast Fuse as it is a very strong hold and perfect for Watercolored Layers.  I then used my MFT Die-namics Zig Zag Rectangles to cut a shaker frame.  I added a few black sequins and some black seed beads to the shaker window. 

Thanks for stopping by!  Blessings, Tina


Tuesday, April 19, 2016

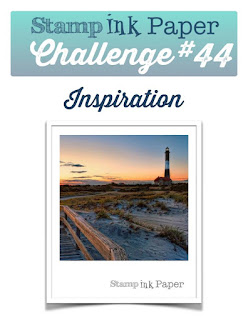
SIP #44 Inspiration with Land and Sea

Hello and Happy Tuesday!  I hope you're week is going good so far!  I always feel once I survive Monday, I'm good to go! lol  Well since today is Tuesday, I'm sure you know it's time for another Stamp, Ink, Paper Challenge!  This week we have a Fabulous Inspiration Photo!


I love my nautical cards so I was all about this one!  I wanted to try something a little different this time.  Here's what I came up with!


Yep, I decided to make it a window card and why not make a shaker if you have a window, right?? lol

Tip:  For the Chair Rail, I used a strip of Whisper White Cardstock and scored it on my Score Board to make it look like wooden trim.

Here are the Stampin' Up! products I used:

From Land to Sea stamp Set
A Dozen Thoughts Stamp Set
Hearth & Home Framelits Dies
Night of Navy Cardstock
Coastal Cabana Cardstock (retired)
Real Red Cardstock
Whisper White Cardstock
Nautical Striped DSP (retired)
Memento Tuxedo Black Ink
Marina Mist Ink
Real Red Ink
Crushed Curry Ink
Mossy Meadow Ink
Metallic Button

Other Products used:

Pretty Pink Posh Sequins
Foam Tape

Thanks so much for stopping by!  Blessings!  Tina


Monday, January 11, 2016

Global Design Project Sketch Challenge 18 with The Open Sea

Hi everyone!  I hope you're Monday has been a good one, is that possible?? lol  I worked about 10 hours today and was totally exhausted when my friend Andrea Tracy-Tucker sent me a picture of the sketch challenge for Global Design Project.  Oh my....I loved it!  What a great opportunity to run into my craft room and throw a card together. lol  So that's is just what I did!

So, in true Tina Style, I decided to make a nautical shaker card but I used a set I haven't used before so.. yay me!  lol   So here's what I came up with!


I used seed beads and they are mostly in the bottom so it m  ay be a little hard to see but they are there.  For the sentiment I used my new Going Global stamp set from the Occasions Catalog.    I hope you like it!  Thanks so much for stopping by!  Blessings, Tina


Tuesday, July 14, 2015

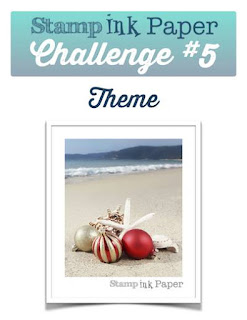
SIP Challenge #5 - Christmas in July


Hello and Happy Tuesday!  Stamp, Ink, Paper has a super fun challenge for you this week...it's Christmas in July!  I don't know about you but it always seems like I wait until the last minute to get my Christmas cards made and mailed so I'm super excited to have a little inspiration early this year!  It also may be a little wishful thinking since the temperature has been running in the mid 90's here in Middle Tennessee! :)
http://stampinkpaper.com/2015/07/sip-challenge-5-theme/


Here's my card.. I know, I know, another Shaker card.  I've been on a Shaker Card roll lately.  I promise to quit soon, really soon....lol


So yep... I did it again, I decided to try a little shaker action for my Christmas Challenge Card.  I used the Classic set "Lovely as a Tree".  I absolutely love this stamp set and believe me it has been very well used over the last few years.  I used an A2 card base of Real Red and added a layer of Bermuda Bay cardstock that had been run through the Big Shot with a Tim Holtz distressed woodgrain embossing folder.  My window frame was made using some Spellbinders nested dies with a Window Sheet cut with the same dies and adhered to the back of my window frame.   My outdoor scene was made by cutting random hill shapes out of scrap cardstock and sponging the shadows onto Soft Sky cardstock by using Lost Lagoon Ink.  I then stamped the Pine Tree from the Lovely As a Tree stamp set with Midnight Muse ink in various places out of the sponged hills but using scrap paper to cover the areas that I didn't want stamped.  I used a little bit of Silver Wink of Stella on the borders of the hills as well as the trees.  After this was dry, I inserted some sequins in the window frame and used adhesive and fun foam to adhere the window frame to the background.  I then used Multi-purpose glue to adhere the frame to the card.  I cut some thin strips of Smoky Slate cardstock and ran it across the window a couple of times and and then used various candy dots for my Christmas Lights.  I stamped the Merry & Bright sentiment from the retired Good Greetings stamp set in Real Red onto Whisper White cardstock and backed it with Real Red cardstock with banner ends cut into both.  I adhered my banner with Stampin' Dimensionals onto the upper left corner of the window.


For the inside of my card, I sponged some of the Lost Lagoon Ink onto the right lower portion of my card and then stamped the Pine Tree again in Midnight Muse Ink.  I also stamped the sentiment from the Wonderous Wreath stamp set in Midnight Muse in the center of the card.

I've had a ton of fun looking at all of the SIP design team inspiration and I hope you have too!  Don't forget to head over to Stamp, Ink, Paper and link up your Christmas in July card!

Here are the Current Stampin' Up Products I've Used:


Built for Free Using: My Stampin Blog


Non-Stampin' Up Products used:

Spellbinders Nested Dies
Doodlebug Sequins
White Fun Foam
Tim Holtz Distressed Woodgrain Embossing Folder

Thanks so much for stopping by!


Blessings,
Tina