Tuesday, January 26, 2021

The Spot Challenge #147 - Get Your Heart On Theme Challenge with Stampin' Up! Whale Done Bundle

 Hi There!  Hope your week is off to a great start!  I'm back over with the Design Team at The Spot with a "love" themed card this week that is just a little different!


Since I don't have a lot of Heart or Valentine's Themed Stamps, I decided to use one of my very favorite sets from the Annual Catalog for an Anniversary Card for my hubby, Jeff!


My anniversary is February 18th, just 4 days after Valentine's Day.  Jeff and I had wanted to get married on Valentine's Day but couldn't work out the logistics of it!  We are huge lovers of Cruises and all things Nautical so I thought that this adorable Whale Done Bundle would work perfectly for an anniversary card!  I love this sentiment!  I can tell you that from going on so many cruises that when you are in the middle of the Ocean on a huge Cruise Ship, you really understand just how BIG the Ocean is!  

I started out with an 8 1/2 x 5 1/2" card base of Pacific Point Cardstock, scored at 4 1/4" I used the Whale of a Time DSP for my background cut 3 3/4" x 5" and matted it on layer of Night of Navy Cardstock that measured 3 7/8 x 5 1/8" for a nice thin border that left a lot of the beautiful Pacific Point Cardstock showing!  I heat embossed the sentiment in White Stampin' Emboss Powder.  The focal Circle was more of the Whale of a Time DSP cut using the largest circle in the Stitched Shape Dies and I backed it with the largest Scalloped Circle from the Layering Circles Dies cut in Night of Navy Cardstock.  I ran a piece of Pool Party 3/8" sheer ribbon around the panel and tied it in a bow on the right side prior to adhering the Circle with Dimensionals.  The Whale was punched out of the DSP as well.. I feel like I totally cheated on this card using so much DSP! lol  I finished this one off by adding three of the Blue Adhesive-Backed Gems... so pretty!

Here's how I finished the inside


The bottom portion of course is from the Whale Done Stamp Set stamped in Calypso Coral and Pretty Peacock with another punched "Whale" from the DSP.  The top sentiment is from the Floral Essence Stamp Set and the bottom sentiment is from the Itty Bitty Greetings Stamp Set.  

Thanks so much for stopping by today!  I hope you have a fabulous week and make some time to get your craftiness on!  Blessings, Tina


Product List

Tuesday, January 19, 2021

The Spot Challenge #146 - Case the Designer Jay Soriano

 Hello there!  Hope you are having a happy Tuesday!  I have such a fun challenge to share with you today!  Over at The Spot we are Casing the Designer, Jay Soriano!  So in case you don't know, to CASE means to Copy and Selectively Edit or Copy and Share Everything.  I like to use the selectively edit version when I CASE cards.  I use the original as an inspiration and carry some aspects over and edit other aspects.  You can choose your own style of CASEing!


If you don't know Jay, you are absolutely missing out and need to head over to his blog Mitosu Crafts right away!  Both Jay and Barry are fabulous!  Jay has such a fun and unique style.  His watercoloring is amazing and he has so so many absolutely awesome cards that choosing one will be really hard!


Here is Jay's card that I chose to CASE..


  I loved his card but as you will see I changed a few things up.  I those this card because I absolutely loved the tone on tone with one of the die cut images standing out.  Also, this is pretty far away from my style and seemed like a little bit of a challenge to me.


Here's what I made using Posted For You Bundle.. I love anything that has a punch!


Instead of White Cardstock, I decided to go with Very Vanilla Thick 11" x 4 1/4" for my card base, scored at 5 1/2".  My next layer was 5 3/8" x 4 1/8" Very Vanilla Card Stock embossed with the Scripty 3D Embossing Folder.  I stamped the bird image with Memento Tuxedo Black Ink onto Very Vanilla Cardstock and used my Balmy Blue, So Saffron and Granny Apple Green Stampin' Blends to color the image in.  The colored image was punched out the the Postage Stamp Punch as well as three plain Very Vanilla Postage Stamp Shapes.  All four of the images were popped up over the embossed layer with Stampin' Dimensionals.  The sentiment "Just a note" was stamped in Memento Tuxedo Black onto a scrap of Very Vanilla, fussy cut, and then attached with Liquid Adhesive over the colored image and a small snipet of a dimensional over the section that hung off the stamp shape.  I finished it off with one Blue Adhesive-Backed Gems.  


Thanks so much for stopping by!  I hope you'll hop over to Mitosu Crafts and find one of Jay's amazing cards to CASE.

Blessings!  Tina


Product List

Tuesday, January 12, 2021

The Spot Challenge #145 - Splish Splash with Stampin' Up! Friends are Like Seashells Bundle and an Ink Smooshing Technique

 Hello my Friends!    I'm so excited to share my design team card for this week's challenge over at The Spot!  One of my all time's favorite techniques is Ink Smooshing and it was perfect for the Splish Splash Challenge #145!


So here's your change to smoosh, splatter, sprinkle or spritz your way to a fun card!

Here's my card featuring Stampin' Up!'s  Friends are Like Seashells Bundle from the Sand and Sea Suite in the brand new January - June 2021 Mini Catalog!


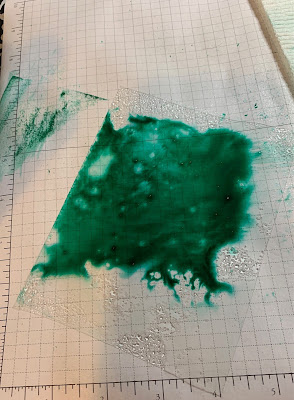
I loved the background so much!!  If you have never done ink smooshing, I hope you'll give it a try!  I used Stampin' Up!s Fluid 100 watercolor paper for my background.  Fluid 100 paper comes in 7" x 5" panels so I always cut them in half and use 3 1/2" x 5" panel for my card.  I start off by spritzing the watercolor panel with water so that the ink will move well once applied.  Next I pressed my Bermuda Bay Ink pad onto a piece of window sheet and spritzed it and then pressed onto the watercolor paper.


After I applied the Bermuda Bay Ink, I repeated the process with Shaded Spruce Ink focusing on the upper portion of the panel. 


After applying it to the panel I decided to add more texture by sprinkling some salt on it... 


Depending on the type of salt you use, you will get a different effect.  I usually use sea salt but I was out of it so I used table salt.  The salt will absorb some of the ink and create a speckled effect.  The larger the salt, the large the speckle.  Mine turned out to be pretty small since I used table salt.  I used my heat tool to dry the panel and then brushed the salt off with a paper towel.

I decided I wanted to add a little bit of yellow at the bottom so instead of using the acetate sheet, I just used a acrylic block to smoosh the So Saffron Ink onto the bottom..


I finished the bottom layer off with more salt and dried it but wait... there is more! lol


Next to add some shimmer... I mixed a dollop of  Frost White Shimmer Paint mixed with 70% Isopropal Alcohol in a SU Spritzer and spritzed all over the panel!  So pretty.. the picture doesn't do it justice!


Before Adding my Sea Shells, I decided to use my Basic Black Stampin' Write Marker to spritz some black onto the panel.  The beautiful Seashells were stamped in Sahara Sand ink onto Whisper White cardstock and then colored in with Petal Pink Stampin' Blends.  I added some clear Wink of Stella to them as well.  The sand dollar was stamped in Sahara Sand Ink onto Whisper White but that one I left white but again added some Wink of Stella for shimmer.  I stamped the Starfish in So Saffron onto Whisper White and added some Wink of Stella to it as well.  After cutting everything out with the coordinating dies, I used the Seashells 3D Embossing Folder to add some dimension to the two Seashells.  I applied the Starfish and Sand Dollar with Multipurpose Adhesive and added the shells with Dimensionals.  The sentiment was stamped with Versamark Ink on a Strip of Basic Black Cardstock and then heat embossed in White Stampin' Emboss Powder.  I added the strip with dimensionals just above the Seashells allowing them to overlap the strip just a bit.  I matted the panel on Basic Black Cardstock and then adhered it all to a top folding Shaded Spruce Cardbase. Last but not least I added three Shaded Spruce Gems to complete it.

For the inside...


I have several good friends that love the beach so I thought the love you to the beach and back were perfect for the inside of a birthday card for them.  I added some of the stamped images at the bottom of the inside panel in Bermuda Bay, Shaded Spruce, Sahara Sand, and Petal Pink. 

I really LOVE how this turned out and it was so much fun to make.  Card making is all about having fun, right?  If you haven't ink smooshed, please give it a try!  

Blessings, Tina


Product List