Thursday, August 27, 2015

Nerdy Bird Back to School CYCI #83

Good evening!   What do you get when you combine a Retired Stampin' Up! Set, Stampin' Up! Dies, Cardstock and Schoolhouse DSP with a Nerdy Bird Unity Stamp?  Well you get my entry in this week's Can You Case It? Back to School Challenge


I love this "Nerdy Bird" Unity Stamp and it was my first time to ink it up!  I used the School House DSP to paper-piece the body of him.  The Books are from the Retired Stampin' Up! Set "Sweet Laughter".

Here's the CYCI Challenge Banner if you'd like to check it out and enter a Back to School Card in it!


Thanks for stopping by!  Blessings, Tina


Wednesday, August 26, 2015

Lighthearted Leaves Spotlight on the Holiday Catalog

I absolutely LOVE the new Stampin' Up! Holiday Catalog!  Today I had a little time to finally play with one of the new sets that I received on my preorder.  I used a couple of techniques and had lots of fun getting inky on this one!

First of all, let me say one thing.. Where has Pumpkin Pie Cardstock been all my life??  I just got my first pack of it today.  Yep.. I've had tons of Stampin' Up! Cardstock colors but never Pumpkin Pie!  It is such a yummy color!  I love Pumpkin anything so I should have known, right?  I mean Pumpkin Spice Latte is my all time favorite Starbucks drink so of course I would love Pumpkin Pie Cardstock. On this card I started with an A2 Yummy Pumpkin Pie Cardstock Card Base and layered in a 4" x 5 1/4" piece of Old Olive Cardstock.  My top layer was Whisper White.  For the Masking Technique I used Post-It Notes to Mask the Top and Bottom Portions of the White Layer and stamped with different stamps from the Lighthearted Leaves Stamp Set using Old Olive, Hello Honey, and Cajun Craze.  I used a Pumpkin Pie Marker to color in some of the design on one of the more decorative leaf styles and add some of that yummy color! I stamped the sentiment in the lower right corner in Cajun Craze.   For my larger leaves, I used the Emboss Resist Technique.  I heat embossed in White three of the Lighthearted Leaves onto Shimmery White Cardstock.  I then used my daubers to sponge in Cajun Craze, Pumpkin Pie, Hello Honey, and Old Olive Ink onto the Leaves and then cut them out with the new Leaflet Framelits. Let me just say that if you have never sponged on the Shimmery White Cardstock, what are you waiting for??  It goes on so smoothly and has such a luscious shimmer!   I used a paper towel to rub down the white embossing after sponging so that the white wouldn't have ink residue on it.  I tied three of the leaves together with some of the Linen Thread and then popped them up with Stampin' Dimensionals.
Built for Free Using: My Stampin Blog


Thanks for stopping by!

Blessings,
Tina

Tuesday, August 25, 2015

SIP Challenge #11 Tic-Tac-Toe Masculine card

Hello everyone!  I am pretty pumped about this week's Stamp, Ink, Paper Challenge!  First of all I love Tic-Tac-Toe Challenges because you get so many styles, themes and looks from one Challenge. Secondly, I have been semi-addicted to the combination of the Stampin' Up! World Map and Traveler set and when I see the opportunity to make a masculine card.. well that's where I end up going!  lol
Here's the cool Tic-Tac-Toe Board to choose your 3 in a row from!

I went right down the middle row for my card with Masculine-Die Cut-Button combination!


I started out with a base of Baked Brown Sugar and layered in  Lost Lagoon and then a Watercolor Paper layer that I stamped the World Map Stamp on with Black Stazon and then watercolored.  I added some crumb cake and baked brown sugar ink to distress the map.  The train image from Traveler was stamped onto Very Vanilla cardstock with Early Espresso Ink.  It was die cut with the MFT Zig Zag Circles as well as the Baked Brown Sugar Circle.  The burlap ribbon on the left side was cut and unraveled on the sides  and had a piece of blue twine run over it with a gold button tied to the bottom where the sentiment flag was placed with a lost lagoon backing.

Now I have a question for you.  Does the layout of this card look familiar at all?  Well I used the sketch from week #9 for my design inspiration!  Yep, make sure you check out the challenges every week!  We've had some awesome sketches, color combos and inspiration photos!

Here are the Stampin' Up! Supplies that I used:
Built for Free Using: My Stampin Blog


Non-Stampin' Up! Products Used:  MFT Zig Zag Circle Dies, Blue Twine from my Stash

Thanks so much for stopping by!

Blessings!

Tuesday, August 18, 2015

SIP #10 Inspiration Challenge


Hello all!  I hope you've been having a wonderful week so far!  It's still crazy in the world of Import.  Hopefully it will slow down by Mid-September.  Until then, I'll just keep taking it a day at a time!  Well since it is Tuesday,  it is time for another Stamp, Ink, Paper Challenge!
http://stampinkpaper.com/2015/08/sip-challenge-10-inspiration/

This week's Inspiration Photo is so versatile.  You can use "home" as the theme, or go with the colors, or the feel of the picture.  I decided to do something with those awesome mason jars!  I knew that I had a Sizzix Jar die and my first thought was to clear emboss a mason jar die cut for a card with flowers in it but when I pulled out the die it was too large for a card front so I decided to use the die to make a jar shaped card.  Fun idea and one I think I'll use again. 
 
It looked too plain with just the tag on the top but I didn't want to stamp on the jar itself so I added a belly band that will slide on and off.  I used Soft Sky cardstock for my jar/card body, Smoky Slate cardstock for the jar lid and the belly band.   I tucked a little piece of the Stampin' Up Tea Lace Doily under the lid and attached some Linen Thread to hold on the cute little general store tag.  The flower was made with the Cherry on Top Cotton Paper in Watermelon Wonder.  I punched several layers with the Pansy Punch and the Petite Petals Punch and scrunched it up and then used my Paper Piercer to punch a hole in them and inserted an Antique Brad in the center and then attached to the card with glue dots.  The Happy Birthday sentiment from Tag Talk was stamped in Watermelon Wonder Ink on Whisper White Cardstock and punched out with the coordinating Label Bracket Punch.  I attached it to the belly band with dimensionals. 


Stampin' Up! Products used: 


Built for Free Using: My Stampin Blog


Non-Stampin' Up Products used:

Sizzix ScoreBoards XL Canning Jar Die
Memory Box General Store Tag Dies
My Craft Spot Tiny Tags II stamp set "friend" 

Saturday, August 15, 2015

TGIFC16 Birthday Card

Hello and Happy Saturday!  Whew!  What a week I've had!  Saturdays are a chance to catch my breath and sometimes even have a little fun.  This morning I needed to make a birthday card for our oldest granddaughter, Nevaeh.  Is it wrong that I combined a sketch challenge with a birthday card that I needed to make??  I hope not.  lol  I'm entering this card in TGIF Challenge #16 .  When I saw it I couldn't wait to give it a shot.  It was an awesome sketch challenge!  Here's what the sketch looks like:

Here's my card for the sketch.

I had a stencil that I used for the background with Daffodil Delight Ink on Whisper White cardstock.   I've seriously had that stencil for about 4 years and this is the first time I've used it.  I knew it would get used sooner or later. lol  The balloon was stamped in Melon Mambo.  I used some confetti chunky glitter in the shaker and used some on the outside along with some Doodlebug sequins.    The cardbase is Island Indigo and the bottom of the hot air ballon was stamped in Island Indigo as well.  I used fun foam with the same balloon die cut as the top layer to add the depth for the shaker.  This was a fun card to make.  I think Nevaeh will like it as she loves a little bling.  Here's a picture of the beautiful birthday girl..

Thanks for stopping by!

Blessings,  Tina


Thursday, August 13, 2015

OSAT Blog Hop - Back to School

Hello!  It seems like this year is flying by!  I can't believe it's already time for the August One Stamp At A Time Blog Hop!  If you've been hopping along, you should have hopped over from Megan Thompson's Blog!   She had some awesome inspiration!   As I'm sure you know this month's theme is Back to School.  I can tell you that this theme was a tough one for me since  I haven't had a school age child for many years now!  After doing a long, extensive inventory of my stamps, here's what I came up with for my card and project!


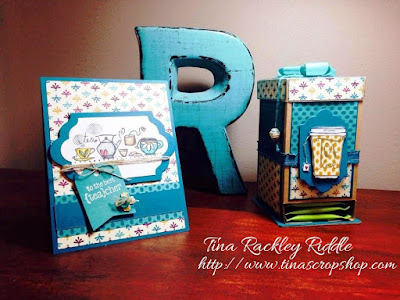
I knew that I had some awesome Unity Stamp Co.  "Tea" themed stamps so I used two  different stamps to create my projects.  The stamp sets used were "Beau-Tea-Ful Friend" and "Tea Love".  The Designer Series Paper used was Stampin' Up! "Bohemian" and the Cardstock used was Stampin' Up! Island Indigo, Bermuda Bay, and Kraft. I have 8 1/2" x 11" Cardstock in pretty much every color imaginable but not 12" x 12"!  I'll be honest,  I would have loved to have used Bermuda Bay for my tea box base but since I only had 12" x 12" in Kraft ,that's what I used.  I can tell you that my next order is going to include some 12" x 12" cardstock in a variety of colors!


I stamped my Unity "Tea Love" image on my card with Memento Tuxedo Black Ink, and used Copics to color it.  It was stamped on Heavy Whisper White Cardstock and was cut out using the Lots of Labels Framelit Dies. I added a larger Label of Island Indigo and added some Linen Thread.

My first introduction to this adorable little Tea Box was when I received one as a gift from my sweet friend, Lisa Altman.  Lisa was kind enough to share the tutorial she used and if you would like the tutorial for yourself click HERE.   I made the box out of Kraft and used Island Indigo with Bohemian DSP on all of the panels.  For the Tea Love Cup, I stamped it with Versamark and heat embossed in Gold Embossing Powder onto some of the Bohemian DSP. I layered it over one that had been stamped in Memento Tuxedo Black Ink onto Heavy Whisper White cardstock and then fussy cut.  I attached some linen thread behind the cup  and onto the little heart tea tag and then adhered to an Island Indigo label die cut.  My bow flower on the top of the Tea Box was made using the Stampin' Up! Bow Builder Punch.  I also handmade a bead out of DSP.  It was my first time to do that and it took me quite a while to get the glue off of my hands.  lol  I attached it to my flower  with some thick baker's twine that had been seperated into fewer strands.


I hope you enjoyed my projects.  It's time to head onto the next stop, the talented Andrea Pancrazio! 

http://www.andreascardshop.com/new-blog-avenue/osatbloghopbacktoschool


James Weber
Holly Stene
Ginger Pelfrey
Elizabeth Jeanne
Wynne Grob
Marisa Gunn
Kim Smith
Lori Mueller
Megan Thompson
Tina Riddle -- That's Me!!
Andrea Pancrazio
Andrea Tracy-Tucker
Martie Pollard
Diane Squires
Maggie Mata
Eva Bussom
Justin Krieger


Blessings,
Tina

Tuesday, August 11, 2015

SIP Week #9 Sketch Challenge

Hello all!  Hope you're having a wonderful week so far.  As a reward for surviving Monday, we have a fun sketch challenge for you over at SIP!
I took a little bit of creative license with mine and used vines on the left side and the new Lots of Labels Framelit Dies instead of a circle.


I started with a A2 Card Base of Cajun Craze.  I then embossed a 4" x 5 1/4" piece of Crumb Cake cardstock with one of my new favorites, the Brick Wall Embossing Folder! With my aqua brush I painted in the raised portion of the brick.  After adhering it to my cardbase, I attached two vines that I cut with a Memory Box Woodland Branch die onto Mossy Meadow Cardstock with Two-Way Glue. One person's branch, is another person's vine, right??  I added some flowers punched from Daffodil Delight cardstock with one of my mini punch pack punches. The edges were sponged tone on tone and a small basic pearl jewel was added to the center and then adhered to the vines with glue dots.  My awesome sentiment is from the "Feel Goods" stamp set and was stamped in Cajun Craze onto Very Vanilla cardstock and cut it out with the Lots of Labels Framelets Dies.  The edges were sponged with Cajun Craze Ink and edge of the right side was cut to mimick the sketch.  I then adhered the Sentiment/Label to my Brick Wall with Stampin' Dimensionals.  I used a Candy Dot on the Left side and added another Daffodil Delight flower on the lower right side of my "Sign".

Here are the Stampin' Up! Products I used:


Built for Free Using: My Stampin Blog


Thanks so much for stopping by!

Blessings,
Tina

Wednesday, August 5, 2015

ICS Blog Hop - Beyond the Sea


Hello and Welcome to the August Inspire, Create, & Share Blog Hop!  If you started at the beginning, you would have landed from the fabulous Eva Bussom's blog!  Eva is a talented lady and certainly a hard act to follow!  If this is your first time hopping, I hope you'll enjoy and remember to come back the first Wednesday each month for even more inspiration!

This month's theme is Beyond the Sea and I was super excited since some of my favorite current Stampin' Up! stamp sets are nautical in theme!  For my card today I decided to create a scene using one of my favorite Stampin' Up! stamp sets, Wetlands!


I started with an  11 x 4 1/4"  base of the thick Whisper White Cardstock scored at 5 1/2".  Over that I layered a 5 1/4" x 4" piece of Soft Sky cardstock that had been embossed with a woodgrain embossing folder.  I added some thick baker's twine in Smoky Slate and attached a fussy cut anchor from the Open Sea stamp set that I had stamped with Memento Tuxedo Black Ink onto Whisper White cardstock.  I used my 1/4" hole punch to make the hole to tie it onto the thick baker's twine.

For my window I used my square punch to punch out the window panes in a of 3 1/4 x 3 1/4" piece of Thick Whisper White cardstock.  I recently learned how to make the window by watching a video by another Independent Stampin' Up! Demonstrator, Brian King.  To watch his awesome video click here!  My background scene was sponged onto Whisper White cardstock with Bermuda Bay, Smoky Slate, and Lost Lagoon Inks.  I had cut a scrap piece of cardstock to use as a guide to ink in my mountains and sand beyond the sea. I embossed my sea birds with White Stampin' Emboss Powder.  I used some versamark on the bottom of the scene along with some heat and stick powder and then my heat tool to make it sticky and then ground some Pink Himalayan salt for make my sand. I adhered the scene to the back of the window with Snail and then adhered the window to my woodgrain layer with Stampin' Dimensionals.  My sentiment is from the Sheltering Tree stamp set and was stamped with Lost Lagoon Ink onto Whisper White cardstock and backed with Bermuda Bay.  I cut banner ends on both layers and then used my Bone Folder to make it wavy and adhered it to the top left corner of my window with more Stampin' Dimensionals.  I hope you are loving it as much as I am.  My husband and I love to cruise and the mountains beyond the sea reminded me of some of the Carribean ports we've traveled to.  


For your next stop on the hop, you'll get two cards for one stop, the Stampin' Sisters of Darla Roberts and Nancy Kee are up next.  Just click the next button and you'll be there!


Here are the Stampin' Up! Supplies used for my card:
Built for Free Using: My Stampin Blog


Thanks so much for stopping by!  Blessings!
Tina

Tuesday, August 4, 2015

SIP Week #8 Card Maker's Choice Challenge - You've Got This

Hello and Happy Tuesday again!  I hope you've been having a wonderful week so far.  It's still pretty hot in my neck of the woods.  I think I'm ready for fall and a bit cooler temperatures!

Well since it is Tuesday, that means I'm back over at the Stamp, Ink, Paper Challenge blog with another design team card.

This week you pick the Stamp, Ink, and Paper!  How cool is that??


Here's my card using two of my favorite colors, Island Indigo and Real Red!


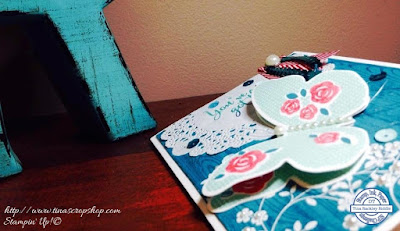
For this card I used part of 4 different stamp sets.  I used "Hardwood" for the background, "You've Got This" for the sentiment, "Thoughts and Prayers" for the small flowers that I embossed in white, and Floral Wings for the Butterfly.  Whew!  That is crazy! I stamped the sentiment in Hero Arts Ombre Ink.  I seem to be going to the "You've Got This" stamp set a lot lately.  I just love the sentiments in that set as well as the font!  The butterfly was stamped in Pool Party with Red Red (stamped off) roses and Island Indigo (stamped off) leaves.   I really LOVE the butterfly in the new "Floral Wings" Hostess stamp set.  It really is one of my new favs!


I stamped the butterfly twice and layered for some dimension.  I then added some basic pearl jewels to the body of the butterfly.  I also looped a little silver metallic thread under the butterfly.  


I LOVE to finish out the inside of a card and the Floral Wings set has this gorgeous little vine that was perfect as well as the Love Ya sentiment!

Here are the Stampin' Up! Supplies I used:

Built for Free Using: My Stampin Blog


Non Stampin' Up! Products:

Hero Arts "Pool to Navy" Ombre Ink
Doodle Bug Sequins

Thanks so much for stopping by!

Blessings,
Tina