Tuesday, April 27, 2021

The Spot Challenge #159 - Ink Blending Sneak Peak of Stampin' Up!'s new Color & Contour Bundle

Hi There! I hope you are having a great week!  My Monday was crazy but the good news is that it was my last Monday at work!  I'm retiring this Friday!  I couldn't be any more thrilled!!!  So the weekend was fun filled as I attended a virtual demonstrator event.  Monday being what it was, I ran home as fast as possible to make my card for this week's Ink Blending Challenge at The Spot.  I love ink blending!


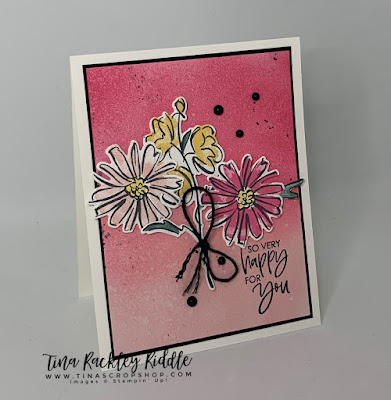
So this week's ink blending is what I will call a Pink Ombre with a Sneak Peak of the new Color & Contour Bundle from the 2021-2022 Annual Stampin' Up! Catalog!


I started blending my 3-3/4" x 5" panel of Basic White Cardstock with Blushing Bride Ink and then blended in Flirty Flamingo and Polished Pink!  I spritzed a little water on it and used a paper towel to absorb the moisture.  Then I added some spritzes of a Mixture of Champagne Mist Shimmer Paint and Alcohol.  I stamped the outline of the flowers from the Color & Contour Stamp Set in Memento Tuxedo Black Ink.  The watercolored look inside of the flowers was stamped in So Saffron, Polished Pink, and Blushing Bride.  I colored the leaves in with the new beautiful So Succulent Blends and added some quick coloring using the Light Mango Melody blends to the inside of the two pink flowers.  I heat embossed the sentiment on the bottom right of the front panel in black.  I added the flowers with Dimensionals and added a few splatters with my Basic Black Stampin Write Marker.  I matted the front panel onto a 3-7/8" x 5-1/8" panel of Basic Black cardstock and then mounted that onto a Thick Basic White 4-1/4" x 11" card base (scored at 5-1/2") for a top folding card.  Finally I finished it off with some Matt Black Dots!  The Matt Black Dots are my new favorite embellishment!  

Thanks so much for stopping by!  Blessings, Tina


Tuesday, April 20, 2021

The Spot Challenge #158 - Since you loved this Sketch Challenge, Sketch Revisited with Stampin ' Up! Art Gallery Bundle

 Well Friends, this is a first!  The Spot Challenge is revisiting last week's sketch since it was so popular!  I agree, of course, it is an awesome sketch!


I had some fun this weekend playing with the Art Gallery Bundle so I decided to use it again on my revisit with this fun sketch.  The gorgeous Fine Art Floral was perfect to use on this card!  


 I started with an A2 Card base of Night of Navy.  I added a 5-1/8" x 3-7/8" matt of So Saffron and a panel of the gorgeous Fine Art Floral DSP measuring 5" x  3-3/4".  The vertical matt of  Night of Navy measured 1-7/8" x 4-3/4" and the DSP measured 1-3/4" x 4-5/8".  There are sooo many fabulous color combinations that can be used with the Art Gallery Stamp Set!  Because of the DSP I used, I went with So Saffron for the flower and the detail flower image (since restamping the same color over the base will darken it just enough, I think) and Calypso Coral for the flower center.  I used Mossy Meadow for the stem and leaves.  Instead of using the label dies with the bundle, I just used my trimmer and matted them in Night of Navy with a fun slant on both the top and bottom for a bit of a funky look.  I finished it off with three pearls and a little Night of Navy Twine Bow.  This DSP is so gorgeous that it really doesn't need much added... so sad it will retire soon!

Thanks so much for stopping by!  Blessings, Tina


Product List

Tuesday, April 13, 2021

The Spot Challenge #157 Sketch Challenge with Stampin' Up! Hydrangea Haven Bundle

 Hello and Happy Tuesday!  I am sooo excited that this is the just the 3rd Tuesday I have to work until I retire!  Yes... the end of April and I'm home free and ready to craft my days away!  Ok, so maybe a little cleaning and cooking to keep my Hubby happy!


Since it is a Tuesday, that means it's time for another Spot Challenge and this week we have what I think is a pretty cool sketch..


Here's what I came up with...


My colors for this fun card are Highland Heather, Misty Moonlight, Basic White and Mossy Meadow.  The Hydrangea Hill DSP is so beautiful that I chose to cover the entire front of the Highland Heather Card  Base with a panel of it measuring 4-1/4" x 5-1/2".  The vertical panel of DSP measures 2" x 4-3/4" and was matted with 2-1/8" x 4-7/8" piece of Highland Heather CS.   I stamped the sentiment from the Art Gallery Stamp Set in Misty Moonlight on a scrap of Basic White CS and cut it out with the coordinating Die from Floral Gallery Dies.  The Highland Heather scallop strip using the Peony Dies and cut to 2-3/8".   and I thought it added a nice touch to the design.  I love scallop accents added under the sentiment.  I cut the stem and leaves out of Mossy Meadow and adhered it with glue dots and added a small bow with the Misty Moonlight and White twine from the Flowers for Every Season Combo Pack.  The top to the Hydrangea was cut out of Highland Heather cardstock and the edges were sponged with Misty Moonlight before adding it with dimensionals over the stem and leaves.  Finally I added some mini Pearl Basic Jewels over the holes in the hydrangea so that the dimensionals wouldn't show through.  I finished the card front off with three of the Elegant Faceted Gems.  

Thanks so much for stopping by!  Blessings, Tina


Product List

Thursday, April 8, 2021

OSAT Blog Hop April 2021 Say What - Emphasis On Sentiment


Hi There Crafty Friends!  I'm super excited to be with the One Stamp At a Time Blog Hop Team with a Say What Project!  This theme is all about the sentiment and I knew exactly what stamp set I wanted to concentrate on for today's card!  I always need Thank You card and my very favorite stamp set "Ornate Thanks" is the perfect set for all types of Thank You sentiments!  I love Photopolymer Stamp Sets especially for sentiments!  This is one set I'll keep forever!


I used my Stampartus to stamp some diagonal sentiments tone-on-tone with just the right placement on my Pool Party background.  After I was pleased with the background stamping, I cut the panel with one of my stitched rectangle dies and then embossed it with the Tasteful Textiles Embossing Folder.  That layer was matted with the soon to be retired Pretty Peacock Cardstock.  Next, I used one of my Blending Brushes to ink blend some Pretty Peacock at the top of a strip of Pool Party Cardstock creating a Ombre effect by blending darker at the top of the strip.  Using the Playful Alphabet Dies I cut "THANKS" out once on the Ink Blended Strip and twice more in scraps of Pool Party so that I could build up the word to stand out more on my background.  I used Multipurpose Adhesive to adhere the layers of letters together and then used a T-Ruler to get a straight placement of the letters to adhere to the card panel with more of the glue.  Once all letters were placed, I added some Spritzes of Frost White Shimmer Paint mixed with 70% Isopropyl Alcohol for some fabulous Shimmer!


Here's a close of that Shimmery goodness!!  So pretty!  If you haven't tried the Shimmer Paint.. you really need to jump on the band wagon!  So Pretty!  I finished the matted layer off by adding some of the beautiful Pool Party 3/8" Sheer Ribbon around the panel tying it a bow on the right side of the card.  The panel was then added to the Pool Party A2 Cardbase with Dimensionals.  Last but certainly not least, I added three of the gorgeous Blue Adhesive-Backed Gems.


Finally, I added a little treat holder...


I used the gorgeous Fine Art Floral DSP along with the Mini Curvy Keepsake Box Dies.  The label was punched in Pretty Peacock Cardstock with the Label Me Fancy Punch.  I added a Pool Party Tasteful Labels Diecut stamped with a sentiment from the Hydrangea Haven Stamp Set.  The little flower was from the coordinating Hydrangea Dies.  I added the tag with some Pool Party 3/8" Sheer Ribbon and a Blue Adhesive-Backed Gem in the middle of the flower.  Super simple and so cute!

Thanks so much for stopping by!  Please continue the hop by clicking the name directly under my name....  Blessings, Tina

Product List

Tuesday, April 6, 2021

The Spot Challenge #156 - Color Challenge with Stampin' Up! Flowering Cactus Product Medley

 Hello and Happy Tuesday!  I hope you had a wonderful Easter Weekend!  We had absolutely gorgeous weather here in Middle Tennessee!  Unfortunately with all of the beauty of Spring comes lots of Pollen so we had to watch our Easter Service on line again as I didn't think I should bring my cough out in public in the age of Covid-19.  I'll be happy when things begin to feel a little normal again.. that being said, they may have to get used to a new normal.


Since it is Tuesday, that means I'm back with the rest of The Spot Design Team with my take on a new Challenge.  This week's challenge is a color challenge that made me think immediately of the beautiful Flowering Cactus Product Medley in the Current January - June 2021 Mini Catalog.  


Here's my card utilizing this beautiful medley of products...


The beauty of this Product Medley is that the DSP really does the work for you!  For this card I used half sheet of Calypso Coral cardstock (5-1/2" x 8-1/2", scored at 4-1/4"), I layered on a panel of Mint Macaron Cardstock cut to 5-1/8" x 3-7/8", and then a layer of the DSP cut to 5" x 3-3/4".  I ran some white twine around the matted panel prior to attaching to the cardbase with Dimensionals. I added a Tasteful Label Die Cut in Basic White with the sentiment stamped in Calypso Coral.  Both the cactus and the flowers were cut from the coordinating DSP and added to the label as well.  I added just a little grounding with a Smoky Slate Stampin' Blend and then attached the label with more Dimensionals to the front of the card base.  I love how pretty and how easy this card was to make with the products in the Flowering Cactus Product Medley.  I hope you have a chance to grab this one if you haven't already before it retires!  It's a must have and certainly one that I will keep around!  


Thanks for stopping by!  Blessings, Tina

Product List