Tuesday, November 12, 2024

OSAT Tis the Season Blog Hop with Sentimental Wishes Bundle


The November One Stamp At a Time Tis the Season Blog Hop begins today and I'm finally creating some Christmas cards!  It's been quite the end of Summer/Beginning of Fall for me with a broken ankle!  I'm super excited to be free of that cast and walking boot and able to walk into my craft room and get started creating!

For my cards I used the Sentimental Wishes Bundle along with the Sentiment Christmas DSP.  


I absolutely love the nostalgic feel of this suite!  I also loved the price point for this bundle!  At just $38.50 US this is a winner! The bundle includes just 5 dies which is the reason for the low price point but paired with the DSP for an additional $12.50, this gives you so much bang for the buck!  

My first card is so simple featuring the stocking that was cut from the DSP with the coordinating dies!


The background is simply more of the beautiful nostalgic DSP matted on Poppy Parade Cardstock and then added to a Shaded Spruce top folding card base!  The circle dies are from the Spotlight on Nature Dies (Shaded Spruce) and the Stylish Shapes Dies (Basic White).  I stamped the sentiment from the stamp set directly onto the background DSP.  I cut the stocking out the coordinating die directly from the DSP (I love when we can do that!)   I added some Real Red and White baker's twine around the stocking and then popped it up on the layered circles with the Stampin' Dimensionals!  This is absolutely a case of letting the DSP do the work on this card!

My next card was very sentimental to me because it reminded me of my childhood and our Christmas candles that were always in our windowsills!


I stamped the candle image on some basic white card stock and did a quick simple coloring.  I added some of the greenery leaves cut from more of the Shaded Spruce Cardstock behind the cut out candle.  It was all layered onto a Basic White Spotlight on Natures diecut and then layered onto Poppy Parade and more Shaded Spruce to make the focal image a little more dynamic.  I used a top folding Shaded Spruce card base with more of the DSP panels added onto Poppy Parade mats.  I added some of the Real Red and White Baker's Twine around the panels before attaching them to the card base and added a scrap of White and Silver ribbon into the twine bow.  

I hope this gives you a couple of card ideas with the awesome Sentiment Christmas Suite.  It really is one of my favorites!

To continue on for more inspiration, please just click the name directly below mine on the below blog roll!  Thanks so much for stopping by!  Blessings, Tina


Tuesday, October 8, 2024

Falling for Farmhouse OSAT Blog Hop October 2024


Hello and Welcome to One Stamp At A Time's October 2024 Blog Hop!  We have a super fun theme this month... Falling for Farmhouse (Rustic/Farmhouse Style Projects)!


I knew immediately I was heading for the Country Flowers Bundle and the Country Woods DSP!


I love all of the DSP in the Country Woods pack but my favorite is probably this Pool Party distressed woodgrain!  I used it for my background of my card.  I cut a small 3/4" strip of the opposite side of the Pool Party DSP to ground my stool/flower pot.  I stamped the sending love sentiment directly on that strip in Memento Black Ink.   I used blends to color my images.  The stool was colored using the light and dark Smoky Slate blends, the pot/vase was colored using the Copper Clay blends, and the plant was coloring using Old Olive light and dark and Mossy Meadow blends.  I'm certainly NOT an expert colorist but I think they turned out pretty good.  I definitely need to color more and practice.  I mounted my 4 1/8" x 5 3/8" DSP onto a piece of Copper Clay that measured 4 1/4" x 5 1/2".  I then added that to an 5 1/2" x 8 1/2" Pool Party Card Base, scored at 4 1/4".  I ran some linen thread along the left side of the card and added three Faux Glass Dots embellishments to finish off the cardfront.

For the inside of my card, I kept it pretty simple by adding another sentiment from the stamp set as well as a small strip of the DSP.


Thanks so much for stopping by!  Please click the name directly under mine to continue on for more Farmhouse/Rustic Project inspiration!

Blessings, Tina


Tuesday, September 10, 2024

OSAT PUMPKINS, PIES, & FRIGHTS BLOG HOP SEPTEMBER 2024 WITH MORE THAN AUTUMN BUNDLE


Hello and welcome to the September 2024 One Stamp At A Time Blog Hop!  This month is all about Pumpkins, Pies & Frights!  I'm not a huge fan of Frights but I'm all about Pumpkins and Pies! 


Actually, this month's hop will probably be my favorite hop of the year because I LOVE all things Coffee and Especially Pumpkin Spice!  When I saw the new More Than Autumn Bundle in the new Mini Catalog I was sooooo excited!  

I'm sharing three different card ideas with the More Than Autumn Bundle with a surprising selection of DSP!  I used the Full of Life DSP utilizing the watercolor wash "B" side of the paper and I love how they turned out!


My first card was a Pumpkin Pie card base with Mossy Meadow matt with the beautiful Full of Life DSP.  I used Ivory, Crumb Cake, and Pumpkin Pie Blends.  The pie and doughnut were colored in with Crumb Cake, Pecan Pie, Pumpkin Pie, and Peach Pie blends!


My second card is a Basic White Thick Card base with a matt layer of Pumpkin Pie Cardstock and more of that Full of Life DSP.  Coffee Cup was colored using Ivory, Crumb Cake, Mossy Meadow, and Pumpkin Pie blends.  The doughnut and pie were colored with Crumb Cake, Light Pecan Pie, Peach Pie and Pumpkin Pie blends.

And last but not least may be my favorite..


For my last card I matched the diagonal flow that was in the Full of Life DSP with a diagonal shelf of all things Pumpkin!  I colored the donut and pie as I had with the previous two cards but I added some Mossy Meadow Blends coloring in my coffee cup this time for a different look.  I added a thin strip of Mossy Meadow Cardstock for my Pumpkin things to sit on and added some Linen thread over the strip for a little added interest!

I hope that I've inspired you a little with this amazing bundle!  I'm pretty sure this one is going to be a favorite of mine for a LONG time!  

Have a blessed day and enjoy all of the inspiration along the hop!  Just click the name directly below mine on the Blog Roll to continue on!    Blessings, Tina


Tuesday, August 13, 2024

OSAT Find a Sketch Blog Hop with Stampin' Up! Season of Green and Gold Suite


Hello!  Hope you are having a fabulous week so far!  I'm been M.I.A. for a while but I'm turning over a new leaf and back with a fun blog hop today featuring the card sketches in Stampin' Up!'s Annual Catalog!  If you are starting the hop at my blog, please make sure to continue on for so much fabulous inspiration!  I love using sketches to jumpstart my creativity and hopefully you do as well!  Below is a clip of 8 of the card sketches featured.  I chose to use the 3rd sketch in the top row for my card today!


The Suite of Products used is from Stampin' Up!'s online exclusives and is called the Season of Green and Gold!  The suite contains two bundles, The Golden Greenery Bundle and Greetings of the Season Bundle as well a DSP and Specialty DSP Vellum that coordinates!


I made a top folding card and used the Birchwood Embossing Folder to emboss a layer over my cardbase.  The Birchwood EF will be in the upcoming September 2024 mini-catalog and was at the top of my preorder list!  


I used the Specialty DSP Graceful Greenery Vellum for my strips.  I cut a piece of the vellum 3" wide x 5" tall and then cut the 3" wide piece into 3 x 1" strips.  I added my adhesive under the greenery print on the vellum to assure it would not show through.  I ran some linen thread across the front bottom of the card three times and made a bow towards the left side.  The sentiment from the Greetings of the Season Stamp set was stamped in Garden Green onto Basic White Cardstock and cut with one of the smaller circle dies from the Deckled Circle Dies and popped up over the linen thread with Dimenstonals.  I then added some pine greenery cut with the Golden Greenery Dies.  Using one of the dies I also cut one of the Gold Bells out of the Season of Green and Gold DSP.  I added two of the greenery die cuts behind circle and popped one up with mini dimensionals only tucking the end behind the circle.  I popped up the bell as well just under the popped up piece of greenery.  I finished the card front up with a few Iridescent Pearl Basic Jewels.  

Next up is the coordinating treat holder..


I used the Season of Green and Gold DSP to make a Hersheys Nugget holder.  These dimensions are for a small purse holder but instead of adding handles, I ran more linen twine through the top of the front and back and added twine and a label from the Greetings of the Season Dies added another piece of the diecut greenery and another bell die cut from the DSP.  The basic dimensions of the Treat Holder is a 6" x 6" square scored at 1-1/2" and 4-1/2" and the other side scored at 2-1/2" and 3-1/2".  Once you fold your score lines, you will see the 1" middle section that will be the bottom of the treat holder.  At that time, you will cut down on the score lines to the bottom on both sides so that you can fold those sections in and adhere them with strong adhesive such as tear-n-tape or Seal +.   This is a simple treat holder and I love that it can be made with just a 6 x 6" sheet of DSP.

Just click the name below mine on the Blog Roll to continue on!

Have a blessed day, Tina 


Thursday, March 9, 2023

OSAT Blog Hop Fuzzy Buzzy Friends Blog Hop


Hello and Welcome to the March 2023 OSAT Blog Hop!  This month's theme is Insects or Animals and although I am totally Bee Crazy, I decided to go with the amazing Rain or Shine Suite!  This Suite features the Playing in the Rain Bundle that coordinates with the Rain or Shine Specialty 12x12" DSP!  I have 4 card ideas featuring primarily ideas using the DSP!

My first card is my favorite!  This DSP is soooo gorgeous!  The texture and shine on the rain drop patterned paper is absolutely beautiful!  


The only struggle with this card was how many images from the DSP could I highlight and still show that amazing raindrop paper in the background!  I added three cut out with stitched circles using the Stylish Shapes Dies.  I added  the "HI" using the Alpha bet A La Mode Dies!  

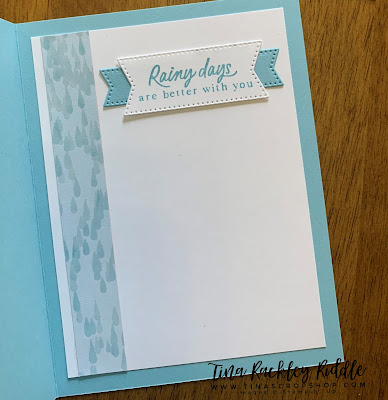
I used the sentiment with the Playing in the Rain Stamp Set for the inside of my card.


Of course I also had to add a strip of that raindrop paper to the inside.  The sentiment was cut out using the stitched banners from the Stylish Shapes Dies 

M next card features another animal image from the DSP. 


Of course I added more of that Raindrop Paper for the Background.  The focal image from the DSP was cut out using the Layering Circles Dies and was matted using the scalloped circle from the same die set.

Next up, I used the dies to cut out the Bunny and Turtle and added them directly over more of the DSP.


I hand cut a hill using the daisy design of the DSP and layered it over the Raindrop DSP.  Super simple card but the animals are just adorable!

My last card used the daisy design of the DSP as my complete background.


I added the Bunny die cut from the DSP and just added the sentiment cut out using more of the Stylish Shapes Dies for the stitched circle and the banner behind it.  

I hope this gives you some ideas for cards using this awesome suite of products!  I absolutely love everything about this bundle and DSP!!

Have a blessed day!  To continue on, just click the name directly under mine!  


Thursday, February 9, 2023

OSAT Shabby Chic or Boho Blog Hop February 2023


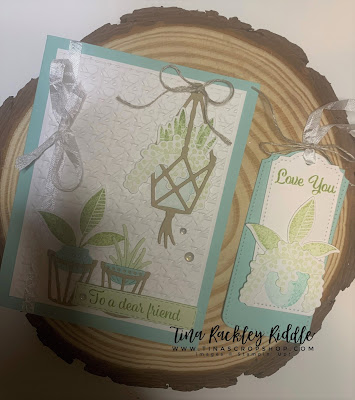
 Hello and Welcome to the February 2023 One Stamp At A Time Blog Hop!  This month's theme is Shabby Chic or Boho!  I decided to go with Boho for my Card and Tag and used the Plentiful Plants and the Perfect Plants Dies!  


I used a much softer color palette than usual but I really love how it turned out.  The card base was Pool Party, the background was Basic White embossed with the Cane Weave 3D Embossing folder and adhered to another layer of Basic White.  The sentiment was stamped with Pear Pizzazz Ink on Soft Sea Foam Cardstock.


I love the natural tones along with the white crinkled seam binding and linen thread.  I added three adhesive-backed milky dots to finish it off.


The inside turned out super cute as well.  The natural weave layer behind the plant was a die cut from the Share a Milkshake Die Set.


My tag was cut from the Tailor Made Tag Dies.

Thanks so much for stopping by!  Make sure you check out all of this month's inspiration by clicking the name directly under mine on the below blog roll!

Blessings, Tina


Thursday, January 12, 2023

OSAT Fresh Finds Blog Hop January 2023 Fun Fold Card using the Framed Florets Bundle and Favored Flowers DSP


Hello and Welcome to the January 2023 One Stamp At A Time Fresh Finds Blog Hop!  I'm super excited to be taking some time to stamp and create this year using the new January - April 2023 Mini Catalog and the 2023 SALE-a-bration selections!  Today's card is a Angled Cut Joy Fold Card.


To me the star of this beautiful card is the Favored Flowers DSP!  The card base is a 5-1/2" x 8-1/2" Thick Basic White Card base scored at 4-1/4".  To get your diagonal cut, you will need to align the top front of the card base at the 4-1/4" score line and the bottom of the front at the outer corner on the blade track at the same time to make your cut.  The angled DSP is a 4" x 5-1/4" piece that is cut the same way.  I added one of the cuts to the bottom flap and the other piece to the inside of the card at the top.  The small top fold card added to the center was also Thick Basic White and measures 3-1/4" x 8-1/2" and is scored at 4-1/4".  The DSP for the front of that measured 3" x 4".  


The card opens by raising the top of the small card and then opening the flap of the angle cut.


I added a piece of the angled cut DSP to the inside of the front flap as well but that's totally optional.

Thank you so much for stopping by!  Please continue on for some amazing inspiration by clicking the name directly under mine on the below blog roll!  Blessings, Tina


Product List