Monday, June 21, 2021

Shark Frenzy Bundle Baby Girl Card! - Baby Shark Doo Doo Doo Doo Doo Doo....

 Hi There!  Hope your week is off to a fabulous start!  I spent the weekend watching two of my sweet Granddaughters play in a softball tournament.  I'm exhausted and sunburnt!  lol  But it was so much fun!  I wanted to share a super cut Baby Girl card I made with the Shark Frenzy Bundle, soon to be retiring,  and the beautiful new Basic Borders Dies.  If you don't have the Shark Frenzy Bundle and you love it, make sure you head over to my Stampin' Up website and grab it before it's gone.  It will officially be retired the end of June!  Oh and before I go any further.. I apologize that the picture is no great.  It's been storming here so very little light here!


How cute are these sharks stamped in the new Polished Pink??  So so cute!  I started with a 5" x 3-3/4" panel of Basic White Cardstock.  I used a blending brush to blend a little bit of Balmy Blue Ink in the upper part of the panel.  On a scrap of Basic White,  I stamped the outline of the sharks in Memento Tuxedo Black Ink and the fill in portion in Polished Pink Ink.  The purse and hair bow were both stamped in Memento Tuxedo Black and colored with Polished Pink Stampin' Blends.  I used the coordinating dies to cut out the sharks and accessories.  The Sloped edge and Wave edges at the bottom of the card were cut out of the Subtles 6"x6" DSP (Balmy Blue) using the Shark Dies.  I adhered the waves with Multi Purpose adhesive directly to the bottom of the card front.  Using Versafine Onyx Black Ink, I stamped the Doo Doo Doo... directly on the DSP of the sloped panel and then attached it on the bottom of the card using Dimensionals.   I adhered the Sharks and the Purse with Dimensionals.  The bow was attached to the baby shark with a glue dot.  With more Basic White Cardstock, I cut the cloud border from the Basic Borders Dies and attached it with Dimensionals at the top of the card panel.  I used Versafine Onyx Black ink to stamp Baby Shark on card panel once the sharks were in place and I knew where I wanted it stamped!  Finally I matted the card panel with a 4" x 5-1/4" piece of the 6x6" 2021-2023 In Colors DSP in Polished Pink and then attached it all to an A2 Basic White Thick Cardstock base.  To finish off the card front, I added three clear epoxy water droplet embellishments!

Thanks so much for stopping by!  Blessings, Tina


Saturday, June 19, 2021

Brutus Monroe Mermaid Lagoon Card - Splashing to Say Hello

 Hello and Welcome to my first post as a Brand Ambassador for Brutus Monroe.  I have loved and used Brutus Monroe products for quite some time so I'm super happy to be able to be a Brand Ambassador for them! They have fabulous products for stamping, scrapbooking and general crafting!!


 The most amazing part is that my very first post is using one of my favorite stamp sets... Mermaid Lagoon!  I am seriously all about anything nautical and especially Mermaids!


I had a blast making this card since it is so very much about Amazing Images, Stenciling,  Media Paste and of course... Distress Inks!  My intent was to make my Mermaid and three of the fish look as though they are riding in on waves "Splashing to say Hello"! I hope I got my point across!  My background was a 4" x 5-1/4" panel of  Bristol Smooth Cardstock.  You could certainly use watercolor paper or heavy weight cardstock as well.    Using Blending Brushes,  I did some Distress Ink blending on it first with Tumbled Glass and then added in some Broken China.  I used the Tangled Waves Stencil, and a medium mover to add some Media Paste for dimension to the right side of my card panel.  Once the Media Paste had dried, I did some additional Ink Blending over the paste and even added some subtle blending to the left side of my card by lining the stencil back over the card front and using a Blending Brush to add some additional ink.   I spritzed just a bit of water over the panel and then blotted it off with a paper towel to get some of the lighter blotches. 


  Once the panel was completely dry, I heat embossed the sentiment in the upper left side with Raven Embossing Powder.  My background panel was adhered with Multipurpose adhesive to a matt of  Black cardstock and then adhered with more Multipurpose Adhesive onto a 100 lb. Cover Weight Whitewash Cardstock.   On another piece of Bristol Smooth Cardstock, I stamped the Mermaid, starfish and fish from the Mermaid Lagoon Stamp Set with Raven Ink.  Once they were dry, the images were watercolored with more Distress Inks and an Aqua Pigment Brush filled with water.   Using the Aqua Pigment Brush allows me to add water when needed to lighten the color.  Once I was finished watercoloring and everything was completely dry,  I used my Paper Snips to fussy cut everything.    If you, like me, are not an expert fussy cutter, I find that adding a water-based maker in a color close to your background helps.  Thankfully I had a medium blue marker to help out just a bit. 


 I added my images to my card panel with foam tape, except for the Starfish that I added to the Mermaid's Hair with liquid Multipurpose adhesive.    I love that Brutus Monroe carries but 1/16" and 1/8" foam tape.  On this card I used the 1/16" foam tape so that I could double up on some images so that some are popped up more than others!    I finished off the front by adding three Mermaid Sequins.

For the inside of the card, I added some simple stenciling..


I really like the simplicity some the light Broken China Distress Ink Blending using the same Tangled Waves Stencil on the inside.  Sometimes simple just works!

Thanks so much for following along!  Have a wonderful day and make time to get crafty!

Blessings, Tina

Tuesday, June 15, 2021

The Spot Challenge #166 Color Challenge with Calypso Coral, Coastal Cabana and Pale Papaya and The Sweet Ice Cream Stamp Set

 Hi There!  Happy Tuesday and once again, I hope your week is off to a great start!  Tuesdays mean it's time for another Card Challenge over at The Spot and this week we have a beautiful color combination!


Here in Middle Tennessee it is H.O.T. so I pulled out my Sweet Ice Cream Bundle for a cool card to help me chill out some!  I absolutely LOVE the watercolor look on the popsicle images in this set!  I love this color combination!  I especially loved how the Pale Papaya looks like a lighter version of Calypso Coral!  


I love this beautiful striped DSP from the Pattern Party Stamp Set.  I think it coordinates really well although the color in this paper I believe is Bermuda Bay instead of Coastal Cabana.. oh well just a bit darker but still looks great I think!

Here's the inside of my card...


Once again, I went for a Gatefold Card because well... I love me a good Gatefold Card!  Here are the details in case you'd like to CASE it!

  • Stamp Set - Sweet Ice Cream Stamp Set
  • Die Set - Hippo & Friends  Dies (labels) 
  • Embossing Folder - Painted Texture 3D Embossing Folder (for Basic White label)
  • Inks: Coastal Cabana, Pale Papaya, Calypso Coral, and Crumb Cake
  • Card Base - Coastal Cabana 5-1/2" x 8-1/2", scored on the long side at 2-1/8" and 2-1/8"
  • Layers - (2) Pale Papaya 5-3/8" x 2" and (2) Pattern Party DSP 5-1/4" x 1-7/8" (striped multicolor)
  • Inside Layers: Pale Papaya 5-3/8" x 4 1/8", Basic White 5-1/4" x 4"
  • Die Cut Labels: Pale Papaya, Coastal Cabana, Basic White
  • Sentiment stamped on Scrap of Pale Papaya and cut apart into strips
  • Popsicles stamped on Scraps of Basic White and fussy cut.
  • Embellishments -  Baker's Twine Essentials Pack (15" White), Pale Papaya 3/8" Open Weave Ribbon (approx 3" scrap) and 2021-2023 In Color Jewels (Pale Papaya)

Cut and score the Coastal Cabana Card Base and layer on the Pale Papaya Cardstock and Pattern Party DSP on each side using Multipurpose Adhesive.  Cut the labels using the Hippo and Friends Dies.  Emboss the Basic White label with the Painted Texture 3D Embossing Folder.  Adhere the labels together with Multipurpose Adhesive with the White embossed label on top.  Adhere Dimensionals to the left side of the back of the labels so that the Labels only adhere to the left side of the Gate.  With Basic White scraps stamp two Popsicles using Coastal Cabana full strength ink on the bottom layer of the Popsicles and stamping the top layer with 2nd Generation Coastal Cabana. Using full strength Coastal Cabana Ink add the confetti circles at the upper part of the Popsicle.  Stamp one Popsicle Calypso Coral for the bottom layer and Pale Papaya for the top layer and use the Calypso Coral Ink for the confetti circles at the upper part.   Stamp the Popsicle sticks with Crumb Cake Ink as well as the wood grain stamped layer.  Fussy cut the 3 Popsicles out.... I know, I know.. we all hate fussy cutting but I promise these are super easy!  Adhere the bottom two popsicles with Multipurpose adhesive on the Label Layers.  The top Popsicle can be popped up with Dimensionals.  Stamp the sentiment in Calypso Coral Ink onto a small scrap of Pale Papaya Ink and cut apart and into three small strips.  Cut some small strips of Dimensionals (I use the edges) and adhere to the back of the three sentiment strips and add to the Label section of the card. Run some White Baker's Twine along the left gate of the card and adding the small piece of Pale Papaya Ribbon before tying in a knot in the upper left.  Trim the ends to finish them off and adhere a glue dot under the knot to hold it in place.  I like to unravel the ends of the Baker's Twine.  Finish the front of the card off by adding three of the Pale Papaya Jewels.  To finish off the inside, stamp Happy Birthday in Calypso Coral on the Basic White layer and add some of the confetti circles in the lower right corner using in Pale Papaya Ink.  Add the Basic White inside layer to the Pale Papaya with Multipurpose Adhesive and then add the matted layer to the inside with more of the Multipurpose Adhesive.  


Thanks so much for stopping by!  Blessings, Tina

Thursday, June 10, 2021

OSAT Blog Hop - Boys in The Hood June 2021 Masculine Themed Card with Hats Off Bundle

 Hi There!  I'm over with the One Stamp At A Time Blog Hop Team today with a Masculine Hard using the Hats Off Bundle in the new Annual Catalog!  It's a super fun  theme and I've had such a blast playing with this fabulous new Hats Off Bundle!  


If you are starting at my blog, please make sure you hop all the way through for some fabulous inspiration!  If you started at another blog, thanks for continuing on!

Here's a look at my Gatefold Hats Off Father's Day Card.  


I loved the combination of the Woodgrain DSP and the Distressed Cap!


I LOVE this Hats Off Bundle!  For my card today I used a half sheet of Evening Evergreen Cardstock that measured 5-1/2" x 8-1/2", and scored the 8-1/2" side at 2-1/8" and 6-3/8".  I used my bone folder to burnish the score lines.  On each of the two sides I added a panel of 2-1/16" x 5-7/16" of Crumb Cake Cardstock and added a layer of the In Good Taste DSP in the distressed woodgrain pattern that measured 2" x 5-6/16".  I used the New 2021-2023 In Colors DSP in the Evening Evergreen plaid pattern to cut out the cap.  I also cut a hat out of Evening Evergreen and Crumb Cake Cardstock.  The bill of the Evening Evergreen cap was cut off right above the stitched line and adhered to the plaid cap.  The Crumb Cake cap was adhered to the back of the DSP cap to strengthen it.   The cap emblem was stamped in Evening Evergreen Ink onto Basic White Cardstock as was the You're The Best Label.  The sentiment label measured 2" x 3/4" and was matted with 2-1/8" x 7/8" strip of Evening Evergreen DSP and then added to the same size of Crumb Cake Cardstock to strengthen it as well.  Crumb Cake Baker's Twine was run around the left side of the label three times and tied in a knot in the front.  Prior to adhering both the label and the hat,  I used a small wire brush to distress the edges of the bill of the hat, the hat emblem and the Sentiment label.   


I love how the distressing added interest and texture to the card front!  I think it's my favorite part of this card!  Distressed caps are such an "In" thing right now!

Here's how I finished up the Inside...


The inside card panel of Basic White measured 3-7/8" x 5-1/8" and was matted on Crumb Cake Cardstock measured 4" x 5-1/4".  I used Inspired Thoughts stamp set for the fabulous sentiment .  This card is for my son-in-law for both his birthday and Father's Day so I love that this was a great sentiment and perfectly generic enough that I can write in what ever I want to go with it.

I also threw together a super easy and quick gift bag..


I had some plain white bags from the Dollar Store so I grabbed one and stamped some caps and emblems, as well as a few stars, on the bag with Crumb Cake Ink.  The tag was cut with the Tailor Made Tags Dies from Crumb Cake and Evening Evergreen cardstock and stamped with Evening Evergreen Ink.  I tied it on with some Crumb Cake  Baker's Twine.  It was certainly simple  but for Masculine gift bags sometimes simple is the best!


Thanks so so much for stopping by!  You are at Tina Riddle's Blog, so just click the name directly under mine to continue on.  If you are interested in purchasing any of the products that I've used, they will be listed below the Blog Roll.  Blessings, Tina


Product List

Tuesday, June 8, 2021

The Spot Challenge #165 - Stencils Challenge , Congratulations Card using the Hand-Penned Petals Bundle

 Hi There!  Hope your week is off to an awesome start!  We have a super fun card challenge over at The Spot Creative Challenge Blog this week.  This week is all about stenciling.  I love to add details using stencils on my card fronts, whether it is with Embossing Paste or Ink, it creates a really fun background for your card!  


I used the Basic Pattern Decorative Masks and used a blending brush for some subtle tone-on-tone Polka Dots for my card today.  Polka Dots are right up there with Gingham and Buffalo Plaid for my all time favorite patterns to use on cards!


I loved the Pale Papaya and Mint Macaron color combination in the Hand-Penned DSP so I carried that over to my card base and layers.  The Mint Macaron card base was 5-1/2" x 8-1/2", scored at 4-1/4" for a side opening A2 card.  On a 5-3/8" x 4-1/8" panel of Pale Papaya, I held the decorative mask in place and used a blending brush and Pale Papaya Ink to stencil the tone-on-tone polka dots in the lower left and upper right corners. The focal rectangle was cut in Mint Macaron and measured 3-1/4" x 4-1/4".  The Pale Papaya layer was 3-1/8" x 4-1/8" and the Hand-Penned DSP measured 3" x 4".  I love the watercolor look of the floral images in this stamp set and have found that my favorite look is use 2nd generation inking on them for the fill-in images.  My flower was stamped with Memento Tuxedo Black onto Basic White cardstock.  The leaves were stamped in Mint Macaron that had been stamped off once.  The large floral image was added in stamped off Blushing Bride and the small flower was Pale Papaya that had been stamped off.  After cutting out with the coordinating die, I adhered the flower onto a Pale Papaya label cut from the Tasteful Labels Dies with Multi-Purpose Liquid Adhesive.  The label was centered over the double-matted DSP layer, and popped up using Dimensionals.    I used the 2021-2023 In-Color Gems to add some bling onto the Floral Label Layer.  The sentiment "Congratulations" from the Hand-Penned Petals Stamp Set was heat embossed in Black onto the bottom of the stenciled panel and then the focal rectangle was added to the card front using more Dimensionals.  I added some white baker's twine on the left side, making sure it went over the popped up rectangle  and tied it in a bow in the upper left corner.  To finish the card front off I spritzed it with some Clear Wink of Stella because everything is better when it is sparkly, right?

Thanks so much for stopping by!  Blessings, Tina


Product List

Tuesday, June 1, 2021

The Spot Challenge #164 - Let's Hear it for the Boys! Masculine Card Challenge with Sailing Home

 Hello and Happy Tuesday!! I hope you were able to enjoy a wonderful weekend for sunny weather and time with family!  Since it is Tuesday, it is time for another Creative Challenge over at The Spot!  This week it is all about Masculine Cards!  I hope you'll stop by and check it out!


I just realized that I have hardly played around with the Sailing Home stamp set.  It is perfect for masculine cards!  I did a little #simplestamping to make this card and I love how it turned out.  


I went with a landscape gatefold base of Balmy Blue and layered with Night of Navy and the Plaid Balmy Blue DSP from the Subtles 6"x 6" DSP Assortment.  The center panel is Basic White matted with Night of Navy.  Using Balmy Blue ink, I stamped the birds and the compass.  I added the Thanks in Night of Navy Ink as well as the boat that was stamped over the compass.  I ran some of the White Baker's Twine along the right side of the front panel twice and tied it in a bow towards the top.  I frayed the ends of the twine just a bit.  

Here's how I finished the inside...


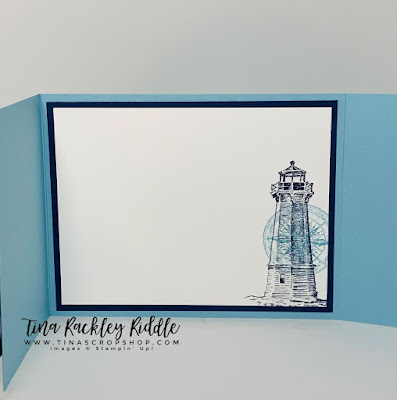
 I matted the Basic White inside panel on Night of Navy.  I used Balmy Blue Ink to stamp the compass on the lower right corner and Night of Navy Ink to stamp the Lighthouse over it.

Thanks for stopping by!  Blessings, Tina