Hello! Hope you are having a wonderful week! It's so hard to believe this year is almost over! All of the Bloggers at One Stamp At a Time want to thank you for hopping along with us this year! We've had some fantastic hops thanks to some super talented Bloggers and it's been a ton of fun! If you have already been hopping, well then of course you landed here from my friend and partner in crime,
Andrea Tracy-Tucker's blog! Isn't she super talented?? I love Andrea's work!
Here is my card and project for you, I used some of my favorite sets on these... from Land to Sea, Wetlands, and Traveler. Yep, if you know me at all, you know I LOVE these stamp sets!
I had a hard time photographing the sponging well enough that you can see the colors that I used. Here's a close up of the card that is a little better.

For my card I started out with a 4 1/4" x 11" piece of Night of Navy cardstock that was scored at 5 1/2" for a top fold card. I layered on a skinny layer of Real Red cardstock that measured 4 1/8" x 5 3/8". My top layer was Whisper White and I started by first stamping the Light House from the From Land to Sea set in Real Red. Once I had the lighthouse in place, I cut some scrap pieces of cardstock to mask off sections for my rolling seaside hills. I masked both the curves of the hills as well as the lighthouse itself. I used Sahara Sand, Crumb Cake, and Chocolate Chip for the hills. Once I had the hills the way I wanted them, I masked them off to sponge on the water in Lost Lagoon. I used a straight piece of cardstock to separate the water from the sky. Once I had the water sponged, I masked the water and sponged the sky. I started with some Blushing Bride closest to the water, and then Soft Sky. I sponged some yellow around the lighthouse to represent the rays of light coming from it. At the top section of the sky and on the sides of the sky, I sponged Night of Navy closest to the edge and some tempting turquoise blended into the Soft Sky. On the bottom of my scene I stamped some Sea Oats from the Wetlands Set in both Crumb Cake and Chocolate Chip. I then tied a piece of 1/2" Real Red Cotton Ribbon across the bottom and tied it in a knot. My sentiment from the Happy Notes stamp set was stamped in Red Red Ink on Whisper White cardstock and cut out with the Lots of Labels Framelits Dies. I also cut a larger Lots of Labels Die in Night of Navy for a mat and glued the sentiment on the mat and then adhered the mat with Dimensionals onto the upper right portion of my card.

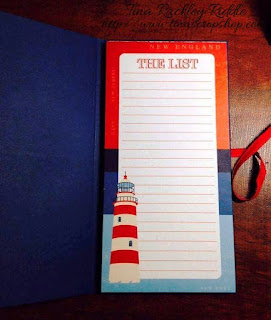
I found an awesome little Lighthouse notepad at Michaels that I thought matched my card so well that I decided to make a cover for it to go along with the card as a gift. The notepad measured 4 x 8" and was 1/4" thick, so my measurements for the cover were 8 3/4" x 8 1/4". I scored the 8 3/4" side on my scoreboard at 4 1/4" and 4 1/2". I used tear tape to adhere my pad to the interior back panel. I then ran a piece of 1/4" cotton ribbon in Real Red and adhered it to my cover with tear tape on the front as well as the back of the cover. My Real Red Panel on the front measured 3 3/4 x 7 3/4". I positioned it in my scoreboard diagonally and scored every 1/2" for some interest to the cover. Over the Real Red Panel, I made a port hole by using circles cut with my Little B Circles Dies in both Night of Navy and Red Red. The Little B Circle Dies are super cool in that they can just cut circles or you can use a separate piece to cut the outer circle as well cut the holes inside the circle. My ship from Traveler was stamped in Night of Navy on Whisper White Cardstock and punched out with a 2 1/2" Circle Punch. The ship circle was adhered with multipurpose glue onto the Red Circle, and the Red Circle was adhered with dimensionals onto the Night of Navy circle and then glued with Multipurpose Glue onto the Front of the Notepad Cover.
Here's a look at the inside of the Notepad...
I hope you've enjoyed my projects. Next up on this hop is my friend
Megan Thompson and I know she'll have something awesome to share with you.. she always does! Just click the next button!
In case you've lost your way, here is a list of all of our talented Bloggers..
1.
Ginger
2.
Maggie
3.
Elizabeth
4.
Martie
5.
AJ
6.
Raquelle
7.
Wynne
8.
Marisa
9.
Justin
10.
Renee
11.
Dena
12.
Andrea Tucker
13. Tina Riddle - You are here!
14.
Megan Thompson
15.
Kim Smith
16. Lori Mueller
Here are the Stampin' Up! Products used:
Non Stampin' Up! Products Used:
Little B Circle Dies (Joann's)
Note Pad (Michaels)
Thanks so very much for stopping by! Blessings! Tina


