Saturday, March 31, 2018

Happy Easter My Friends..Easter Card using WPlus9 Modern Calla Lilies and He Is Risen

Hello My Friends!  I want to wish you all a Very Happy Easter and share an Easter Card I made using two awesome stamp sets from WPlus9.  I adore the palm branches and calla lilies in the Modern Calla Lillies Stamp Set and the sentiments in He Is Risen is the perfect compliment!


The background paper is from a 6x6" Paper Pack from Altenew called Reflection.  It has some of the most gorgeous papers and I probably should pick up another pad before it is no longer available!

Below is a quote that I saw on Facebook and loved. It is so true!  


Again Happy Easter and I hope you have time to spend with your family and contemplate what God has done for us!  Blessings, Tina

Thursday, March 29, 2018

A Paper Pumpkin Thing Blog Hop May Good Things Grow


Hello and Welcome to A Paper Pumpkin Thing Blog Hop highlighting the fabulous March PP Kit called May Good Things Grow!  This is probably one of my very favorite kits!  So many fabulous options with this one!!  

I'm not sure how you change things up with a Paper Pumpkin kit, but I always start by making a card or project as kitted first.  This gives me an opportunity to decide what I love about the kit first.  I have to tell you that this month was so awesome as designed but it was also very versatile and had so much product that allowed for a lot of options!  


I was all over the place with this kit!  I could have made cards forever!  lol

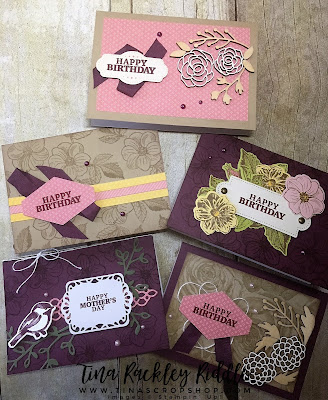
I made some cards that strictly used items from the kit, others added a punch and one added a stamp and die bundle.


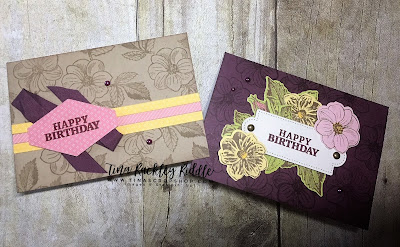
If I were to have a nickname it would likely be Tone-on-Tone Tina!  lol  I love using that technique for a fun background.  In these two pictured cards, I used stamps from the kit to stamp the background.  On the card on the left everything was from the kit with the exception of the Tailored Tag Punch used for the sentiment and the Fresh Fig and Crumb Cake Ink.  The card on the right was exclusively Kitted Product except for the addition of the Fresh Fig Ink. 


The card pictured above used products from the kit except for the addition of the Fresh Fig Ink for the sentiment. I loved the gift of the wooden elements from the kit  So much fun!


This had a little more added with the stamped bird from the Petal Palette Stamp Set and cut out with the Petals and More coordinating dies.  The greenery is from the same die set as was the strip behind the label die.  I also added the Fresh Fig Ink as I did more Tone-on-Tone Stamping for the background.  I added some of the enclosed White Twine across the top of this one.  I love twine!

Thanks so much for stopping by!  Blessings, Tina


Blog Roll:


Wednesday, March 28, 2018

PCC286 Sketch Challenge with Concord & 9th Hi There Bear!

Hello and Happy Hump Day!  I'm back over at the Paper Craft Crew with a card for a new fun sketch!  Hope you'll stop by and check out all of the Design Team's Inspiration!

Here's the sketch..


Believe it or not, I didn't stray too far from the sketch this time.. Gasp!  It's a miracle!  lol


This was a quick and super easy card with the help of a premade card base, a piece of DSP, and coordinating Cardstock and a little stamping with the fun Concord & 9th Hi There Bear Stamp Set.    Sometimes a fun simple card can be a lot of fun and help you to feel like you've accomplished something quickly.  I love these card bases and will certainly be super sad when I've used them all! 

Have a wonderful day and a great week!  Blessings, Tina


Tuesday, March 27, 2018

SIP #143 Basket of Flowers with Concord & 9th Posie Fill In and Banners & Blooms Bundles

Hi There! Hope you're week is off to a fantastic start!  This week at Stamp, Ink, Paper we have a fun new theme Challenge called "Basket of Flowers"  


My Basket of Flowers is definitely a "loose" interpretation!  lol  


I just got this adorable Concord & 9th Posie Fill In Bundle and I really thought the background looked a lot like a basket.... That's my story and I'm sticking to it!  lol  I stamped the Background on SU Crumb Cake Cardstock tone-on-tone with Crumb Cake Ink.  The edges were sponged with Crumb Cake Ink as well.  Since I stamped it on Crumb Cake all of the Flowers and Leaves were stamped and/or die cut separately and glued on.  Actually some of the flowers were popped up on Dimensionals.  I used Old Olive for the stamped Leaves and the card base.  The foliage diecuts were cut out of a scrap of Mossy Meadow (retired SU) cardstock.  The flowers were stamped with Blushing Bride onto Pink Pirouette Cardstock.  The center was stamped with Flirty Flamingo and I used a scrap of Rose Red behind the die cut center.  The banner was from the Banners & Blooms Bundle.  I'm determined to have a LOT of birthday cards this year.  I never seem to have enough.  

Thanks so much for stopping by!  Blessings, Tina

Wednesday, March 21, 2018

PCC285 Color Challenge - Coffee Because Adulting is Hard!

I've had a heck of a couple of days at work.  Today I was finally introduced to my new boss and 5 co-workers were fired all in the same day.  I really didn't have a lot of inspiration tonight to make a card for my Design Team project for Paper Craft Crew but somehow I pulled it together..  Here are the colors for the challenge.  You can pick 3 of these if you'd like to enter this week!


So my inspiration came from what else.. coffee!  I love coffee and today adulating really did seem hard so this is what I came up with.


The coffee cups were from a Gina Marie Coffee Stamp Set.  The Coffee Die and the Adulting is Hard Sentiment are both from Cas-ual Fridays Coffee Cup Fri-dies and Coffee Talk Stamp Set

The water coloring was done with Distress Inks at first.. Mustard Seed, Peacock Feathers and Dusty Concord.  I made the shadows with Zig Clean Color Markers and then darkened up the purple and turquoise with them as well.  

Thanks for stopping by!  Blessings, Tina

Tuesday, March 20, 2018

SIP #142 Color Challenge - Gray, Aqua and Lime!

Hello and Happy Tuesday!  Hope your week is off to a great start!  I'm back over with my friends at Stamp, Ink, Paper with my take on a color challenge this week!


My goal this week was to use some stamp sets that I have NEVER used!  I'm embarrassed to say there are a lot of those never inked stamp sets..... too many!!! 

So for this card I used a FSJ bundle called Dreams Follow for the butterflies and flowers.  The "hello" die is from Concord & 9th's Everyday Bundle.  I thought the peek through of the words showing the gray was a good way to bring more of the gray into the card.  

I hope you have a wonderful day!  Blessings, Tina


Sunday, March 18, 2018

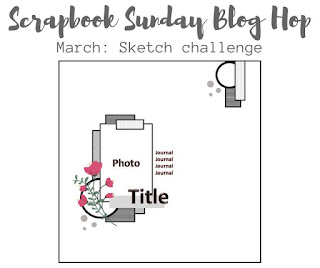
March Scrapbook Sunday Blog Hop with Sketch Inspiration!

Hello and welcome the March Edition of Scrapbook Sunday Blog Hop! This month we have a very cool scrapbook page sketch to inspire you!

So I ordered one of those DNA kits from Ancestry.com a couple of months ago and I recently received my results along with some DNA matches of probable 3rd and 4th cousins.  It was all very interesting so I decided to start a Family Tree on their website.  One thing led to another and before you know it I was about 5 hours into it one evening and was mesmerized by all of the information available on their website.  One of the coolest things that I saw was a scanned copy of my Grandparents wedding license... how awesome is that??!!  As I was deciding what photo to use on my page I ran across this picture of those same Grandparents at their 50th Wedding Anniversary and was excited to use it!  


Of course I'm still using the fabulous Sweet Soiree Embellishment Kit!  It was perfect for adding some fun cake and floral layers to my page.  Since the picture is an old one I really wanted to give the page a subtle vintage background look.  I used Crumb Cake to sponge the edges and used stamped off Crumb Cake and Powder Pink to stamp the new SAB "Eclectic Expressions" images on the background.  I pulled out the awesome Number of Years stamp and Die set for the 50th anniversary title..... I love this set!!!  I also used the Celebrate You Thinlits for the "amazing" over the 50th Anniversary because anyone that makes it to a 50th must be amazing!

Thanks so much for stopping by!  Below is our blog roll with all of the other Bloggers listed.. remember you are at Tina Riddle's blog now so just click the next in line.


Blog Roll..


Tuesday, March 13, 2018

SIP #141 - Sketch Challenge with SU This Little Piggy

Hello and Happy Tuesday!  I hope you had a wonderful weekend and that your week is off to a fabulous start.  It was a messy rainy softball weekend for us.  We drove to Chattanooga to watch our sweet Taylor Rose play ball.  She loves softball so much and is really improving every year!  This was her first tournament this season and had a really good start!  Of course after my hubby, my kids and grandkids, scrapbooking and card making are definitely filling up my spare time.  This  week I'm back over at Stamp, Ink, Paper with a Design Team Card for this week's challenge.  

What a fun sketch right?  So many possibilities with this one!  I decided to finally use a stamp set that had never been inked up... This Little Piggy by Stampin' Up!  I've seen so many adorable cards with it so it's hard to believe I've never used it!


I stamped my adorable flying pig with SU Archival Black Ink onto Bristol Smooth Cardstock.  I love Bristol Smooth for light watercoloring where you aren't saturating the cardstock too much!  I used a watered down TH Distress Oxide in Spiced Marmalade and Picked Raspberry for my pig.  The wings were pretty watered down so they were a pale pink.  After the wings dried I used some Clear Wink of Stella to add some glittery shine to them.  I also used some watered down TH Peacock Feathers for the sky.. it was a very light wash.  After everything was dry I used SU Layering Square Framelits to cut it out as well as a black scallop tap and a larger layer of Powder Pink.  I used one of the Tutti-Frutti Cards as my card base.  I stamped the sentiment on the bottom with my Stamparatus to make sure that I got a good dark impression.  I have to tell you that I LOVE my Stamparatus.  At first I was a bit skeptical since I already had a Misti that I used most all of the time.  There are so many cool things you can do with the hinged lid that makes it an awesome value.  The stamping plates on the top and side are also very thick and make it easier to get a good dark stamped image.

Thanks so much for stopping by!  Blessings, Tina

Thursday, March 8, 2018

OSAT Blog Hop Happily Ever After


Hello!  Can you believe it's already the second Thursday in March??  It's time for another One Stamp At A Time Blog Hop!  This month's theme is Happily Ever After and I'm sure that means different things to different people.  When I think of happily ever after I think of a wedding that joins two people together with the intent of living the rest of their life happily together!  So with that in mind, I made a wedding card and a mini treat bag that I will use as a gift card holder!


I have to admit that when I first saw the Petal Palette Stamp Set I wasn't sure if I loved it... well let me tell you I do now!  It is absolutely awesome!  So many great sentiments and so many possibilities!  I really REALLY hope that Stampin' Up! will keep this one around!  It is perfect for a Wedding card, a Congratulations card, a Love You card, Thank you card, and it goes on and on and on!  I seriously think this is my favorite stamp set!  


I finished the inside by just adding the congratulations sentiment and part of the branch die from the Petals & More Thinlits Dies cut in the awesome Painted with Love Specialty Designer Series Paper.

Thanks so much for stopping by!  For a list of the products used, please see directly below the blog roll.  You are at Tina Riddle's blog now so to continue on, just click on the next blog!


Blog Roll...


Product List

Tuesday, March 6, 2018

SIP Challenge #140 - Four Legged Friends with Hero Arts Raining Cats & Dogs

Happy Happy Tuesday!  Is your week going well so far?  We've had soooo much rain lately but we did have a really nice weekend and nice weather on Saturday and Sunday.  We were so happy to see the sun!  Of course now, it's raining again but at least the two days of sun gave our lawn a chance to dry out a little bit!

Well you know it's Tuesday!  Time for another Stamp, Ink, Paper Challenge!  This week it's a Four Legged Friends Challenge and you know I'm all about dogs.. lol  I did throw in a cat for good measure!  I actually love cats too but our dogs don't. :(


I thought I'd do something I rarely do... make a shape card.  I used the Hero Arts Nesting Clouds Infinity Dies. This adorable stamp and die set as well as the Nesting Clouds Infinity Dies, were add ons for a My Monthly Hero Kit last year and the adorable rain stencil was part of the kit!


I love that the dogs have their tongues out... no doubt lapping up some of that rain that is coming down.  lol  I used 110# Neenah Classic Crest Solar White Cardstock for my card base.  I cut two of the cloud shapes out but I used my scoreboard to score a little line at the top of the back card to allow the top to swing open.  I used some Tombow Multipurpose Adhesive to adhere the top of the cloud panels together.  I cut another cloud out of Vellum and heat embossed the sentiment on it.  I used my rain mask and some Peacock Feathers Distress Ink and an Ink Blending Tool to add my rain.  I stamped my dogs and cat onto Bristol Smooth Cardstock with Versafine Black Onyx Ink and then clear embossed them.  I used my Zig Clean Color Real Brush Markers to color them and as you can see.. I didn't add a lot of color... just enough that they weren't completely plain.  I used my Plus Permanent Vellum Glue Tape Dispenser to adhere my vellum in a few places.  I'm really loving that it works pretty well and hardly shows.  I do try to cover up the adhesive when possible but it is more invisible than most adhesive for vellum.

Thanks so much for stopping by!  Blessings, Tina

Thursday, March 1, 2018

A Paper Pumpkin Thing Blog Hop - Wildflower Wishes


Hello!  Hope you are doing well!  I'm super excited to be hopping in A Paper Pumpkin Thing Blog Hop showcasing the fabulous February Wildflower Wishes Kit!  If you have already been hopping you should have been landed here from Lori Mueller's fabulous blog.. she is so talented!   If you are starting here, please make sure that you click the next button at the end of my post to continue on for some awesome inspiration!  

Seriously, wasn't the Wildflower Wishes Paper Pumpkin Kit awesome!!!!  I usually make one or two cards as kitted and then decide what I love about the kit and how I want to shake things up.  Well for this kit, there is so much to love!  Those small florals are sooo cool and I LOVED the sentiments!  I went all Sahara Sand and Basic Black crazy with my alternatives this month!  


This is the first card that I made.  I started out by stamping randomly all three of the small floral images tone-on-tone onto the Sahara Sand Panel.  I also sponged some of the Sahara Sand Ink around all of the edges and ran some of the Linen Thread around the panel three times and knotted it.   The Lots of Labels Framelits Dies were used to cut a matt in Basic Black for the Die-Cut Friend Sticker.  I adhered the Matted Friend Panel with Dimensionals.  I threaded more of the Linen Thread through one of the True Gentleman Buttons and tied it into a bow.  It was adhered with glue dots on the left side of the Friend Label.  I stamped the "hello sweet" in Archival Black Ink onto a scrap of  Sahara Sand Cardstock and sponged the edges of it with Sahara Sand Ink prior to matting it with Basic Black Cardstock.  I adhered the matted sentiment strip with Tombow Multipurpose Glue.  


This was super simple and may be my favorite card.  I splattered a bit of Basic Black Ink on the Sahara Sand Cardbase with my Stampin Write Black Marker before I did anything else.  I then stamped one of the front panels from the kit tone-on-tone with the "thank you" sentiment twice.  I then stamped it as well as the "so much" with Archival Black Ink.  I cut this out with one of the Layering Squares Framelits Dies and cut a matt of Basic Black with a scallop square from the same set.  I used some Fast Fuse to adhered my strip of  5/8" Burlap Ribbon.  The matted square was mounted over it with Dimensionals.  So easy and so cute!


The next two cards encorporated some of the Detailed Dragonfly Thinlits Dies.  I told you I was Sahara Sand and Basic Black crazy on these!

Thanks so much for stopping by!  Please make sure you click the Next button so you can continue on to Monika Davis' amazing blog!  You'll be so glad you did!


In case you've lost your way.. Here's the entire Blog Roll!


  1. Sara Levin
  2. Kimberley Morris
  3. Melissa Thomas
  4. Kelly Acheson
  5. Candy Ford
  6. Jenny Hall
  7. Melissa Davies
  8. Dena Rekow
  9. Pam Staples
  10. Andrea Tracy-Tucker
  11. Lori Mueller
  12. Tina Riddle ----That's Me!
  13. Monika Davis
  14. Rachel Tessman
  15. Maria Willis
  16. Jennifer Hill