Tuesday, December 29, 2020

The Spot Challenge #143 - Sketch Challenge with Stampin' Up! Sweet Strawberry Bundle and Berry Blessings SAB Stamp Set

 Hey Friends!  I hope you had a wonderful Christmas weekend and if you are like me, you are ready to say goodbye to 2020!  What a year we've had! The last Card Challenge over at The Spot is a sketch that is super easy to use and sparks lots of creativity!  Check it out!


So many options for this fun sketch, right??

I used the Sweet Strawberry Bundle (Sweet Strawberry Stamp Set and Strawberry Builder Punch from the upcoming January - June 2021 Mini Catalog along with the Sale-A-Bration Bundle (Berry Blessing Stamp Set and Berry Delightful DSP! Both of these bundles are available to Demonstrators to preorder now and will be available to Customs on January 5th.  The SAB bundle is free with a $100 purchase and it is soooo good!  many of the Strawberry images from the DSP will punch out with the Strawberry Builder Punch!  Both of these bundles are must haves in my humble opinion!


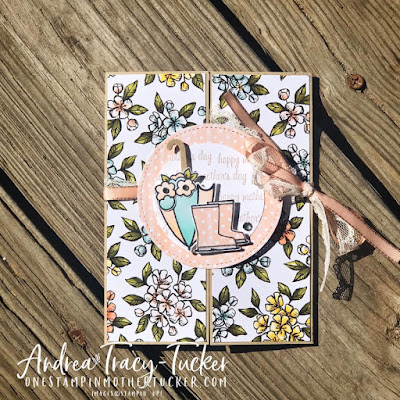
Fun card, right?  My card base is a 8 1/2" x 5 1/2" half sheet of Thick Whisper White Cardstock that was scored at 4 1/4" for a top folding landscape card.  I adhered a strip of the fun SAB Berry Delightful DSP onto a panel of Garden Green Cardstock and then used a Stitched Rectangle Die to cut the panel out.  The blueberry image was stamped on a scrap of Whisper White Cardstock by first stamping the outline of the leaves in full strength Garden Green Ink and then stamping the fill in with Garden Green that had been stamped off for a 2nd generation inking.  The blueberry outline was then stamped in Pacific Point Ink full strength and then the fill in image was 2nd generation Pacific Point.  I stamped the Sentiment with Pacific Point and then used the largest of the Stitched Shape Dies Circle Die to cut it out.  I used the Layering Circle Dies to cut out a large Pacific Point Scallop Circle to matt the Stitched Circle Die. On more scrap Whisper White, I stamped the Strawberry from the Sweet Strawberry Stamp Set in Poppy Parade full strength for the outline and 2nd generation for the fill.  The leaf and the top to the strawberry were both stamped in Granny Apple Green for the outline and filled with 2nd generation for the fill.  Both the large and small flower were stamped using Pacific Point for the outline and then filled in with 2nd generation fill images.  I used the Strawberry Punch for the Strawberry Parts and the small flower and used the Medium Bloom Punch for the larger flower.  The strawberry and leaf were added to the Stitched Circle using Multipurpose Liquid Adhesive and the flowers were popped up with Mini Dimensionals.  I ran some linen thread around the DSP layer and let it slightly layer over the edge of my circle die cut.  To finish up my card front I added three Poppy Parade Embellishments from the All the Trimmings Embellishments (currently on clearance from the Holiday Catalog).  

Here's the inside of my card..


I started with a Stitched Rectangle Panel of Whisper White Cardstock.  I stamped the Blueberry image the same way as I did on the outside of the card but for the strawberry, I punched all of the parts out from the Berry Delightful DSP.  The Strawberry was adhered with multipurpose liquid glue onto the panel.  The sentiment was stamped in Pacific Point Ink and the panel was then adhered with Stampin' Seal Adhesive.  Simple and pretty I think.  

If you aren't accustomed to using sketches to kick start your creativity, I hope you'll give this one a try.  I can't wait to see what you come up with!  Blessings, Tina


Tuesday, December 22, 2020

The Spot Challenge #142 - Black and White with a Pop of Color!

 Good Morning!  I'm finally back after a 2 week absence!  The last couple of weeks have been crazy for me and I couldn't find time to create or blog anything.  I always make cards for my co-workers for Christmas and I have been frantically attempting to finish them and get them handed out.  Although I'm totally OVER Christmas Cards, I have one more to mail out and didn't want to mail it until I blogged it for this challenge.  Barbara, I sure hope you get it by Christmas!


This week's Challenge is Black, White & a Pop of Color and I had this card in mind for my friend Barbara because of her love of Buffalo Plaid.


I recently purchased the Buffalo Check stamp from Stampin' Up!... not sure why I waited so long to purchase it but I am loving it!  This was a super easy card to create and has a lot of shimmer and texture in person.  I started with an 11" x 4 1/4" Basic Black Card Base that was scored at 5 1/2".  I added a layer of Whisper White (4 1/8" x  5 5/8").  Over that was a 4" x 5 1/4" piece of Whisper White that had been stamped with the Buffalo Check stamp in Memento Tuxedo Black Ink.   I used my SU Stitched Rectangles (2nd to largest) to cut  out a window in the panel.  For the background I used a panel of Basic Gray Carstock and used my SU Blending Brushes to ink blend some Memento Tuxedo Black Ink onto the panel keeping it darker around the edges and lighter in the middle.  I then spritzed on just a little bit of water and then splattered on some clear Wink of Stella.  From the panel that I cut out, I punched two Christmas Trees using the Pine Tree Punch.  I added those two with Multipurpose Adhesive.  I stamped another scrap of Whisper White with the Buffalo Check Stamp with Real Red Ink and punched it out with the Pine Tree Punch and then popped it up with Dimensionals.  The sentiment was stamped in Memento Tuxedo Black Ink onto a thin strip of Whisper White Cardstock and attached to the card front with Mini Dimensionals across the bottom of the card.  I added a small piece of the Whisper White Polka Dot Tulle Ribbon at the top left with a piece of Black and White Baker's Twine (from the Playful Pets Trim Pack)  tied around it and adhered with a glue dot.  Finally I finished it off with three White Resin Dots from the Playing with Patterns Resin Dots assortment.  


For the inside, I utilized my November Paper Pumpkin Stamp Set to finish it up..


The Merry Christmas from the Paper Pumpkin Stamp Set was stamped in Real Red and the Wreath was stamped off the side of the 4" x 5 1/4" Whisper White Panel with Memento Tuxedo Black Ink to finish the card off.

Thanks so much for stopping by!  Have a wonderful Christmas and I'll be back with you soon!  I have a link of products used below.    Blessings, Tina


Product List

Tuesday, December 1, 2020

The Spot Challenge #139 - Case The Designer, Andrea Tracy-Tucker

Hi There!  I hope you had a wonderful Thanksgiving and hopefully a long weekend like I had!  I really needed the break!  I had a great time seeing my granddaughters and grandsons at my daughter's home in Knoxville.  It was beautiful weather and wonderful food but a really quick one day trip.  The rest of the weekend was time for the much needed down time.  

We have another fun challenge over at The Spot this week with a CASE of a card from on of our Design Team Members, Andrea Tracy-Tucker, or as she is known, One Stampin Mother Tucker.  


So first of all, I'll show you Andrea's card that I chose to case..


Isn't her card beautiful?!?!  I love Gate Fold cards and I loved the ribbon run around it to keep it closed so here is my card with the same concept.. hope you like it!


Other than the stamp set, DSP, and Cardstock, there were very few changes.  My card base was Gray Granite and I did matt the beautiful Peony Garden DSP with some Petal Pink Cardstock to help it stand out a little more.  I did use circles in the middle but I also used one of the Tasteful Labels Dies to Back them, then layered on a Stitched Circle from the Stitched Labels Dies and the smaller circle with the decorative edge was also from the Tasteful Labels Dies.  I love stamping sentiments on
circular die cuts because you can just move the circle to make the stamping level. The small Peony image is from the Prized Peony Bundle.  I stamped it with Gray Granite Ink onto Whisper White cardstock and colored it in with Petal Pink and Mint Macaron Blends and then cut it out with the coordinating die.  I used the Label Me Fancy Punch to punch the slits on the side of the Large Petal Pink Tasteful Labels Die cut.  I loved how Andrea ran both ribbon and lace around her card so to get the same feel, I used Whisper White Polka Dot Tulle Ribbon.  I love how it turned out!

Here's how I finished off the inside..


I stamped the peony onto a Whisper White panel with Petal Pink Ink that had first been stamped off for a lighter look.  The sentiment was stamped over it in Gray Granite Ink.  I then cut the panel with one of my Stitched Rectangle dies and then matted it on Petal Pink Cardstock and adhered the layers onto my Gate Fold Card Base.  

Thanks so much for stopping by today!  I have the products linked for you below.  

Blessings, Tina


Product List

Tuesday, November 24, 2020

The Spot Challenge #138 - Sketch Challenge with Stampin' Up! Cherish The Season Bundle

 Hi There and Happy Tuesday!  Are you ready for Thanksgiving yet?  It's just 2 days away so hopefully you are.  Everything is so odd this year with Covid-19 still playing such a huge part of today's social culture.   I play on going to my daughter's home on Thursday.  It's a little over a 3 hour drive but so nice to have it at her home and not have to worry about doing it all myself like I did for so many years.  


Are you ready for a sketch challenge over at The Spot.  I think we have a fun one this week.  It's funny how you can look at a sketch and immediately know what you want to use with it.  This week the Stampin' Up! Cherish The Season Bundle came to mind immediately!


Of course those circles could represent so many things but I thought ornaments or bells would be perfect so that's just what I used.


Such a pretty but simple layout.  I love sketches!  So I started off with a Shaded Spruce 8 1/2" x 5 1/2" card base that was scored at 4 1/4" for a book fold card.  my top layer was a piece of the Heart Warming Hugs DSP in Real Red that was cut 3 3/4" x 5 1/2".  I layered on some of the bells die cut from the Brushed Metallic Cardstock.  I ran the dies that had cut outs of the holly again in both Shaded Spruce and Real Red and paper pieced the holly leaves and berries back into the die cuts.  I used some linen thread to loop through the bell hooks and ran it to the back of the card front panel and taped them on the back.  I cut a few of the Pine Sprigs out in Shaded Spruce and attached them with glue with glue dots at the top of 3 of the bells.  The sentiment was stamped in Shaded Spruce on Whisper White Cardstock and then cut out with on of the Stitched Rectangle Dies and then added with Dimensionals on the left side of the card front.  Finally I cut a piece of Shaded Spruce just a touch wider than the top layer (3 7/8" x 5 1/2") and then layered it under the card front and attached it to the card base.  Such a simple design but I think I nailed the sketch.. hope you agree!  If you are interested in any of the products used, I have them linked below.  Thanks for stopping by!

Have a blessed day and a Wonderful Thanksgiving!  Tina


Product List