Thursday, November 30, 2017

A Paper Pumpkin Thing Blog Hop Back in Plaid


Hello and Happy Thursday!  I hope you've been having a wonderful week!  It's time for some awesome Paper Pumpkin Alternative Design inspiration... I hope you're ready!  Both the October and November 2017 Kits were awesome!!!  I think they have been two of my all time favorites!  If you've already been hopping today, you should have landed here from the fabulous blog of Kimberley Morris and I thank you for continuing!

The super cool thing was that both the October and November Kits coordinated and both were seriously fabulous kits!  Since I didn't hop in October (I was on a cruise), I'll show you my alternate cards with the October kit first.


Both of the alternate cards with the October kit were super easy.  Sometimes easy is good!

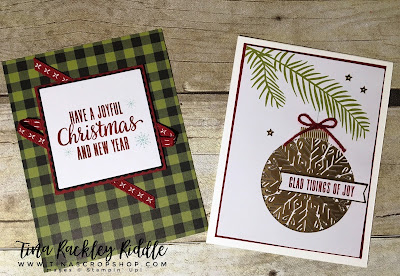
The design of the November kit is to make Stockings.. all super adorable just as designed!  With the tag, stamp set, and Cherry Cobbler twine,  I made a card and an alternate stocking layout. 


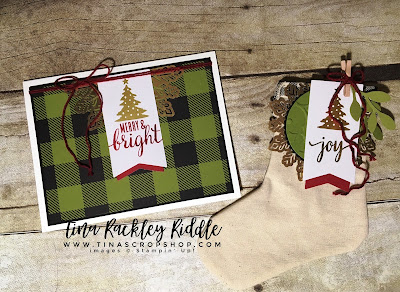
I love that the plaid DSP from the Merry Little Christmas DSP coordinates with the kit as well!  Since the tree on the tag was embossed in gold, I thought the addition of the gold foil snowflakes worked perfectly.  I also loved the idea of adding a pop or two of Cherry Cobbler.  

Next up is none other than the Crafty Yogi, Audra Monk!  Just click the next button and you'll be there for some more awesome inspiration!


Below is a list of all of our Hoppers in case you've lost your way:

  1. Sara Levin
  2. Rachel Tessman
  3. Kimberley Morris
  4. Tina Rackley Riddle - You are here!
  5. Audra Monk
  6. Rick Adkins
  7. Jennifer Hill
  8. Kelly Acheson
  9. Megan Thompson
  10. Lori Mueller
  11. Monika Davis
  12. Dena Rekow
  13. Andrea Tracy-Tucker
Thanks so much for stopping by! Blessings, Tina

Wednesday, November 29, 2017

PCC270 Sketch Challenge, Monochromatic with Lawn Fawn Stitched Ornaments

Hello and Happy Hump Day!  I think after only working 2 days last week that this week will never seem to end!  Oh well, work during the day and craft at night... that's the way I roll!   It's Wednesday so that means another Paper Craft Crew Challenge!  What do you think of this sketch??


I took one look at this and immediately saw Christmas Ornaments!  Of course you know I still have Christmas Cards to make so you knew it would be something to do with Christmas! 


I love this Black and White Christmas Pine Patterned Paper from FSJ so that's where I got my inspiration!  I decided that I wanted to make my ornaments black, white and shades of gray or silver.  These Lawn Fawn Stitched Ornaments Dies were perfect to make use of all of my colors.   I absolutely love how it turned out!  It looks even more beautiful in person!

Thanks so much for stopping by!  Blessings, Tina

Tuesday, November 28, 2017

SIP Challenge #127 - Wrap It Up! Tags My Monthly Hero November 2017 Hero Arts

Hello and Happy Tuesday!  I hope you had a wonderful and hopefully long Thanksgiving Weekend!  I had a wonderful and super long holiday and I am so thankful we were able to spend it with most of our children and grandchildren.  We are truly blessed! 

This week's challenge at Stamp, Ink, Paper is All Wrapped Up and is all about packaging or tags.  For me this was a really cool challenge because I had recently received my November My Monthly Hero Kit from Hero Arts that had lots of tag stamps and dies along with a ton of sentiments!


Here are my super cute tags....


I adore these little tags.  They are so cute, they could be ornaments!  I made most of them into shakers as the dies in the kit had shapes that were perfect to cut out the inside.  For the tree, I used some Lucy's Things "Little Things Rainbow Jewels"  that I thought worked perfectly for the ornaments.  The kit was wrapped up with some twine that I used for some of the tags.. for the others I used some Red and White twine from my stash.  

Here's a look at the back of the tags.... 


I kept the back simple in that I stamped the exact image as the front but added the To and From Shape to the back so that I can write the names on it.  I have lots more of these to make but I love how these first few turned out!  I hope you love them too!

Thanks so much for stopping by!  Blessings, Tina


Wednesday, November 22, 2017

PCC 269, Very Vintage Stampendous Snowy Postcard Stamp

Hello and Happy Thanksgiving Eve. Tomorrow is the day.. I hope you have the Turkey bought!  We aren't having Turkey this year.  Honestly I didn't really intend to cook.  The last couple of years we have gone to Cracker Barrel with the kids that were in town on Wednesday night to have our Thanksgiving.  Everyone just has so many places to go that it seemed silly to spend so much time cooking a huge meal for the kids to spend 1 or 2 hours and leave to eat someplace else.  Well this year I decided I wanted to try cooking again but this time I will cook on Wednesday instead of Thursday and I'm not making a thousand dishes this time.  So I've bought a ham, and will be making homemade macaroni and cheese, sweet potato casserole, corn casserole and green bean casserole.  Those are usually the most requested dishes by the kids!  Hopefully keeping the menu a little more simple and having it on Wednesday will be a great combination and will work out well!

Well since it is  Wednesday, that means another Paper Craft Crew Challenge.  This one was super easy and a lot of fun.  It's a Very Vintage Theme and that's one of my favorite styles!


I used the Stampendous Snowy Postcard Stamp on this one.. it is perfect for a Vintage Look!

I started off by Stamping the Snowy Postcard Stamp onto Crumb Cake Cardstock with Early Espresso Ink.  Once I stamped it, I used an Aqua Painter and some Old Olive Ink to color in the Houses and Holly Leaves as well as the oval ring around the scene.  I sprayed the edges with water and used my finger nails to distress the edges.  I used a heat tool to dry it and then used the aqua painter to color the edges with more of the Old Olive Ink.  I then sponged some Crumb Cake Ink onto the front to age it.  I stamped the retired French Script Stamp in Mossy Meadow Ink (also retired) onto Old Olive Cardstock.  I distressed the edges of this layer the same way I distressed the edges of the top layer.  I used craft glue to adhere slightly skewed the Snowy Scene onto the Old Olive layer.  I tied a piece of Tan Lace around the two layers and then adhered them both to an Early Espresso A2 Card Base.  After deciding that the left upper corner needed some love, I cut some Pine Boughs out of Wild Wasabi Cardstock using the Take A Bough Die set from Concord and 9th.  I sponged the edges with Old Olive Ink and then adhered them with Ranger Multi Medium Matt.  I used a Gina Marie Pine Cone Die set to cut out the small pine cone.  The bottom layer was Chocolate Chip Cardstock and the upper layer was Soft Suede.  I sponged some Soft Suede Ink over the top of the Pine Cone and adhered it over the Pine Boughs with Glue Dots.  I know that had a lot going on.. thanks for hanging in with me on it!  

Thanks for stopping by and have a Blessed Thanksgiving!

Tuesday, November 21, 2017

SIP Challenge #126 - Thankful with My Monthly Hero from Hero Arts

Hello and Happy Tuesday!  I hope you're ready for Thanksgiving because it's just 2 days away!  This week's Challenge over at Stamp, Ink, Paper is all about Thankful, Grateful, and Blessed.  I decided since I was finished with my Thanksgiving Cards that I would make a Thank You.  After all when you are Thankful for someone or something, you often say Thank you, right??  

http://stampinkpaper.com/?p=3487


Finally I used the My Monthly Hero Kit from July 2017.  I had previously only used one image and wasn't exactly sure how much I liked it.  Well ..... I LOVE it!  Some of the cutest images!  I just adore this little pitcher and the bouquet of flowers is just perfect in it.  I honestly had part of this card already made.  I have a drawer that I keep half made cards in.  Am I the only one that starts a card and then gets on a completely different track and ends up with partially made cards?  Well I do it a lot.  For this one I had the Early Espresso Base done with a layer of Old Olive embossed with the Layered Leaves Dynamic Textured Embossing Folder.  I also had the strip of the Early Espresso Chevron DSP matted in Early Espresso Cardstock on the partially done card.  So what I did was add some of the light pink DSP matted on a scrap of Early Espresso.  I used my bone folder to pry open a section of the already adhered strip so I had room to tuck the new strip under the old one.  Once through, I adhered the right side down first.  I then added some Natural thread on the left side three times around and then tied it into a bow.  I used some Multi Medium Matt to adhere the bow down and then used some craft glue to adhere the left side of the new strip down.  I heat embossed my Thank You sentiment in White on the top of the Chevron Strip.  Both the flowers and the pot were first inked with Versamark and then with Soft Suede Ink onto Neenah Classic Solar White Cardstock.  I then clear embossed them.  I used my Stampin' Blends to color both the flowers, leaves and the planter and then used the coordinating dies to cut them out.  I adhered them all with 3M Foam Tape.  Finally I decided that the planter needed grounding so I cut a small section of a White Doily and adhered it with Multi Medium Matt.  I finished it off with 3 Espresso Pretty Pink Posh Sequins!

Thanks so much for stopping by!  Blessings, Tina

Wednesday, November 15, 2017

PCC268 Sketch Challenge with Gina K Designs Festive Foliag!

Hello and Happy Hump Day!  I'm super excited to be back at Paper Craft Crew this week with my take on a super fun sketch!  There are soooo many possibilities with this one.. take a look!


How fun is that??!!  I decided since I did the spotlighting technique on mine and had stamped pine branches and cones that mine didn't really need the banner.  


The stamp set I used was one I bought last year from Gina K Designs.. it's called Festive Foliage by Claire Brennan!  I used it for so many of my cards last year and I do believe it will be used for quite a few this year as well!  It has some awesome Christmas foliage images as well as sentiments!  I used my Misti to stamp the images with SU Sahara Sand Ink onto Neenah 110# Classic Crest Solar White Card Base.  Once I had it stamped on the card base, I stamped it on a piece of Whisper White Cardstock again in Sahara Sand.  I then used a sponge dauber to add SU Chocolate Chip, Early Espresso, Old Olive, and Mossy Meadow (retired) inks to the stamp as well.  I used the SU Layering Circle Framelits to the section that I wanted to spotlight and added an Old Olive small scallop border (also from the same die set).  The sentiment was added at the top on the right in Old Olive Ink and then Versamark and clear embossed.  I used a 3/4" x 5 1/2" piece of  Merry Little Christmas DSP in an Old Olive pattern.  I ran some Natural Thread around the strip of DSP and tied it in a small bow and then added the circle layer with the spotlighted design over it.  I used my scissors to snip the overhanged portion off from the back of the card.  Lastly.. as usual, I added a few Pretty Pink Posh 4mm sequins in Espresso with Multi Medium Matt adhesive.   

Thanks so much for stopping by!  Blessings, Tina


Tuesday, November 14, 2017

SIP #125 Color Challenge with Stampin' Up! Vintage Leaves

Hello and Happy Tuesday!  Hope you are having a fabulous Fall weather week.  Today is of course another Stamp, Ink, Paper Challenge and is my very last Fall Card of the year!  Take a look at the Challenge Graphic.. it really does scream fall to me!


I decided considering the colors in the challenge that it would be a perfect time for one last card to mail out for Thanksgiving.  I used the incredible Vintage Leaves stamp set from Stampin' Up! but the
sentiment is from the retired Lighthearted Leaves stamp set.  I love this sentiment and can't seem to part with this set!  All of my stamping was done on one layer of Watercolor Paper.  I used the smooshing technique to smoosh some Pumpkin Pie, and Daffodil Delight Ink onto the watercolor paper and dried in between layers with my heat tool.  Once completely dry I ran my embossing buddy over the front of the card.  I used my Misti to stamp the leaves and Sentiment first in Versamark and then in Early Espresso.  I then heat embossed all of the stamping with clear embossing powder.  There ending up being just alittle more white on the stamped panel than I wanted so I took a sponge and a little bit of Daffodil Delight Ink to fill in the other areas.  I used my Lil' Inker Stitched Rectangle Dies to cut out the stamped panel and layered on a skinny layer of Early Espresso Cardstock.  All of that was mounted to a A2 card base of 110# Neenah Classic Crest Solar White Cardstock.  Lastly I added a few sequins from Pretty Pink Posh to finish it off.

Thanks so much for stopping by!  Blessings, Tina


Tuesday, November 7, 2017

Pallet Birthday Card with Concord and 9th Petals and Pallets Bundle

Hello and Happy Tuesday evening!  I wanted to share my Pallet Card made with the Concord and 9th Petals and Pallet Bundle and the Happy Balloons Bundle!


I loved the idea of a Pallet Sign Card!  Pallets are so popular now. After I cut two pallets out of Kraft Cardstock, I used the coordinating wooden plank stamps in SU Crumb Cake Ink to add the woodgrain.  I heat embossed the Forever  Young sentiment in Black to make it stand out.  The Celebrate Balloon and Birthday Wishes banner were stamped in Black on Soft Sky Cardstock.  Those were both from the Happy Balloons Bundle.  I cut out the banner prior to stamping the sentiment... I found that made it easier.  To finish it off I added some Doodle Bug Sequins and some Natural Thread for the Balloon String.    I love how it turned out.   Hope you do too!  Have a wonderful day!

Blessings, Tina

SIP #124 Girls Night Out with Stampin' Up! Half Full

Hello and Happy Tuesday!  I hope your week is off to an awesome start!  Since it is Tuesday that means another Stamp, Ink, Paper challenge and this time it's all about Girls Night Out!  

I finally got the opportunity to use my Stampin' Up! Half Full Stamp Set.  I have a few friends that are all about wine so I why not start on Christmas Cards for our card swap!  


This one was pretty simple with just a little bit of coloring.  I stamped the glasses onto Kraft Cardstock with using my Misti and the Creative Corners to align the wine glasses.  I used two light colored pencils to color in the white wine.  The larger wine glass was stamped with Memento Tuxedo Black Ink onto Neenah Classic Crest Solar White 80# cardstock.  I used the Stampin' Blends Markers in Cherry Cobbler to color in the wine and the berries and in Old Olive for the holly leaves.  Both the large wine glass and the berries were fussy cut.  I used my Stampin' Write Basic Black marker along the edge of the fussy cutting so that the white would not show.  The DSP used is from the Stampin' Up! Quilted Christmas 6x6" paper stack.... I love these prints!  The larger splats are of course from Gorgeous Grunge (Retired).  The smaller splats are from my Cherry Cobbler Stampin' Write Marker.  I remove the top and pull the brush edge against the edge of the top to make the splatters.  


Here's how I finished up the inside.....


Thanks so much for stopping by!  Blessings, Tina

Thursday, November 2, 2017

OSAT Blog Hop - Winter Holiday

Hello and Happy Thursday!  I hope you are having a fabulous day!  I'm super excited to be joining my friends for the November One Stamp At A Time Winter Holiday Blog Hop!


If you've already been hopping you should have landed here from Jenny Hall's fabulous blog and thank you for continuing on!  If you are starting with me you'll want to be sure you stop by every blog for some awesome Winter Holiday Inspiration.  As for me.. Christmas is where it's at!  It's that time of year where most of us celebrate the birth of Jesus.  For me Jesus is the reason for the season!


Here's my card and project...


I love the Good Tidings Stamp Set from Stampin' Up! and thought it looked amazing with the Plaid Paper from the Christmas Around the World DSP.   The "Merry Christmas" banner was from the Santa's Sleigh Stamp Set.  I used Washi Tape to omit inking with Versamark the "wishes" from "Merry Christmas Wishes".   Then heat embossed the sentiment in White.  I also added a few Pretty Pink Posh Onyx Sequins because of course you have to have a little bling!


Here is the inside of my card...


I couldn't help but use the Merry Musical Specialty Paper on the inside.  I loved the sheet with "Deck the Halls" and thought it went perfectly since I had a Bough of Holly on the card.   

For my project I used a mini pizza box as a treat box and used more of the Merry Musical Specialty DSP matted in black on the top and all of the sides.  I used the same size oval framelits to make my tag and the same Good Tidings stamp set to make the tag.  I love using circle framelits or oval framelits to make tags by punching a hole on one of the sides.


Thanks so much for stopping by!  The next stop on the hop is amazing Rick Adkins!  Just click the next button and you'll be there!