Tuesday, August 25, 2020

The Spot Challenge #125 - Sketch Challenge with Stampin' Up! Gnome For The Holidays

 Hi there!  Hope you are doing well this week!  I have finally used the adorable new Gnome For The Holidays Stamp Set this week.  It's been stacked on one of my craft tables for a week or so and every time I have seen it I knew I had to find a chance to use it soon.  It is just too adorable!  This week's sketch challenge over at The Spot seemed like the perfect opportunity!


Here's this week's Sketch..


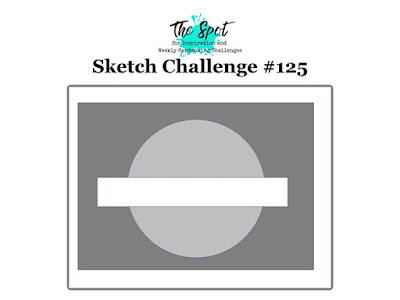
I absolutely LOVE this sketch!  There are sooo many possiblities but as I said.. I need to ink up my Gnome For The Holidays Stamp set so here's what I made..


So I was thumbing through my Snowflake Splendor DSP when I saw this gorgous watercolored snowflake background, I was in loooooove!  It is absolutley gorgeous!  I used a Pacific Point 5 1/2" x 8 1/2" cardbase, scored at 4 1/4 for a top folding landscape card.  I matted my gorgeous DSP with a thin layer of Whisper White Cardstock and ran some of the beautiful Pool Party 3/8" sheer ribbon around the panel after it was attached to the card base.  I did a watercolor wash with Balmy Blue Ink onto a piece of Fluid 100 Watercolor Paper.  Once dry, I used the largest of the Stitched Circle dies to cut it out.  The circle was attached with dimensionals onto the card front.  The gnomes were stamped onto  a scrap of Whisper White cardstock with Basic Gray Ink and colored in with my Stampin' Blends.  I used my paper snips to fussy cut the gnomes out and attached them to the circle with Multipurpose adhesive. I stamped the "you're a freind like gnome other" sentiment in Pacific Point ink onto a strip of Whisper White Cardstock and attached with Multipurpose adhesive over the gnome's feet and with a mini dimensional on each side of the circle.   Such a quick and easy card except for the little bit of coloring with my blends.  I find coloring pretty relaxing so I stamped them earlier and then brought them into the living room while Jeff and I were watching tv and colored them.  Multi-tasking at it's best.  I should have stamped multiple while I was coloring.... right?

Thanks so much for stopping by! If you are interested in any of the products used, there is a link up below to all of the products.   Blessings, Tina

Product List

Tuesday, August 18, 2020

The Spot Challenge #124 Color Challenge with Mint Macaron, Cinnamon Cider and Blackberry Bliss

 Hi There!  I hope you're having a great week!  I'm back over with the rest of The Spot Design Team today with my take on a color challenge!


Although all of these colors are gorgeous, I was a bit stressed with using them together.  All in all, I am happy with how it turned out although it took me just a bit out of my comfort zone!


If you have followed me much, you may have noticed that I've used the Tasteful Touches Bundle a zillion times!  It's funny how it wasn't even a bundle that spoke to me when I first looked at the new annual catalog but I absolutely LOVE this stamp set and coordinating label dies.  So if you are tired of me using it.. I'm sorry but I just seem to be drawn to it!

Here's the details on my card...

Mint Macaron Top folding card base 11" x 4 1/4", scored at 5 1/2" 
Blackberry Bliss cardstock layer 4" x 5 1/4" embossed with the Dainty Diamonds 3D Embossing Folder
Stamp Set:  Tasteful Touches
Dies:  Tasteful Labels Dies, Forever Flourishing Dies
Floral Stamped Image stamped in Blackberry Bliss and colored in with Blackberry Bliss and Cinnamon Cider Stampin' Blends and fussy cut.
Label cut out in Whisper White with design stamped in 2nd generation Mint Macaron and the sentiment stamped in Blackberry Bliss.  
Forever Flourishing Greenery was cut in Mint Macaron and Cinnamon Cider.

Thanks so much for stopping by!  Blessings, Tina


Product List

Thursday, August 13, 2020

OSAT Blog Hop - New Beginnings with Stampin' Up! Press On Stamp Set


Hi There and Welcome to the One Stamp At A Time Blog Hop for August 2020!  This month's hop is based on a New Beginnings Theme!  It can be anything from a new year in school, new job, new marriage, new parents, etc.  I decided to make a card and treat holder for my husband who will finally going back to work in a few weeks after being off work for ankle surgery!  It's going to be like starting over for him for sure as he was completely off of his left foot for about 2 months.  He just got his cast off and is doing physical therapy to gear up for his return to work!  I chose to use the awesome new Press On Stamp Set because quite frankly Coffee is "our" thing.. well actually Coffee and Dogs!  When Jeff and I first met about 13 years ago, we met for coffee.  We loved it then and still love it now!   The Dogs came after.  We've  had as many as 5 and currently have 4 that are all either rescues or Granddogs that we are raising.. which really makes them rescues too! 


So here's my card that I am absolutely head over heels over!  I started out with an Early Espresso 11" x 4 1/4" card base, scored at 5 1/2" for a top folding card.  I added a 4" x 5 1/4" panel of the Tis The Season DSP in a Real Red Plaid... so pretty!  Next was the fun part!  I pressed some Early Espresso Ink onto a Large Clear Block and spritzed it several times with water.  I then pressed the block onto a piece of the Fluid 100 Watercolor Paper and let it sit a few minutes.  After I removed the block, I added some salt and allowed it to sit a few more minutes and then spritzed it again and heat dried it with my Heat Tool.  The salt absorbs some of the liquid and produced speckling on the watercolor background.  It's a beautiful look and I loved it for my background.  Once the panel was completely dry, I used the 2nd largest of the Stitched Rectangle Dies to cut my panel and then adhered over the DSP with Liquid Multipurpose glue.  I cut one of the largest circles from the Layering Circle Framelit Dies out of Early Espresso Cardstock and Heat embossed the sentiment in White.  I cut the scalloped circle in Real Red from the same framelits to back the Early Espresso Circle.   On a scrap of Whisper White Cardstock, I stamped my To Go Coffee Cup in Early Espresso.  I used Crumb Cake light and dark Blends to color in the cup and then fussy cut it.. I promise this is super easy to fussy cut or I would not have attempted it.    I also stamped the same image onto a scrap of the Poinsettia Place DSP and fussy cut the sleeve to place over the cup.  I ran a piece of Real Red1/8"  stitched ribbon from the Playful Pets Trim Combo Pack around the front of the card and knotted it on the left side.  I added the Circle focal image with Dimensionals on the back of the top and bottom of the circle, avoiding the ribbon.  Oh and then to ground the cup, I colored under it with my Bronze Stampin' Blends.  I couldn't stand it floating

Here's how I finished off the inside of the card...


I love the font in the Press On sentiment and I added some of the coffee beans stamped in the lower right side to finish off the inside.

I'll add some treats to this adorable little mini Paper Pumpkin Box for him as well..


I added some panels of Real Red Cardstock along all of the sides of the box.  On the top I added a panel of the Poinsettia Place DSP backed with a layer of Real Red Cardstock.  For my tag I heat embossed the "hope your day is full of perks" sentiment in Whisper White onto Early Espresso Cardstock. I punched it out with the Label Me Lovely Punch and used the Label Me Fancy punch to punch the little hole in the top.  I ran some more of the 1/8" Real Red stitched ribbon around the box and through the tag and tied it into a bow.  On a piece of scrap Whisper White cardstock, I stamped the image with the small To-Go Coffee Cups and then fussy cut one of them out and added it to the bottom of the tag.  I used my Crumb Cake light and dark blends to color in the diagonal stripes on the cup.  

Such a fun little set and super easy to create!  If you don't have this adorable Press On Stamp Set and you're a Coffee Person.. then you sure need it!  

To continue on  and check out all of the amazing projects by the Blog Hop Design Team, just click on the name directly under mine. Remember you are at Tina Riddle's Blog now.  


Product List