Wednesday, May 31, 2017

PCC246 Sketch Challenge with SSS You Matter and SU Detailed Dragonfly Thinlits Dies

Hello and Happy Wednesday!  This week seems to be flying by for me!  As usual since this is Wednesday, It's time for another Paper Craft Crew Challenge.  This week is another fun sketch for you to check out!  


I used one of my favorite sentiment stamp sets from Simon Says Stamp "You Matter"with the coordinating "You" Die.  I also used the Stampin' Up Detailed Dragonfly Thinlits Die for the first time.  I love dragonflies so I'm not sure why I had not used this before!


I used Gold Cardstock to cut out my You Die as well as the Dragonfly Die.  The "are the best" sentiment was heat embossed in white on Soft Suede Cardstock to match the matting and the SU Designer Series Paper.  The lace trim and white ribbon are SU Retired Ribbons from my stash.

Thanks so much for stopping by!  Blessings, Tina

Tuesday, May 30, 2017

SIP #101 Graduation Challenge with Concord & 9th Enjoy it All!

Hello and Happy Tuesday!  I guess to many of us it feels like a Monday after the Memorial Day Holiday!  I love long weekends and I love when I have time to spend with family.  Since it is Tuesday, that means it's time for another Stamp, Ink, Paper Challenge!


This one through me for a loop.  I wanted to make a card that was different than ones I've made in the past.  I have a basket on my craft table that I have my most recently purchased stamp sets and as I was thumbing through them two stamp sets were calling to me!  Concord & 9th Stamp Set "Enjoy It All" with the coordinating "Detailed Blooms Dies"  and Butterfly Reflections, Ink "Hashtag" Stamp Set.  Here's my card that I plan on giving to my Daughter-In-Law that will be graduating in December.


I mean, after you've been in College for four years, graduation day is a Happy Day, right?  I love the bold Oh happy day sentiment with the smaller #WINNING!  There was another hashtag that I thought about using.L.... #NAILEDIT.  I feel like I'm going to get a lot of use out of both of these sets!

Thanks for stopping by!  Blessings, Tina

Products Used:

Concord & 9th Enjoy It All Stamp Set
Concord & 9th Detaled Blooms Die Set
Butterfly Reflections, Ink Hashtag Stamp Set
Lil' Inker Designs Stitched Rectangle Dies
Stampin' Up! Perfect Plum Cardstock
Stampin' Up! Basic Black Cardstock
Stampin' Up! Very Vanilla Cardstock
Stampin' Up! Perfect Plum Ink
Stampin' Up! Wisteria Wonder Ink
Stampin' Up! Pink Pirouette Ink
Stampin' Up Blushing Bride Ink
Altenew Frayed Leaf Ink
Altenew Forest Glades Ink
Versamark Ink
Stampin' Up White Embossing Powder
Pretty Pink Posh 6mm Ballerina Pink Sequins

Thursday, May 25, 2017

A Paper Pumpkin Thing May 2017 Blog Hop

Hello!  Can you believe this is my third post this week!  When that happens it's either a miracle or a blog hop.. and yes it is a blog hop!  


This is A Paper Pumpkin Thing  Blog Hop and we're all about alternative ideas for the May 2017 Sprinkled with Love Paper Pumpkin Kit!  If you have already been hopping you should have landed here from Carolynn Sander's blog and thank you so much for continuing!  If you started with me please click the next button at the end of the post to continue on for all types of awesome inspiration!


So I have to be honest.... this month was a struggle.   I honestly loved all of the projects in the kit and thought they were perfect as designed.   I finally decided that the blue round cardbase looked like a wreath but wasn't cut like one so I took my circle framelits and cut a whole in the front.  I added a white circle on the inside and heat embossed the "you make me oh so very happy" sentiment in gold.  I stamped centers in four of the flowers.  I added three flowers on the left side of my wreath with dimensionals.  I tied a piece of the gold twine into a knot around the left side of the wreath and tied a messy layered bow onto the knotted twine.  I added three of the included confetti dots to the front.  For my treat bag I stamped the "for you" sentiment on one included blue banners.  I cut the top edge straight and added a twine bow like the one on the wreath.  I added one of the flowers and three more of the confetti dots.  I attached the banner with a small wooden clothespin.  

Thanks so much for stopping by!  Please click the next button to continue to Rachel Tessman's blog!


Here is a list of all of our fabulously talented bloggers in case you lose your way:

  1. Kimberly Morris
  2. Melissa Davies
  3. Sara Levin
  4. Carolynn Sander
  5. Tina Rackley Riddle - You are Here!
  6. Rachel Tessman
  7. Rick D. Adkins
  8. Megan Thompson
  9. Lori Mueller
  10. Audra Monk
  11. Cathy Caines
  12. Pam Staples
  13. Jennifer Hill
  14. Andrea Tracy-Tucker
  15. Dena Rekow
  16. Monika Davis -

Wednesday, May 24, 2017

PCC245 Tic-Tac-Toe Challenge with Concord & 9th Flourish Stamp Set

Hello and Happy Wednesday!  I'm not going to lie to you.  This week's Paper Craft Crew Challenge was a challenge for me!  It is an awesome Tic-Tac-Toe but for some reason everything wasn't coming together for me. Does that ever happen to you?  It is so frustrating!  Here's the Tic - Tac-Toe..


For some reason I think I was overthinking this one.  I finally went straight down the middle with Enamel Embellishments, Favorite Stamp Set and Flowers!


Now I'll confess again.. I love this Concord & 9th Flourish Stamp Set but when I started stamping I realized I had no clue what I was doing.  I've seen some awesome cards made with it but I was at a loss how it all comes together.  So... I stamped off the side so I could put parts of it together. lol  As soon as I finished my card I went to the Concord and 9th YouTube Channel and watched this video!  And it turns out I didn't make any of my flowers right!  lol    So what did I do?? I altered the flowers!  Here is my new card.. Which do you prefer?


I love the texture that the stamps have when layering them so my pick is definitely the 2nd one!  Well there you go.. learn from my mistakes!  


Thanks a bunch for stopping by!  Blessings, Tina

Tuesday, May 23, 2017

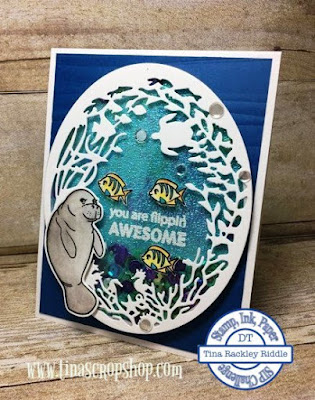
SIP #100 Card Maker's Choice with Hero Arts Manatee Stamp & Cut

Hello and Happy Tuesday!  I hope today is wonderful and brings you many smiles!  I'm super excited about Stamp, Ink, Paper's #100th Challenge!  It's my favorite type of challenge.. Card Maker's Choice.  Make whatever you want and post it!  How cool is that!


The other part of the challenge I'm super excited about is using my new Hero Arts Manatee Stamp & Cut .  I love the Hero Arts My Monthly Hero Kits and this was one of the Add-ons for the month of May!  It is such an stamp set!  The Hero Arts Reef Border Frame is another of the Add-ons.  It is currently sold out and I'm so happy that I got it before it did!


For the card base I used an 11" x 4 1/4" piece of 110# Neenah Classic Crest Solar White Cardstock scored at 5 1/2" for a top folding card.  My next layer is a 4" x 5 1/4" piece of Fun Stamper's Journey Huckleberry Fusion Cardstock that was dry embossed with We R Memory Keepers Next Level Wave Embossing Folder.  I cut the Hero Arts Reef out of more of the 110# Neenah Classic Crest Solar White cardstock.  I used the outer oval ring to also cut some Window Sheet for my shaker.  I attached the reef to the window sheet with FSJ Craft Glue.  I then added some Stampin' Up! Foam Adhesive Strips around the outside edge of the window sheet.  For my shaker background I heat embossed in white the sentiment onto some of the fancy ice blue paper that was in my Hero Arts kit.  I added the sequins inside the shaker window and attached tghe ice blue embossed paper to the back.  I stamped my Manatee and fish with Versafine Black Onyx Ink onto Strathmore Bristol Smooth Cardstock.  Once the ink was set, I used Zig Clean Color Markers to color the images in.  I attached the fish with mini glue dots and the Manatee with Foam Tape.  Lastly I added a few Pretty Pink Posh Clear Sparking Confetti.  I hope you like it as much as I do!  That Manatee is my new favorite!

Have a wonderful day!  Blessings, Tina

Thursday, May 18, 2017

Just For Fun.. Beautiful Happiness FSJ

Random Post.. lol  I have been playing around with the Fun Stamper's Journey Beautiful Happiness Stamp set.  It is super fun with lots of great sentiments.  Here's a card and small shadowbox framed art I made.  I know it's a little wild.. but I like it. lol  I used Tim Holtz Distress Inks for all of my coloring and ink blending.  The Cardstock is Bristol Smooth Cardstock since it handles the water well.  The sentiments were stamped in Versafine Tuxedo Black ink and then clear embossed.


Have a wonderful weekend!  Blessings, Tina

Wednesday, May 17, 2017

PCC244 Sketch Challenge - FSJ Beautiful Happiness

Hello and Happy Hump Day!  Is it Summer where you live yet?  Today it was in the high 80's and it seemed even hotter!  I have the feeling it is going to be a long hot summer.   Well since today is Wednesday it is time for another Paper Craft Crew Challenge.  This week's sketch is super fun!


Isn't this one awesome??  So since I am all about some watermelon during the hot summer I decided to use the Fun Stamper's Journey Beautiful Happiness stamp set for this one.  I decided to turn the sketch upside down for my card!


I started with a 5 1/2" x 8 1/2" FSJ River Stone cardstock base that was scored at 4 1/4".  I added a 5 1/4" x 4" piece of Strathmore Bristol Smooth Cardstock.  I did a little messy watercolor wash with Tim Holtz Fired Brick Distress Ink.  I added a few splatters of FSJ Cranberry Silk and then dried it with my heat tool.  I added some Silver Journey Thread.  I stamped my Watermelon and Leaves with Versafine Onyx Black Ink onto more of the Bristol Smooth Cardstock.  I used Tim Holtz Fired Brick, Crushed Olive, and Peeled Paint Distress Ink and my Aqua Painter to color my watermelon and leaves. I used a Black medium tip marker to color in the seeds and then added a little Glossy Accents to them.  I added a bit of Garden Green SU Ink to the leaves to distinguish them from the watermelon a bit.  I fussy cut out the melon and leaves and attached with foam tape over the thread.  The sentiment was stamped in Versafine Onyx Black onto more of the FSJ River Stone cardstock.  I clear embossed it and then cut it into three strips.  That was all for this wild and crazy creation.  

Thanks so much for stopping by!  Blessings, Tina

Tuesday, May 16, 2017

SIP #99 - Packaging K-Cup Holder

Hello and Happy Tuesday.  Hope you had a wonderful weekend and if you are a Mom, I hope you had an awesome Mother's Day!  We have a wonderful weekend and as always, they are too short!  Today I'm back with a Design Team Project for Stamp, Ink, Paper for a Packaging Theme Challenge!

I finally found directions for a project I've wanted to make for a while now....a K-Cup Holder! 


I had searched Pinterest for a K-Cup Holder for a while and finally found one.  Instead of giving you directions myself, I'll send you to the blog of Ruth Norton at Ruth's Stamping Corner.    For directions from Ruth Norton's Blog click here!  On mine I used Fun Stamper's Journey Watermelon Fusion Cardstock and Doodlebug Cream and Sugar Patterned Paper.  The circle was cut from Stampin' Up! Stitched Shape Framelits.  I added some Doodlebug Latte Love Sprinkles Shapes to my stitched circle.  The ribbon was from my endless stash.  I think it turned out super cute!  

Thanks so much for stopping by!  Blessings, Tina

Thursday, May 11, 2017

OSAT May Clean and Simple Blog Hop


 Hello friends!  Welcome to the One Stamp At a Time May Clean and Simple Blog Hop!  If you've already been hopping you should have landed here from the amazing Anna Smith's blog!  If you started with me, you'll want to make sure you hop all the way through and check out all of the fabulous cards and projects!  

Is Clean and Simple your style?  Well it honestly is not mine but I'm beginning to love it more and more.  Of course I always love everyone else's CAS cards... just not always my own!  


I started with an 11" x 4 1/4" piece of Stampin' Up! Bermuda Bay Cardstock scored at 5 1/2" for a top folding card.  My next layer was 3 7/8" x 5 1/8" SU Basic Black Cardstock and the Top Layer was Neenah Crest Solar White 80# cardstock.  The Doily is from the May Fun Stamper's Journey Bloom Box.  The stamp set is called Decorative Doily.  I stamped it in Versamark on Neenah Crest Solar White #80 cardstock and heat embossed it in White.  I used Tim Holtz Peacock Feather Distress Ink and an Ink Blending Tool to color in the image starting in the middle and working my way out so that it was darker in the center and lighter on the outside edges.  I used the coordinated dies to cut it out and and added it to my white layer and cut off part of the right side.  The sentiment is from Stampin' Up! Dragonfly Dreams.  It was heat embossed in white onto a thin strip of  SU Basic Black cardstock and adhered onto the doily with a thin strip of foam tape.  I finished it off with three Pretty Pink Posh Onyx Black Sequins.  I really love the simplicity of this one.  


For my gift card holder I used the Little B Gift Card Holder Die set to cut out a piece of 80# Neenah Crest Solar White Cardstock.  I folded the score lines and used FSJ White Liner Tape to adhere the sides.  My Doily was the smallest from the FSJ Decorative Doily Stamp Stamp Set.  I stamped it in Versamark  on more of the 80# Neenah Crest Solar White Cardstock and Heat embossed it in White.  I used Tim Holtz Peacock Feathers Distress Ink and an Ink Blender to color in the doily and then cut out with the coordinating dies.  I layered it onto a SU Black Stitched Circle from the Stitched Shape Framelits Dies and then a piece of Bermuda Bay Cardstock cut with the Circle Layering Framelits.  The small banner was dry embossed with "For You" and was part of the Little B's Gift Card Die set. I know it's a little card to see the embossed letters.  They did not photograph very well.. Sorry.

Thanks so much for stopping by!  I hope you'll continue on by clicking next.  You'll not want to miss the fabulous blog of Maria Willis! She's a Stampin' Rock Star!


Here a complete list of our bloggers in case you've lost your way!
  1. Jessie Holton
  2. Tina Rackley Riddle - That's Me!

Wednesday, May 10, 2017

PCC243 - Sketch Challenge with FSJ Make Lemonade

Hello and Happy Hump Day!  I'm over with the Paper Craft Crew today with a Design Team card for a new sketch.  I'll be honest that at first I wasn't sure that I loved this sketch but by the time I was done with my card.. I really did!  What do you think of this sketch?

http://papercraftcrew.com/?p=6004

I think the thing I wasn't crazy about was that top banner that was going back towards the left.  My original thought was to put the sentiment there but I usually prefer my sentiment banners to go from left to right.... silly I know.  I guess I'm a creature of habit.  Well I finally decided that didn't have to be a sentiment and I was fine with it.   Here's my card....


I have to tell you that the water colored lemon slice looks much better in person.  It really did not photograph well.  The card base was Fun Stamper's Journey Lemon Grass Cardstock.  The next layer was Stampin' Up! Daffodil Delight.  I stamped the lemons tone-on-tone in Daffodil Delight on the background.  I added some retired Stampin' Up! Nice Cuppa Lemon DSP for both of my banners and matted them in more of the Lemongrass cardstock.  I used the Stampin' Up! Stitched Shapes Framelits Dies to cut my square.  I used Versafine Black Onyx Ink to stamp my sentiment and then clear embossed it.  My lemon was stamped on Bristol Smooth Cardstock and colored with an Aqua Painter and  Zig Clean Color Markers.  I used a button from my stash and some FSJ Gold Journey Thread for my bow.  I added some bling from my Pretty Pink Posh Sparkling Clear Confetti Mix.

So for the inside the stamp set had so many options... Make Lemonade?  Slice them up and make a Mojito?  Slice them up and Garnish?  Make Lemon Meringue??  How about... Keep them, they are free Lemons?  Aren't these adorable sentiments?  Well I went with the tried and true Lemonade one.


Thanks so much for stopping by!  Blessings, Tina

Tuesday, May 9, 2017

SIP #98 Kid's Birthday Card Challenge - Lil' Inker Apple of My Eye


Hello and Happy Tuesday!  I had a wonderful weekend visiting granddaughters so this week's challenge over at Stamp, Ink, Paper was an easy one!  This week it's all about Kid's Birthdays and I have lots of those cards to make for my grandchildren!  


One of the sayings I've always used to my granddaughter Taylor is "you're the apple of my eye" so  when I found this adorable Lil' Inker's stamp set I knew I had to have it!


I love the Lil' Inker  Apple Shaker Die Set that makes this adorable stitched apple!  I used Stampin' Up! Black Archival Ink to stamp the sentiment from the Lil' Inker Apple of My Eye Stamp Set on my apple!  One of the things that I added to make this one fun for Taylor is to add a Hampton Art Action Wobble Spring behind the apple.  I can just see Taylor playing with  it and asking everything about it.   She loves crafts and loves to make cards.  I had given her some of my Paper Pumpkin card kits and she has had so much fun.  I know she'll want some of these Wobble Springs now!  lol

Thanks so much for stopping by!  Blessings, Tina 


Wednesday, May 3, 2017

PCC242 Color Challenge Going Retro with A Nice Cuppa!

Hello and Happy Hump Day again.  Do you ever wait until the very last minute to make a card?   That's what I did today.  Why do I do that?  We have an awesome color challenge up over at Paper Craft Crew but for some reason once I finally sat down to work on it.. nothing was coming to me!  I finally went through some of my retired Stampin' Up! DSP and found some that I thought worked with the colors.  I do love these colors.. what do you think?


I went with the Reddish Pink, Pale Yellow and Deep Blue with my retro card.   Not only is it retired DSP but it's a retired Stampin' Up! Stamp Set called "A Nice Cuppa" and the coordinating Cups and Kettle Framelits Dies.


I decided to use retro cardstock for the base and layering.. Midnight Muse!  Once I picked out the DSP, and the cardstock, I just started layering this one up.  The sentiment is actually stamped in Midnight Muse Ink but I think on the yellow stripe DSP, it almost looks black.  Sometimes I think it's fun to pull out some old stuff and give it a little life.   lol

Thanks so much for stopping by!  Blessings, Tina

Tuesday, May 2, 2017

SIP #97 - Mother's Day Challenge with Stampin' Up! Perfect Mix

Hello and Happy Tuesday!  I hope everything is going well for you this week.  I had a nice relaxing weekend which made going back to work on Monday a bit easier.  We've had a lot of rain but hopefully that will bring forth some gorgeous May flowers!  My clematis and roses have already started blooming!  Jeff and I plan on doing some landscaping to our back yard this summer so I'll need to sit down and plan it out before we get started.  Planning it is the best part!  

Well since it is Tuesday, you know that means it's time for another Stamp, Ink, Paper Challenge and this week is all about Mother's Day!  


Have you ever seen a stamp set that you think is just so adorable that you have to have it.. well from the looks of my craft room, I see them all the time but Perfect Mix was one of those for me.  It's just an adorable stamp set with some cute sentiments.. some are even puns!  I love a good pun!

Here's how I used it today..


My card base is a SU Island Indigo 11" x 4 1/4" top folding card base, scored at 5 1/2.   I added a piece of 80# Neenah Classic Solar White Cardstock that was embossed with a Darice Woodgrain Embossing Folder.  The plaid paper on the bottom is Lawn Fawn Rainbow Perfectly Plaid.  I folded a portion of a doily over it.  I stamped everything on Bristol Smooth Cardstock with Black Versafine Ink and heat set it.  I then used my Zig Clean Color Markers and an aqua painter to color in my images.  I fussy cut the bowl, spatula and mixer and adhered them to the front with foam tape.   For the measuring spoons and sentiment I cut it out with the the SU square layering dies and cut a scallop border out of Island Indigo.  I stamped "Mom" from the SU Thoughtful Banners stamp set under the measuring spoons and adhered it on the upper right side with more foam tape.  I ran some Natural Thread across the top and tied it in a small bow in the upper left side.  I used the side of my scissors to add a little curl to the bottom of twine.  


The inside sentiment is from the Oh So Succulent Stamp set.  I added a strip of the same plaid paper that I used on the front to the inside bottom.

Thanks a bunch for stopping by!  Blessings, Tina