Tuesday, July 28, 2015

SIP Challenge #7 - Color Challenge, You've Got This

Hi all, Hope you've been having a good week so far!  It's another Tuesday and that means a brand new Stamp, Ink, Paper Challenge!  This week we've got a fun color challenge for you!


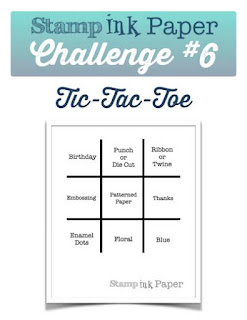
I love these colors but I had one problem.... I didn't have Pacific Point ink or cardstock!  What was I to do???  My friend Andrea reminded me that I had some of the Brights Collection Background DSP and man was I relieved!  I still wasn't sure how to use the Pacific Point DSP though without something else that coordinated with it.  Well here's what I came up with and I really did love how it turned out!


I decided to use the You've Got This Stamp Set and do some paper-piecing.  I started with an 11" x 4 1/4" card base scored at 5 1/2".  I layered on a 4" x 5 1/4" piece of the Pacific Point DSP from the Brights Background DSP stack.  I then cut a piece of 3 3/4" x 5" Sahara Sand cardstock that had been stamped tone-on-tone with the Hardwood Background Stamp in Sahara Sand Ink.  I stamped one flower on the left side of the hardwood background and used a Mossy Meadow Stampin' Marker to color in the stem and leaf.  I then stamped the flower with Memento Tuxedo Black ink several times onto the Daffodil Delight and Pacific Point DSP and fussy cut out the bloom only.  I layered one over the flower that I stamped onto the Hardwood and then began to layer other flowers around the sides and bottom of the hardwood.  I used a White wink of stella glitter pen in the center and then used a Black Medium Tip Faber Castell artist pen to outline the stamped portion so that it would stamp out a little more.  I then used embossed the I'm here for you sentiment in black in the upper right and then as usual I felt it needed something else so I threaded some linen thread into a Pacific Point button from the Brights Buttons and glued it onto a gathered piece of Sahara Sand Lace Trim.

Here are the Stampin' Up Products used:

Built for Free Using: My Stampin Blog


Thanks for stopping by!
Blessings,
Tina

Saturday, July 25, 2015

Every Cloud has a Silver Lining, right??

Hello and Happy Saturday.  Today I'm sharing a card I designed for a Card Class today.  One of the ladies had already bought the Tree Builder Punch and Sprinkles of Life Stamp set so I wanted to give her another option for it :)

One of my favorite things about the Photopolymer Stamp Sets is the ability to cure the sentiments.  In this card I used some of the new 2014-2016 Color Collection DSP in Mossy Meadow and hand cut a hillside and then curved the sentiment on my block and then stamped it in Mossy Meadow Ink.  I used the tree stamp and punch as limbs and cut the right branch off of the bottom one and the left branch off of the top on.  Instead of stamping my birds from the stamp set, I punched in the color dsp I wanted and drew in the eye, beak and wing.  For the clouds I stamped on Whisper White with Smoky Slate Ink.  I glued the bottom cloud down and used dimensionals on the top cloud.  I added some Silver Liquid Pearls on the bottom of both clouds for the silver lining.  

Here are the Stampin' Up Products Used:

Built for Free Using: My Stampin Blog


Thanks so much for stopping by!
Blessings,
Tina

Thursday, July 23, 2015

Still Christmas in July?? I think so!


Well after a couple of Christmas in July posts, this month, I think I may be in the mood to play around with some Christmas stamps a bit.


I used the Brick Wall Embossing Folder on Smoky Slate Cardstock for the background and instead of a door I wanted to make a window.  I used my MFT Stitched Rectangle Dies to make the frame.  In looking for something for the inside of the window, I found this cool Bohemian DSP that looked a lot like a wicker shade to me so I thought it would be fun to use.  The wreath was stamped in Garden Green and Cucumber Crush and the berries were various sizes of pearls that I colored with Red alcohol markers.  I love the way those berries turned out.

For the inside I used a thin strip of the Bohemian DSP on the right side and then added my sentiments from the Wonderous Wreath set onto my card.

Here are the Stampin' Up Products Used:


Built for Free Using: My Stampin Blog


Thanks so much for stopping by!
Blessings,
Tina

Tuesday, July 21, 2015

SIP Challenge #6 - Tic-Tac-Toe

Hello and welcome to Stamp, Ink, Paper's 6th Challenge!  This week we have a Tic-Tac-Toe challenge and it really is a fun one!  Just pick any three squares in a vertical, horizontal, or diagonal row and make a card with those elements!
http://stampinkpaper.com/2015/07/sip-challenge-6-tic-tac-toe/
For my Tic-Tac-Toe Card, I picked Birthday, Punch or Die Cut, and Ribbon or Twine to make a fun birthday card for a my son.  I tend to use a lot of black, white, and gray when making masculine cards but I thought it would be nice to throw a little color into this one.


I started with a 11" x 4 1/4" piece of Basic Black cardstock that was scored at 5 1/2".  On a 4" x 5 1/4" piece of Soft Sky cardstock, I sponged with Island Indigo Ink on the edges and a bit more into the upper part of the sky for some dimension and then adhered it over the Basic Black card base.  I punched out two clouds from my Tree Builder Punch and smonged them with just a little of the Island Indigo ink on the edges.  The bottom cloud I glued down and the upper cloud was attached with Stampin' Dimensionals.  For one of the die cut balloons I adhered some washi tape to white cardstock and cut it out with the balloon die.  For the second balloon I stamped it in Island Indigo Ink onto White cardstock.  I stamped "birthday" with versamark onto Smoky Slate Cardstock and embossed with White embossing powder.   I cut banner ends and then used my score blade on my Stampin' Trimmer to score it twice so the sentiment part of the banner stood up. The balloons were attached with Stampin' Dimensionals after Smoky Slate thick baker's twine was tied to the bottom of the balloon and knotted in the back.  the ends of the ballons were joined and knotted at the bottom of the card and a glue dot was placed under the knot.  That was it!  A really simple card but I think it turned out really cute!

For the inside, I used a layer of Smoky Slate cut 4" x 5 1/4" and adhered a piece of Washi Tape on the bottom.  I stamped a banner from the Celebrate today set in Island Indigo in the upper left corner. 

Here are the Stampin' Up products used:


Built for Free Using: My Stampin Blog


Thanks for stopping by!  Have a wonderful week!

Blessings,
Tina

Tuesday, July 14, 2015

SIP Challenge #5 - Christmas in July


Hello and Happy Tuesday!  Stamp, Ink, Paper has a super fun challenge for you this week...it's Christmas in July!  I don't know about you but it always seems like I wait until the last minute to get my Christmas cards made and mailed so I'm super excited to have a little inspiration early this year!  It also may be a little wishful thinking since the temperature has been running in the mid 90's here in Middle Tennessee! :)
http://stampinkpaper.com/2015/07/sip-challenge-5-theme/


Here's my card.. I know, I know, another Shaker card.  I've been on a Shaker Card roll lately.  I promise to quit soon, really soon....lol


So yep... I did it again, I decided to try a little shaker action for my Christmas Challenge Card.  I used the Classic set "Lovely as a Tree".  I absolutely love this stamp set and believe me it has been very well used over the last few years.  I used an A2 card base of Real Red and added a layer of Bermuda Bay cardstock that had been run through the Big Shot with a Tim Holtz distressed woodgrain embossing folder.  My window frame was made using some Spellbinders nested dies with a Window Sheet cut with the same dies and adhered to the back of my window frame.   My outdoor scene was made by cutting random hill shapes out of scrap cardstock and sponging the shadows onto Soft Sky cardstock by using Lost Lagoon Ink.  I then stamped the Pine Tree from the Lovely As a Tree stamp set with Midnight Muse ink in various places out of the sponged hills but using scrap paper to cover the areas that I didn't want stamped.  I used a little bit of Silver Wink of Stella on the borders of the hills as well as the trees.  After this was dry, I inserted some sequins in the window frame and used adhesive and fun foam to adhere the window frame to the background.  I then used Multi-purpose glue to adhere the frame to the card.  I cut some thin strips of Smoky Slate cardstock and ran it across the window a couple of times and and then used various candy dots for my Christmas Lights.  I stamped the Merry & Bright sentiment from the retired Good Greetings stamp set in Real Red onto Whisper White cardstock and backed it with Real Red cardstock with banner ends cut into both.  I adhered my banner with Stampin' Dimensionals onto the upper left corner of the window.


For the inside of my card, I sponged some of the Lost Lagoon Ink onto the right lower portion of my card and then stamped the Pine Tree again in Midnight Muse Ink.  I also stamped the sentiment from the Wonderous Wreath stamp set in Midnight Muse in the center of the card.

I've had a ton of fun looking at all of the SIP design team inspiration and I hope you have too!  Don't forget to head over to Stamp, Ink, Paper and link up your Christmas in July card!

Here are the Current Stampin' Up Products I've Used:


Built for Free Using: My Stampin Blog


Non-Stampin' Up Products used:

Spellbinders Nested Dies
Doodlebug Sequins
White Fun Foam
Tim Holtz Distressed Woodgrain Embossing Folder

Thanks so much for stopping by!


Blessings,
Tina

Thursday, July 9, 2015

OSAT BLOG HOP - CHRISTMAS IN JULY


Who's ready for Christmas! Well One Stamp At A Time is all about Christmas during this Blog Hop!
If you are hopping along, you should have landed here from the super talented 's Elizabeth Jeanne Thatcher's blog.  I'm sure you've enjoyed her projects and are ready to see what I have for you today!


I decided to shake things up a bit and make a shaker card using White Christmas!  I absolutely LOVE this stamp set and I'm so happy that they brought it back in the new Stampin' Up! Catalog!  I had some fun using my new MFT Zig Zag Square Dies for my window and adhered it as well as the window sheet onto die cut Smoky Slate Cardstock that had been stamped tone on tone with Smoky Slate Ink.  I used die cut fun foam to make my shaker window and put some white and silver Doodlebug sequins inside.  My background for inside the shaker window was A White Christmas Tree scene and snow flakes that were heat embossed in white onto Soft Sky cardstock.  I stamped my snowman onto whisper white cardstock and colored in his carrot nose as well as his hat and scarf and then fussy cut and gluded onto my background.  I used some Lawn Fawn Stitched Hill Dies cut onto Whisper White cardstock to layer on for my snow covered hills. 

For my second project I made a Gift Card Holder and a Coordinating Mini Treat Bag as packaging for the Gift Card Holder.  


I used the Brights Collection Background DSP in Real Red for the Stampin' Up! Mini Treat Bag.  I made a belly band out of Smoky Slate and some Red Ribbon from my stash on the belly band as well.  I then added some Whisper White Twine and a Brights Collection Green button was tied onto the left front side of the belly band.  The gift card holder was made using Little B's Gift Card Holder Die set.  The embossed "For You" on the banner was part of the Gift Card Holder Die set as well.  I cut it out in Smoky Slate and adhered a belly band of the Real Read Background DSP on it as well.  I added a strip of Real Red that was embossed with the For You die.  I banner cut the end and adhered it to the front of the card after adding some Whisper White Twine.  I then added a Garden Green DSP Tree cut with another of the Little B's dies.  I adhered it to the gift card holder with Dimensionals.

I hope you've enjoyed my projects and I know you'll want to hop along and see what our next Blogger has for you!  Just click the Next button and you'll be at the next stop, which happens to be the awesome blog of my tremendously creative friend, Andrea Tracey-Tucker!

http://onestampinmothertucker.blogspot.com/2015/07/osat-blog-hop-christmas-in-july.html

Following is a list of all of the Hoppers on our Christmas in July Blog Hop:

  1. Maggie Mata 
  2. Kim Smith 
  3. Elizabeth Jeanne Thatcher 
  4. Tina Rackley Riddle  (You are here!)
  5. Andrea Tracy-Tucker 
  6. Andrea Pancrazio 
  7. Debra Vance 
  8. Wynne Grob 
  9. AJ Bodine 
  10. Megan Thompson july.html
  11. Holly Stene 
  12. Martie Pollard 
  13. Ginger Pelfrey
  14. Diane Squires 
  15. Marisa Gunn 
  16. Lori Mueller
  17. James Weber 
  18. Justin Krieger

Here are the Stampin' Up! Products Used on my projects:


Built for Free Using: My Stampin Blog


The Non-SU Products Used:  Little B's Gift Card Holder Die Set, Lil' Inkers, Fun Foam, MFT Zig Zag Stitched Square Dies, Doodlebug White and Silver Sequins, Lawn Fawn Stitched Hills

Thanks so much for stopping by! 

Blessings,
Tina


Tuesday, July 7, 2015

SIP Challenge #4 Inspiration Challenge

Hello and Happy Tuesday!  Hope you've been staying dry in your neck of the woods.  There's been quite a bit of rain and some pretty bad storms through Tennessee the last few days.  Today I'm back over at the Stamp, Ink, Paper Challenge Blog with an Inspiration Challenge!
http://stampinkpaper.com/2015/07/sip-challenge-4-inspiration/

This beautiful Inspiration Picture is from my friend Andrea's Wedding. Those flowers were absolutely gorgeous!  


I decided since the picture was from a wedding, that I would make a wedding card for a sweet friend at work that is planning her wedding.  I started with an A2 110# Neenah Crest Solar White Cardbase. I layered on a 5 1/4" x 4" piece of Daffodil Delight cardstock that was embossed with the Spring Flowers embossing folder.  I glued on a piece of Blushing Bride Chevron Ribbon on the left side of the yellow layer and then adhered it to my card base.  I cut a piece of Pink Pirouette cardstock with my My Favorite Things stitched circles die as well as a smaller circle in Whisper White cardstock.  I stamped my circle of leaves from the "Your Perfect Day" stamp set on the whisper white in Garden Green ink.  I then stamped some flowers on it in Daffodil Delight and Blushing Bride.  I punched out 4 Daffodil Delight and 4 Pink Pirouette flowers out from scrap cardstock and inked the edges tone on tone.  I added them to the circle of leaves with glue dots and added Basic Pearl Jewels into the middle of both the stamped flowers and the punched flowers.  I also used Daffodil Delight to stamp the sentiment into the middle of the circle.  I layered the circles with Stampin' Dimensionals and adhered them to the card.  I made a bow of Whisper White Seam Binding and adhered to the bottom of the Chevron Ribbon with White Twine.  I topped the bow with a rose that was cut from Blushing Bride Flower Trim.  I really love the way it turned out!

Here are the Stampin' Up Products I used:

Built for Free Using: My Stampin Blog


The Non-Stampin' Up! Products used:

My Favorite Things Stitched Circle Die Stax

Thanks so much for stopping by!

Blessings,
Tina

Wednesday, July 1, 2015

ICS Blog Hop - Butterflies Are Free

Hello and welcome to another Inspire, Create, & Share Blog Hop.  If you've been hopping along, you should have landed here from Joni's blog!


This month's hop is all about butterflies.  Stampin' Up! has sooo many awesome stamp sets with butterflies that it was really hard to chose which set to use.  I ended up going with the Kinda Ecclectic set that although current, is not a new one.  I haven't used it much and I thought it was about time I did!

I used a standard A2 card base in Bermuda Bay.  My top layer is Whisper White.  I stamped the sun in the upper left corner in Hello Honey and then sponged a little So Saffron ink around the sun and some Soft Sky ink in the other parts of the sky.  I sponged some Mossy Meadow on the bottom and then stamped the leaves in Mossy Meadow Ink around the perimeter of the bottom.  I used my aqua brush to splatter just a bit of the Hello Honey ink onto the background.  It is a very subtle splatter but really adds some interest.  I stamped my butterflies on some scraps of Whisper White cardstock in Bermuda Bay and punched them out with my Elegant Butterfly and Bitty Butterfly punches.  I added a couple of Rhinestone Basic Jewels to the butterfly bodies and adhered them to my card with glue dots.  On the top two butterflies I also added a little of the brand new Metallic Gold Thread under the bodies of the butterflies.  I absolutely LOVE this new Metallic Thread!  If you haven't tried, why not??  It is awesome!  Last but not least for the front, I stamped the I'm here for you sentiment from the new "You've Got This" stamp set and banner cut the right side and adhered under the butterfly on the bottom.

For the inside of my card, I stamped two more of the leaves on the right side and added another sentiment from the "You've Got This" stamp set!  I really love the sentiments in that set.  They are some of my current favorites!  

I hope you've enjoyed my card.  Please continue hopping along by clicking the next button to visit the Stampin with Darla and Sisters Blog!  I'm sure both sisters Darla Roberts and Nancy Kee will have some awesome cards to share with you!


All of the products used were Stampin' Up!  Here's a list of what I used:

Built for Free Using: My Stampin Blog


Thanks so much for stopping by!

Blessings,
Tina