Tuesday, March 29, 2016

SIP Challenge #41 - Weddings!


Hello!  Hope you've been having a wonderful week so far!  I'm just getting back to work after a week's vacation so there has been a lot of catching up to do!  

Since it's Tuesday, then of course it's time for another Stamp, Ink, Paper Challenge!  This week's Challenge is a Wedding Card!

I'll have to admit, my first thought was white on white and I absolutely adore a white on white card but for some reason, I found that Wisteria Wonder was calling out to me this week.  Does that ever happen to you?  I added a bit of Elegant Eggplant and White as well.  


Here's a closer view so you can see the Wink of Stella.  I just love adding glittery goodness to my projects!  I added it to my flowers at first and then decided to add a bit to my leaves as well!


I used my favorite stamp set from Ellen Hutson "Bold Blooms" to stamp some of the scribble roses, leaves, and dots onto a 3 3/4" x 5" piece of Wisteria Wonder Cardstock tone on tone.  I then used the coordinating dies from Ellen Hutson "Bold Blossom" to cut out some of the flowers and leaves.  The Blooms were cut in Elegant Eggplant  and adhered to Wisteria Wonder cardstock and then trimmed out.  The leaves were cut in Wild Wasabi and they were glued onto Pear Pizzazz cardstock and then trimmed out as well.  I used a partial cut of a Stampin' Up! Tea Lace Doily adhered to the Wisteria Wonder Layer before adhering the ribbon and flower and leaves die cuts.  The wooden "Congrats"  was from Stampin' Up! and was one of the Expressions Natural Elements.  It comes in a light natural wood tone.  I pressed it into White Craft Ink to make it White and then used some Wink of Stella on it as well.  I used Alene's Fast Grip Glue to glue on the "Congrats" sentiment.  Tombow Multipurpose glue was used to adhere the Wisteria Wonder layer onto a piece of 4" x 5 1/4" piece of Elegant Eggplant cardstock.  That was then glued to a skinny layer of Whisper White (4 1/8" x 5 3/8") and then those were all adhered to my 4 1/2" x 11" Wisteria Wonder card base that had been scored at 5 1/2".  Finally I added three Pretty Pink Posh Dew Drops with some Alenes Fast Grip glue.

I hope you like it and I hope it's not too colorful for a Wedding Card.  I plan on using it for a coworker's wedding shower that's coming up soon.

Thanks so much for stopping by!  Blessings,  Tina

Monday, March 28, 2016

TGIF Challenge #TGIFC48-Remix

So I saw a post that my sweet friend Holly Stene posted in One Stamp At a Time that intrigued me!  It was a remix of the March challenges over at TGIF Challenge Blog.  There were three challenges listed and you can pick two of the three to mix on one project.  Pretty cool, don't you think?  


So the challenges that I picked to combine are ... all three!


And here is my card...


Here are the Products used:

Cake and Sentiment from Unity Feb 2016 Kit of the Month (Allow Beauty)
Background Spotches are from Stampin' Up! (Gorgeous Grunge)
Cardstock all Stampin' Up! Pool Party, Pink Pirouette, Whisper White
Ink all Stampin' Up:  Pink Pirouette, Pool Party, Mint Macaron
Stitched Circle Die by MFT

Thanks so much for stopping by!  Blessings, Tina

Thursday, March 24, 2016

March D's Stamping Team USA Blog Hop


Hello and welcome to D's Stamping Team USA March 2016 Blog Hop!  This month's theme is Birthdays! If you've already been hopping you should have landed here from Deb Naylor's fabulous blog!  If not, make sure you check it out!  She is super talented and I know you will not want to miss her inspiration!   

As you probably know by now, the fabulous Shannon West with Stampin' Up! has started a Birthday craze with her awesome hashtag #Imbringingbirthdaysback!   I am totally on board with this endeavor and am working on building up my Birthday Card inventories now so what better theme for a blog hop!  


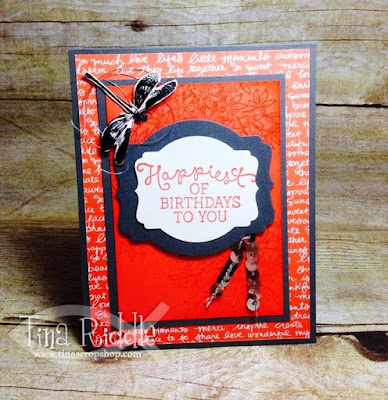
I was straightening up my craft area and putting away some cardstock when I noticed how beautiful Calypso Coral looked with Basic Gray.   I  just knew I wanted to use these together for my card!  I started with an 11" x 4 1/4" piece of Basic Gray Cardstock scored at 5 1/2".  My next layer was  a piece of Calypso Coral DSP Paper Stack.  The 3" x 4 1/4" piece of Calypso Coral was stamped tone-on-tone with the floral stamp from Awesomely Artistic prior to mounting on the  3 1/4" x 4 1/2" Basic Gray cardstock layer.   The sentiment from Birthday Blooms was stamped in Calypso Coral Ink onto Whisper White and then cut out with the Deco Labels Framelits.  I also cut a larger Basic Gray Deco Label to mat it and then attached the layers with Stampin' Dimensionals.  The Dragonfly from Awesomely Artistic was stamped in Memento Tuxedo Black Ink onto the Coral layer and then also stamped and embossed with Black embossing powder on Whisper White cardstock.  Since I had already stamped it on the coral, I didn't have to fussy cut the small antennas on the head.. this saved me a lot of time.  I attached the fussy cut embossed dragonfly onto the stamped one with a glue dot in the middle of the body.  I then made some loops of Silver Thread around the dragonfly tucking it under the wings.  Once I had the loops the way I wanted them, I adhered the end of the dragonfly's wings with gluedots onto the thread to secure it.  Lastly I added a small bent piece of Silver Sequin Trim to the bottom of the Deco Label with two glue dots to secure it well.

Here is the inside of my card..


For the inside, I stamped the "dear friend" sentiment from Birthday Blooms in Calypso Coral Ink onto a 4" x 5 1/4" panel of Whisper White Cardstock.  I added two stamped off sections of the flowers from Awesomely Artistic also in Calypso Coral on the top and right side and then stamped the dragonfly in Memento Tuxedo Black ink. 

I hope you enjoyed my card and are ready to head over to my sweet friend, Megan Thompson's blog!  Just click the next button and you'll be there!


Here's a list of the Stampin' Up Products Used:

Awesomely Artistic Stamp Set
Birthday Blooms Stamp Set
Silver Sequin Trim
Brights Collection Designer Series Paper Stack
Silver Thread
Calypso Coral Cardstock
Basic Gray Cardstock
Whisper White Cardstock
Calypso Coral Ink
Memento Tuxedo Black Ink
Stampin' Dimensionals
Snail Adhesive
Mini Glue Dots

Thanks so very much for stopping by!  Blessings!  Tina

Tuesday, March 22, 2016

SIP Challenge #40 Tic-Tac-Toe

Hi all, I hope you're having a wonderful week!  I'm back over at Stamp, Ink, Paper this week with my card for this fun Tic-Tac-Toe Challenge!


For my card I decided to go down the third row, with Buttons, Congrats, and Ribbon or Twine.


This was a simple card that came together super quickly.  In other words, it's not much of a "Tina" card.  But I am honestly trying to not "over-think" my cards so from time to time you may see a kinder, gentler, Tina.... lol


Here's the inside..

Here are the Stampin' Up! Products Used:

Suite Sayings Stamp Set 
Party Pants Stamp Set
Basic Black Cardstock
Whisper White Cardstock
Memento Tuxedo Black Ink
Memento Luxe Black Ink (for embossing)
Neutrals Collection Designer Series Paper Stack
Tea Lace Doilies
Black and White Twine
Gold Metallic Button
Gold Sequin Trim
Clear Embossing Powder

Thanks so much for stopping by!  Blessings!  Tina

Tuesday, March 15, 2016

SIP #39 Sketch Challenge with Travler

Hello and Happy Tuesday!  I hope you are having a wonderful week!  Since it is Tuesday, it's time for another Stamp, Ink, Paper Challenge!  This week we have a fun sketch for you!


I know this is a complete shocker for anyone that knows me but this week I'm back with the Traveler set!  I know, I know, I'm obsessed with this stamp set!  Almost every sketch I look at speaks Traveler to me.  I try to fight it but I keep getting sucked into this world of trains, and ships.. oh my!  Lol  This week I paired it with the ledger stamp from The Open Sea as well as the retired stamp set.. That's the Ticket!  Here's my take on this sketch this week!


This one started with an 11" x 4 1/4" piece of Basic Black cardstock that was scored at 5 1/2".  I added a piece of 4 x 5 1/4" Basic gray cardstock that I ran through my big shot with an awesome  Darice Diamond Plate Embossing Folder.  I adhered the embossed layer with Multipurpose glue and stamped my tickets onto Very Vanilla Cardstock with Memento Tuxedo Black Ink and punched out the coordinating Ticket Duo Punch.  I glued three end to end onto the gray layer and tore the third one prior to glueing.  I stamped the ledger from The Open Sea stamp set in Memento Tuxedo Black onto a piece of 2 1/2" x  3 1/2" Smoky Slate cardstock.  After stamping, I sponged Smoky Slate ink on the edges and then crumpled it up into a ball.  Yep.. I crumpled it up!  lol  Then I opened it back up and tore away at some of the edges to distress it and then adhered it with foam tape over on the ticket strip.  I stamped the train from the Traveler set onto Very Vanilla cardstock with Memento Tuxedo black and used my Dies By Dave die to cut out the image.  I absolutely LOVE that Dave makes these dies for my favorite stamp set!  I adhered my train with more foam tape and then glued a few charcoal sequins from Pretty Pink Posh onto my card.   I decided not to use a sentiment on the outside and have stamped the "Sending Wishes Your Way" stamp from Butterfly Basics set on the inside.

Following are the Stampin' Up! Items Used:

Traveler Stamp Set
The Open Sea Stamp Set
That's the Ticket (Retired)
Ticket Duo Punch (Retired)
Memento Tuxedo Black Ink
Smoky Slate Ink
Basic Black Cardstock
Basic Gray Carstock
Smoky Slate Cardstock
Very Vanilla Cardstock
Stampin' Sponges

Non-Stampin' Up! Products:

Darice Diamond Plate Embossing Folder
Dies by Dave dies for Traveler Set
Charcoal Mini Sequins from Pretty Pink Posh
3-M Foam Tape

Thanks so much for stopping by!  Blessings, Tina

Monday, March 14, 2016

Balloon Celebration! WWYS #55, PP286

Hi everyone.  I hope you're day has been awesome!  I'm working on my stock of Birthday Cards for  #Imbringingbirthdaysback.  I had posted something on Facebook telling friends and family that if they would like a handmade card to message me so I better get to stocking up on Birthday cards :)  lol


Lucky me, there are also a couple of fun challenges up so I thought I'd combine my birthday card making with these challenges!


I've used the following Stampin' Up! Products:

Balloon Celebration Stamp Set
Balloon Bouquet Punch
Basic Black Cardstock
Whisper White Cardstock
Bermuda Bay Cardstock
Calypso Coral Cardstock
Bermuda Bay Ink
Calypso Coral Ink
Memento Tuxedo Black Ink
Calypso Coral Baker's Twine
Brights Sequins
Glue Dots
Stampin' Dimensionals
Tombow Multipurpose Adhesive


Non Stampin' Up Products Used:

Doodlebug Teal Sequins
Alene's Fast Grab Adhesive

Thanks so much for stopping by!  Blessings!  Tina


Thursday, March 10, 2016

OSAT Blog Hop - Spring Has Sprung!

Hello and welcome to the March One Stamp at a Time Blog Hop!  This month's theme is Spring Has Sprung and man has it ever here in Tennessee!  With temps in the 70's lately, it's really beginning to feel a LOT like Spring!  If you've already been hopping along you should have landed here from the awesome blog of Anna Smith!   Anna is amazing and has such fun and unique projects!!

My husband and I have five granddaughters and will soon have our 6th!   This time of year, I'm always working on Easter Cards for the girls so I took this opportunity to do not only a card  but also a little basket for one of them... don't ask which one this is for because I don't know yet.  lol  I've found that they pay close attention to what the others get so I try to make their gifts similar.  


For my card I started with a 11" x 4 1/4" piece of Pink Pirouette that was scored at 5 1/2".  The front layer is a 4" x 5 1/4" piece of Sahara Sand Cardstock that had been stamped at the bottom with the wood grain stamp from Timeless Textures stamp set in Tip Top Taupe.  Over the top of that layer I added a 4" x 4 1/4" piece of Botanical Gardens DSP.  At the top of the woodgrain portion, I added a cut piece of a Tea Lace Doily.  My little pink "basket" is a piece of Pink Pirouette that has been cut with a piece of the Curvy Keepsake Die.   After cutting the portion out, I cut out a circle with one of my circle framelit dies.   I then ran it through the Big Shot with a Darice Basket Weave Embossing Folder.   I stamped the rabbit face and ears from the Friends & Flowers stamp set onto Whisper White Cardstock with Blushing Bride Ink.  The ears were punched out with the Festive Flower Builder Punch.  The bunny face was cut out with one of the circle thinlit dies.   I used a larger white circle for the bunny's body and then stuck some Easter Basket grass in the basket and adhered to the inside with glue dots.  The basket was attached to the front of the card with Foam Tape.  The Happy Easter sentiment was stamped in Mint Macaron on /Whisper White Cardstock with the Teeny Tiny Wishes stamp set.  I used the Banner Punch to punch the ends of the tag and 1/8" circle punch to punch a tiny hole in the other end.  Linen thread was threaded through the tiny hole to  attach the sentiment to the handle of the little basket.  I then ran a piece of 1/4" whisper white cotton ribbon across the top of the "table" portion and knotted it on the left side of my card.  Wow.. that was a change!  I almost always knot to the right side of my card! lol   


My basket was cut with the Bigz Berry Basket Die.  Instead of cutting two pieces of it out, I cut out a third piece to make the basket a rectangle instead of a square.  I wanted it to hold a tad bit more candy.  I added a little bunny head just as I had stamped and punched out for my card.  I used a glue dot to attached to the top edge of the basket.  I used cream flower trim that I purchased from Hobby Lobby to run around the edge of the basket as well as across the handle of the basket.  All five of our granddaughters are very "girly" so I know they'll love the flower trim :)

I hope you enjoyed my card and basket and will continue on for some more inspiration.  Next up is my sweet friend AJ!  She is absolutely Fabulous and you will adore what she has for you!  Just click the next button and you'll be there!  Enjoy!

http://rutabagapiedesigns.blogspot.com/2016/03/osat-blog-hop-spring-has-sprung-march.html

Here is the list of all of our hoppers this month!

  1. Pam 
  2. Alisa Tilsner 
  3. Melissa Davies 
  4. Anna Smith 
  5. Tina Riddle - That's me!
  6.  AJ Bodine
  7. Megan Thompson 
  8. Justin Krieger 
  9. Dena Rekow 
  10. Andrea Tracy-Tucker 
  11.  Lori Mueller 
  12. Sara Levin 
  13. Kelly Acheson 
  14. Elizabeth Jeanne 
  15. Jeanna Bohanon  
  16. Marisa Gunn 
  17. Renee Ondrajka 
  18. Martie 
 Here's a list of the Stampin' Up! Products that I used today:

Friends & Flowers Stamp Set
Festive Flower Builder Punch
Timeless Textures Stamp Set
Teeny Tiny Wishes Stamp Set
Banner Punch
Curvy Keepsake Box Thinlit Dies
Bigz Berry Basket Die
Circle Thinlit Dies
Botanical Gardens Designer Series Paper
Pink Pirouette Cardstock
Sahara Sand Cardstock
Whisper White Cardstock
Mint Macaroon Ink
Blushing Bride Ink
Tip Top Taupe Ink
1/4" Whisper White Cotton Ribbon

Tuesday, March 8, 2016

SIP #38 - Color Challenge with Blushing Bride, Pear Pizzazz and Sahara Sand!

Hello and Happy Tuesday!  I'm over at SIP today with my color challenge design team card!  I loved the colors on this one.. Blushing Bride, Pear Pizzazz, and Sahara Sand!
Since Easter is only weeks away I really needed to get a jump on my Easter cards so I took these beautiful colors and got started!  I absolutely LOVE the retired Indescribable Gift stamp set that was in last year's Occasions Catalog!  I'm keeping this one around for my Easter cards!

I loved the Blossom Image from the Indescribable Gift Stamp set and I thought it looked so pretty framed up in the Mama Elephant All Prettied Up Creative Cuts Dies.  :)


I used some Clear Wink of Stella on the blossoms for some fabulous shimmer!

Here are the Stampin' Up Products Used:

Indescribable Gift Stamp Set (Retired) - Blossom Image
Teeny Tiny Wishes - Sentiment
Subtles Collection DSP Paper Stack
Whisper White Cardstock
Sahara Sand Cardstock
Linen Thread
Banner Punch
Clear Wink of Stella
Memento Tuxedo Black Ink
Blushing Bride Ink
Pear Pizzazz Ink
Sahara Sand Ink
Big Shot
Stampin' Trimmer

Non Stampin' Up Products Used:

3-M Foam Tape

Thanks so much for stopping by!  Blessings, Tina

Wednesday, March 2, 2016

ICS Blog Hop - Welcome Spring!


Hello and welcome to the March Inspire, Create & Share Blog Hop!  This month's theme is Welcome Spring and I can tell you I am ready to welcome it!   If you've been hopping already, you should have landed here from the fabulous blog of Jen Guarino!  Jen is super talented and I'm sure you've loved her projects!   When I think of Spring, I think of flowers and birds so that's what I went with for my card and project this month.  


For my card and project, I used the new Grateful Bunch Bundle along with Hardwood and the Bird Builder Punch.. oops and the the sentiment is from Honeycomb Happiness :)


My card base was an 11 x 4" piece of Tempting Turquoise that was scored at 5 1/2".  My next layer was a 3 3/4" x 5 1/4" piece of Very Vanilla Cardstock.  I stamped around the edges with the leaves stamp from the Grateful Bunch stamp set in Garden Green.  I used my aqua painter and Old Olive Ink to watercolor in the leaves.    For my birdhouse I stamped piece of Sahara Sand Cardstock with the Hardwood Stamp in Tip Top Taupe ink.  I cut the body of the birdhouse 2 1/2 x 3 1/4".  I also cut a 5/8" strip to use for the roof.  The hole in the birdhouse was punched out using my large oval punch.  I adhered the piece that was punched out to my Very Vanilla leaves layer and then popped the rest of the birdhouse up with dimensionals to look like it was the opening of the birdhouse.  I used my piercing tool to punch a hole in the top of the birdhouse and ran some linen thread through the hole and knotted it and then ran the long end behind that layer to appear that it was hanging.  I then began punching out some Mossy Meadow leafy branches with my bird builder punch and adhered them to various places on the outside and inside of the birdhouse.  I stamped the flowers from the Grateful Bunch stamp set on Tempting Turquoise cardstock with Tempting Turquoise Ink and punched them out with the coordinating punch.  I added Very Vanilla candy dots to the centers of the flowers.  I layered them with dimensionals and adhered them in various places on the birdhouse and hanging above and below the birdhouse.  My bird was punched out in Soft Sky cardstock and the edges were sponged with Tempting Turquoise Ink.  I adhered the bird's body with glue and the wing with a dimensional.  I used a small pearl for the eye.   The sentiment "Oh, Hello" from Honeycomb Happiness was stamped in Tempting Turquoise on a strip of Very Vanilla cardstock and the end was cut with my Banner punch.  I layered the Very Vanilla sentiment banner on a wider Tempting Turquoise strip that was also cut with a banner end.  I used my bone folder to put a wave in the banner and attached it with dimensionals.   


For my 3-D project I made a Birdhouse Curvy Keepsake Box.    It was cut out of Sahara Sand cardstock and stamped in Tip Top Taupe ink with the Hardwood stamp.  A small oval was cut for the birdhouse opening with a small oval framelit die.  I adhered a piece of window sheet to the inside so that the treats wouldn't fall out of the birdhouse! :)  I used my bone folder to curve the curvy keepsake box prior to adhering the two pieces together with tear tape. I added some Mossy Meadow leafy branches and Tempting Turquoise flowers and a bird just like the one on my card!  


For the inside of my bird's nest, I used some scraps of Mossy Meadow cardstock to cut some grass using my Fringe scissors and then of course, I added some foil covered chocolate eggs!  

Thanks so much for stopping by!  I hope you'll continue on to Terri Takashige's Fabulous Blog!!


The Stampin' Up! Products used were:

The Grateful Bunch Bundle (stamp set and coordinating punch)
Hardwood Background Stamp
Honeycomb Happiness Stamp Set (Sale-a-Bration)
Bird Builder Punch
Curvy Keepsake Die
Sahara Sand Cardstock
Tempting Turquoise Cardstock
Mossy Meadow Cardstock
Soft Sky Cardstock 
Basic Pearl Jewels
Neutrals Candy Dots (Very Vanilla)
Tempting Turquoise Ink
Garden Green Ink
Old Olive Ink
Tip Top Taupe Ink
Tombow Multipurpose Glue
Stampin' Dimensionals
Big Shot

Tuesday, March 1, 2016

SIP Challenge #37 Wood, Cork, or Felt

Hello and Happy Tuesday!  Hope you've had an awesome week!  It's been so beautiful here in Middle Tennessee!  We had 70 degree weather over this past weekend!  How gorgeous it was!  Today we have such a fun challenge over at Stamp, Ink, Paper and I know you'll want to grab some wood, cork, or felt and play along!  I just received some of the awesome wooden "Expressions Natural Elements" from Stampin' Up! so I decided to use those for a fun birthday card for my son's girlfriend, Kaci!  

In keeping with the natural elements theme, I added a burlap bow :)


I started with an A2 card base of Sahara Sand.  I added a 5 1/4" x 4" piece of Bermuda Bay that I embossed with my new We R Memory Keepers Next Level Embossing Folder Wave (LOVE these!)
The "Celebrate" wooden element was attached with Beacon 3 in 1 glue onto my embossed layer.  I added a bow that I made from a strip of Burlap Ribbon that was tied in the center with jute thread that had been first threaded through a Bermuda Bay button.  I adhered some Sahara Sand lace trim on the ends of the burlap with more of the Beacon 3 in 1 glue.  I attached the bow to the bottom of my card under the "Celebrate" sentiment with dimensionals.  My flowers from the Grateful Bunch stamp set were stamped in Bermuda Bay and Pool Party and punched with the coordinating punch and then layered with dimensionals.  I added a few leaves punched out with in Mossy Meadow Cardstock with the Bird Builder Punch.  and tucked them under the flowers.  I stamped the butterfly from the Papillion Potpourri stamp set in Memento Ink onto Whisper White Cardstock.  I used my aqua painters to paint in some Pool Party and Crumb Cake ink and then punched out the butterfly with the Elegant Butterfly Punch.  I used a bone folder to curve the wings and then adhered it with glue dots.

Here's the inside of the card..

The inside sentiment was stamped in Bermuda Bay Ink.  The "You are loved  (A LOT)"  sentiment is from the Grateful Bunch and the "Happy Birthday" sentiment is from the Balloon Celebration Stamp Set.  I really liked the cursive font on both of these and felt they looked great together!

Thanks so much for stopping in.  I hope you'll head over to Stamp, Ink, Paper and link up your own card using wood, cork, or felt!  

Here are the Stampin' Up Products used:
Grateful Bunch Stamp Set
Papillion Potpourri Stamp Set
Balloon Celebration Stamp Set
Blossom Bunch Punch
Bird Builder Punch
Elegant Butterfly Punch
1 1/4" Burlap Ribbon
Sahara Sand 7/8" Lace Trim
Brights Button in Bermuda Bay
Bermuda Bay Cardstock
Sahara Sand Cardstock
Whisper White Cardstock
Bermuda Bay Ink
Pool Party Ink
Expressions Natural Elements


Blessings, Tina