Showing posts with label Challenge Card. Show all posts

Tuesday, June 1, 2021

The Spot Challenge #164 - Let's Hear it for the Boys! Masculine Card Challenge with Sailing Home

 Hello and Happy Tuesday!! I hope you were able to enjoy a wonderful weekend for sunny weather and time with family!  Since it is Tuesday, it is time for another Creative Challenge over at The Spot!  This week it is all about Masculine Cards!  I hope you'll stop by and check it out!


I just realized that I have hardly played around with the Sailing Home stamp set.  It is perfect for masculine cards!  I did a little #simplestamping to make this card and I love how it turned out.  


I went with a landscape gatefold base of Balmy Blue and layered with Night of Navy and the Plaid Balmy Blue DSP from the Subtles 6"x 6" DSP Assortment.  The center panel is Basic White matted with Night of Navy.  Using Balmy Blue ink, I stamped the birds and the compass.  I added the Thanks in Night of Navy Ink as well as the boat that was stamped over the compass.  I ran some of the White Baker's Twine along the right side of the front panel twice and tied it in a bow towards the top.  I frayed the ends of the twine just a bit.  

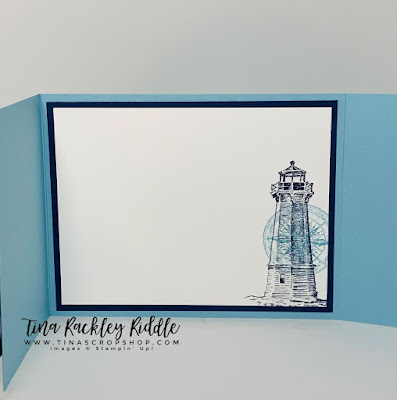
Here's how I finished the inside...


 I matted the Basic White inside panel on Night of Navy.  I used Balmy Blue Ink to stamp the compass on the lower right corner and Night of Navy Ink to stamp the Lighthouse over it.

Thanks for stopping by!  Blessings, Tina


Tuesday, April 30, 2019

SIP #197 Something for Mom

Hi There!  Hope your week is off to a great start!  Stamp, Ink, Paper has a Something for Mom Challenge this week, just in time for Mother's Day!  


I made a super simple card using Concord & 9th Double Cut Alphabet Dies, CZ Designs SSS Simple Sentiments II You are Loved Stamp Set, and DSP!


Since I'm still in a use up my DSP/Patterned Paper kind of Mood, this one took very little stamping!  The beautiful DSP was the perfect background!  I used Stampin' Up Berry Burst Cardstock and Neenah 110# Crest Classic Solar White Card stock.  The sentiment from my new favorite sentiment set, CZ Designs SSS Simple Sentiments II You are Loved was heat embossed in white on a thin strip of Berry Burst Cardstock.  Such a simple card but I think super pretty!

Thanks so much for stopping by!  Blessings, Tina

Tuesday, April 23, 2019

SIP #196 Shaker Card Challenge

Hi Friends!  You know how I love a good shaker card and if you do too then head over to Stamp, Ink, Paper this week for our Shaker Card Challenge!

Here's what I came up with......


I combined some Stampin' Up! Rectangle Dies, Stampin' Up! Stamps and Concord & 9th Fabulous Phrases Dies to come up with this  beauty.   Add some window sheet, foam tape, and sequins and there you have it.  This one is really pretty.  The stamp set is Painted Seasons and was one of the freebie bundles from the recent Sale-a-bration promotion that ended a few weeks ago.  The frame was from the coordinating DSP that came in the bundle.  

Thanks so much for stopping by!  Blessings, Tina

Tuesday, March 26, 2019

SIP #192 - Sketch Challenge with SSS CZ Designs and Stampin' Up!

Hi There!  Hope today is going to be an awesome day for you!  It's Tuesday, so of course it's time for another SIP Challenge.  This week we have a super easy and fun sketch.... check it out!

How cool is that!  I just love Cathy Zielske and I just picked up a cool "woot" die that she designed as well as an awesome sentiment stamp set so I had to use them.  Simon Says Stamp carrys her CZ Design sets if interested.. make sure you head over and check them out!


Of course, I turned the sketch on it's side.  I always have to be a little difficult, right??  For today's card I really could have used any DSP but since I just received my Sale-A-Bration freebie for spending $100 at Stampin' Up "The Painted Seasons Bundle", I decided to go with it.  I really love the colors in the DSP.. especially the Poppy Parade!  The "Woot" Die from CZ Design is awesome and I love that it includes the shadow die so you can use two coordinating cardstock colors.   The Stamp Set is SSS CZ Designs "Simple Sentiments II You are Loved" and it has awesome sentiments that I know I'll use soooo much!  You'll notice I added a little stitched rectangle of Vellum to the middle of the card to soften the center and allow the sentiment to stand out!


I decided to add one of the Painted Season Flowers and a couple of the leaves to the inside to coordinate it with the front!  The flower was stamped in Poppy Parade and the Leaves were stamped in Call Me Clover Ink.  The center of the flower was filled in with an Early Espresso Marker.  Since the flowers in the DSP had Early Espresso centers that I coordinated this with those.

Thanks so much for stopping by!  Blessings, Tina

Wednesday, September 12, 2018

PCC Inspiration Challenge #307

Hello and Happy Hump Day!  Paper Craft Crew has a fun inspiration challenge for you this week!  I was easily inspired since I love all things coffee!


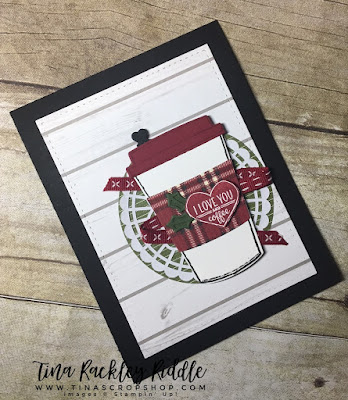
I am so into the new Festive Farmhouse DSP so of course I had to use it on my card along with the Coffee Cup Framelits paired with the retired Merry Cafe stamp set.


I love the Ship Lap Pattern as well as the plaids in the Festive Farmhouse DSP!   I kept this pretty simple with a Cherry Cobbler, White, Black and Mossy Meadow color scheme.

Thanks so much for stopping by!  Blessings, Tina

Tuesday, September 11, 2018

SIP #167 Large Sentiment Challenge with Stampin' Up! Merry Christmas To All Bundle

Hi Friends!  It's Tuesday so that means it's time for another Stamp, Ink, Paper Challenge!  This week is a super fun Large Sentiment Challenge.  


Also, to help you out with your own Large Sentiment, there is a Prize to two lucky participants (U.S. Residents only) of the Concord & 9th Bold & Brushy Upper Case Stamp Set.  Make sure you play along this week for a chance to win one!


I just received my Stampin' Up! Merry Christmas to All Bundle and that seamed perfect for this challenge!  I also used the awesome new Alpine Sports Thinlits Dies paired with the fun Festive Farmhouse DSP and I think this one is a winner!


I love this combination!  Such a fun card layered on Very Vanila Cardstock and then a Basic Black Cardbase!  The Merry was cut out of Basic Black twice and layered to give it a more substatial look.  I heat embossed the Christmas in white on Basic Black cardstock and used my trimmer to trim it as close as possible.   I always need a ton of Christmas cards so you'll see a lot of those from me in the next couple of months!  I try to give a handmade card to all of my coworkers, family and friends!

Thanks so much for stopping by!  Blessings, Tina  
Product List

Wednesday, July 18, 2018

PCC #299 Color Challenge with Stampin' Up! Lilypad Lake Bundle

Hello and Happy Hump Day!  I'm finally back over with my friends at the Paper Craft Crew after a few weeks off.  I am soooo super excited about this week's challenge colors!  Check these out!

http://papercraftcrew.com/pcc299-color-challenge/

So you only have to use 3 of the 4 colors but I used all of them!  I combined two of my favorite things... first of all my love of all things nautical and my love of watercolor backgrounds!


I used Bristol Smooth Cardstock for my top layer and did some watercolor smooshing on a long acrylic block to make my background.  It was pretty much a color blocking of Broken China Distress Ink on the bottom, Mustard Seed Distress Ink in the middle, and Picked Raspberry on the very top.  The bird, lily and lily pads were stamped onto Bristol Smooth as well and watercolored with Zig Clean Color Markers.  I used the coordinating Lily Pad Dies to cut everything out.  I used my Misti to stamp my sentiment in Versafine Black Ink and added three clouds from the Up and Away Thinlits.

Here's how I finished out the inside...


Thanks so much for stopping by!  A list of products that I used is at the bottom of this post if interested.  Blessings!  Tina


Product List

Tuesday, July 17, 2018

SIP #159 - Polkadots!


Hello and Happy Tuesday!  Do you love Polkadots?  If you do then this week's Stamp, Ink, Paper Challenge #159 is right up your alley!  Personally I love them!


I went soooo easy with this one that I'm a tad bit embarassed but not really!  LOL


This was such an easy card!  I layered some whisper white on an A2 Lovely Lipstick Card Base that had a piece of the 2018-2020 In Color 6x6 DSP Stack in Lovely Lipstick polka dots adhered to the front.  I ran a small piece of Whisper White ribbon (retired) around the front layered panels before glueing it down.  I added a Pearlized Doily over it with  Multipurpose liquid glue in the middle section.  I layered on a stitched Lovely Lipstick Circle and adhered to the doily with dimensionals.  On a scrap of Whisper White cardstock I stamped some of the flowers from the Love What You Do Stamp Set in Powder Pink on the background.  I stamped the sentiment from the same set over the flowers with Lovely Lipstick Ink and then cut out a smaller circle with the Circles Collection Framelits Dies and adhered it over the Lovely Lipstick Circle.  I finished it off with three Pearlized White Sequins.   I love when the patterned paper does most of the work for you!  

Thanks so much for stopping by!  Blessings, Tina


Product List

Tuesday, June 12, 2018

SIP #154 Sketch Challenge with Hero Arts My Monthly Hero June 2018

Hello Friends and Happy Tuesday!  Hope you are having a blessed week so far!  It's been super hot here in Middle Tennessee lately but this week we're having some rainy days.  Hopefully the rain will cool it off just a bit!  I think I'm beginning to get too old for extreme heat!  I spent Saturday at my 6 year old granddaughter's softball tournament and felt like I was having a heat stroke by the time the day was over.  Is that crazy or what?  All I was doing was watching them.  I can only imagine how those little girls felt out there playing ball all day long in the heat!  

So of course it's Tuesday... that means another SIP Challenge and this week we have a cool sketch!


Do you look at sketches and immediately see something?  I usually do and this time I saw either a sunrise or sunset.   Lucky for me I just received my Hero Arts My Monthly Hero Kit and had some fun stamps to make my vision come to life.


These are soooo many cool things about this set!  I love the multilayer water scene.  Oh and that sand embossing powder is awesome!  I see many cards in this set's future!  

Thanks so much for stopping by!  Blessings, Tina

Wednesday, May 30, 2018

PCC294 - Designer's Choice Challenge with Concord & 9th Geode Bundle

Hi Friends!  Happy Hump Day!  Tuesday really felt like a Monday all day so no doubt today will feel like a Tuesday!  Well today is another Paper Craft Crew challenge and seriously this one is hands down my favorite challenge because we can do whatever our little heart desires!

http://papercraftcrew.com/?p=6697
I just received my stamps and dies from the new Concord & 9th May 2018 release and I had to use the awesome Geode Bundle!  What is super cool is the size of this geode!  I had to use it to make a shape card since it was large enough!  The card measured 4 3/4" wide by 3 1/2" tall!


I stamped the geode on Bristol Smooth Cardstock with Versafine Onyx Black Ink and then clear embossed it.  I used a mixture of Distress Inks and Distress Oxides to watercolor the geode.  I spritzed it with some water and patted it with a paper towel and then heat set.  I used the coordinating die to cut the geode out and then also used the same die to cut an A2 Black cardbase by putting the top of the die just above the fold so that there would be a flap that would not cut through.  I adhered the watercolored front to the black card base with Tombow Multipurpose glue.  I cut the "you are a Rare Find" sentiment out 4 times in black cardstock and stacked them and then adhered to the front of the geode with more of the Tombow Mutipurpose glue.  Finally I added a boat load of Glossy Accents to the front of the rock so it would look like a rock... lol  It really turned out super cool but unfortunately by the time I finished it the lighting was not really good enough to get a great picture!  Trust me... it's awesome!  My oldest son, Trent has loved rocks since he was a little boy and especially geodes so I'm going to use this one for him!

Thanks so much for stopping by!  Blessings, Tina

Tuesday, May 29, 2018

SIP #152 - Color Challene with Hedgehog Hollow May Kit

Hello!  Happy Tuesday that for most of us will feel more like a Monday!  I hope you had a wonderful Memorial Day and are ready to start off a great week!  

This week over at Stamp, Ink, Paper our color challenge is a fun combination!  


How fun are these colors??  I decided it was about time for me to use my May Hedgehog Hollow Stamp Set so I stamped and colored up some of the fun popsicles and ice cream from the Waffle Flower Sweet Ice Cream Stamp Set!  


After I stamped the popsicles and ice cream in Memento onto Neenah Classic Solar White Cardstock, I used my copics to color them in and then fussy cut them closely so no white would show on the edges.  I also ran the brush edge of a Black SU Stampin Write Marker around the edges and then set them aside to dry.  I diecut a panel of Bristol Smooth Cardstock with a Wonky Rectangle Die and then did some ink blending.  I started with the bottom of the front panel by sponging Lemon Lime Twist on the bottom.  It wasn't quite lime enough so I sponged a little Cracked Pistachio Distress Oxide Ink over the Lemon-Lime Twist lightly towards the bottom and heavier towards the middle.  I sponged some SU Bermuda Bay Ink over the top part of the Cracked Pistachio to darken it a little bit.  I then started at the very top with Wilted Violet Distress Oxide Ink darker at the top and lighter as I came down toward the Bermuda Bay.  What a crazy combination of inks.. right?  I squirted a little water on it from my Distress sprayer and dabbed it with a Paper Towel.  It lightened a little more than I wanted it to so I ink blended a little more of the colors onto the spots.  Crazy background series but still fun to do. lol  I added the background to a panel of Black Swiss Dot Cardstock that was included in the kit and then added that to an A2 Cardbase of Gina K Designs 100# Turquoise Sea Heavy Base Weight Cardstock.   I honestly can't seem to make a cardbase out of cardstock that is not 100 or 110# cover weight anymore.  80# cardstock just seems so flimsy to me now.  I cut the "Hedgehog Hollow Die "Sweet" out of the same Turquoise Sea Cardstock three times and once I cut it out using a scrap piece of SU Black Cardstock.  I used Tombow Multipurpose Glue dotted on the back of each of the layers to stack the word and used the black on the very bottom of the die offset a little for contrast.  Once I decided where I wanted the "Sweet" on my card, I positioned the "you're so" from the Hedgehog Hollow Sweet Sentiments Stamp Set in my Misti and stamped it in Versafine Black Ink and then clear embossed it.  I adhered the "Sweet" on the card with more of the Tombow glue after my stamping and embossing was done.  The popsicles and ice cream were added with SU Dimensionals on the lower part of the card.  I used my SU Black Stampin Write marker to add a few splatters on the bottom... I always seem to get more than I intend to!  lol  Finally I added a few purple, turquoise and black sequins to finish off the card front.   The kit comes with an awesome color collection of Pretty Pink Posh sequins but I didn't use them because they didn't match the SIP color challenge colors.  I'll use them on other cards though... I'm sure! 

Thanks so much for stopping by!  Blessings, Tina

Tuesday, April 24, 2018

SIP #147 Color It Challenge with Gina K Designs Stippled Flowers Bundle

Hello and Happy Tuesday!  I'm finally feeling better.  Yay!!  It took two trips to the Doctor with a total of four shots and seven prescriptions but I finally am feeling alive!  And almost as wonderful, it is actually warming up and I actually feel like I could enjoy being outside some!  Thank goodness!

So this week over at Stamp, Ink, Paper we have a Color It Challenge!  


I finally pulled out my Gina K Designs Stippled Flowers Bundle.  I needed to make a card for Jeff's Mom's birthday and it has such lovely flowers as well as a beautiful Happy Birthday in this set!


I did some stamping and coloring.. can you tell?  Some flowers were stamped with Versamark and embossed in white and others were stamped with Versafine Onyx Black Ink and clear embossed.  I used Bristol Smooth Cardstock for all of my stamping.  It really takes water well.  You can't soak it as much as watercolor paper but it is definitely the next best thing and it is such a beautiful white color.  (I also use it for my Distress Ink Blended backgrounds!)  The Embossing on the Bristol Smooth helps me with watercoloring because it gives me a raised edge to contain my color.  I used Kuretake Zig Clean Color Markers for all of my coloring.  The cool thing about stamping and embossing ahead of time is that I could sit in the living room with Jeff and color while we watched television.  Obviously I was a little more involved with the coloring than the television watching but at least I was in the same room with him.  After coloring I decided that the light purple was my favorite so I used those to make Jeff's Mom's card.  I think my second favorite was the white embossed flowers so I'll probably make something from those next!

Thanks so much for stopping by!  Blessings, Tina


Tuesday, April 17, 2018

SIP #146 Theme Challenge - Food or Drink with Hero Arts It's Fiesta Time!

Hey There!  I sure hope it is warm where you live...  the weather has been loco lately!  It's been super cold and rainy in Middle Tennessee and as usual for this time of year... I have a sinus infection.  I went to the Doctor and got two shots and three prescriptions hoping that this thing will take a hike and stay gone!  Ugh!  I felt so bad on Monday I almost didn't make my Design Team card for the new SIP challenge but I remembered that I just got my Hero Arts monthly goodies so I went for it. 


The April My Monthly Hero is so adorable and so are some of the add-on sets!  I used the It's Fiesta Time Stamp and coordinating dies (these were both kit add-ons)  for this card.  It has some super cute images and sentiments in it.


I used Brusho Crystal Color in Brilliant Red and Gamboge (orange) and water on Bristol Smooth Cardstock for the background.  They are a lot of fun to use and a tiny bit messy! lol  The Chihuahua Taco and the Hot Sauce were also stamped on Bristol Smooth and colored with Copics.  I am NOT an expert Copic Colorist but I give it the old college try. lol  The sentiment was stamped on the completely dry background with Versafine Ink and heat embossed in clear.  Super simple card but I think it's pretty stinkin' cute!  I hope you think so too!

Thanks so much for stopping by!  Blessings, Tina


Tuesday, April 10, 2018

SIP Challenge #145 Ombre with Coffee Helps

Hello and Happy Tuesday!  Hope you had a wonderful weekend!  It was soooo cold here this past weekend.  It's so hard to believe that it's April and still this cold.  It even snowed in some places nearby where we live.  This is definitely out of character for a Middle Tennessee April!   I am soooo ready for warm weather!  I'm hoping we will have it very soon! 

Well it is another Tuesday so you know what that means... it's time for another Stamp, Ink, Paper challenge.  This week's challenge is Ombre!  One of my favorite Distress Ink techniques!


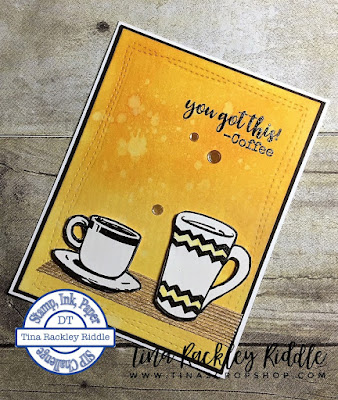
I have to be honest.. I love the Ombre look but this color combination is a little out of my comfort zone.  I would usually go for a blue ombre since I have so many distress inks in blue.  Obviously you can use any type of  ink to make an ink blended background but I think distress inks blend so beautifully and especially on Bristol Smooth Cardstock!  I decided that since I wanted to do a coffee theme I would go with yellow to orange using Mustard Seed, Fossilized Amber and Spiced Marmalade for my colors.


I adore this sentiment from this coffee set from Fun Stamper's Journey.  I purchased this from my FSJ friend and coach Jeanne Bobish.  She was sweet enough to send me their new Spring to Summer Stamp Set and knowing that I love all things coffee.. there were a couple of sets I had to have.

Thanks so much for stopping by!  Blessings!  Tina


Tuesday, April 3, 2018

SIP #144 Birthday Challenge with Gina K Wreath Builder Bundle

Hello and Happy Tuesday!  Hope you had a great weekend and have survived Monday!  We have such a fun (and easy) challenge over at Stamp, Ink, Paper this week!  Who doesn't need birthday cards.. this is my kind of challenge! lol


I finally got my Gina K Wreath Builder Bundle!  It really is a LOT of fun!  I may have gone a little crazy with the Little Things Rainbow Gems by Lucy's Cards. 


Isn't it cute??  There are sooooo many options with the amazing wreath builder template.  I may be in my craft room for the next three days making wreaths!  

Thanks so much for stopping by!  Blessings, Tina

Tuesday, March 27, 2018

SIP #143 Basket of Flowers with Concord & 9th Posie Fill In and Banners & Blooms Bundles

Hi There! Hope you're week is off to a fantastic start!  This week at Stamp, Ink, Paper we have a fun new theme Challenge called "Basket of Flowers"  


My Basket of Flowers is definitely a "loose" interpretation!  lol  


I just got this adorable Concord & 9th Posie Fill In Bundle and I really thought the background looked a lot like a basket.... That's my story and I'm sticking to it!  lol  I stamped the Background on SU Crumb Cake Cardstock tone-on-tone with Crumb Cake Ink.  The edges were sponged with Crumb Cake Ink as well.  Since I stamped it on Crumb Cake all of the Flowers and Leaves were stamped and/or die cut separately and glued on.  Actually some of the flowers were popped up on Dimensionals.  I used Old Olive for the stamped Leaves and the card base.  The foliage diecuts were cut out of a scrap of Mossy Meadow (retired SU) cardstock.  The flowers were stamped with Blushing Bride onto Pink Pirouette Cardstock.  The center was stamped with Flirty Flamingo and I used a scrap of Rose Red behind the die cut center.  The banner was from the Banners & Blooms Bundle.  I'm determined to have a LOT of birthday cards this year.  I never seem to have enough.  

Thanks so much for stopping by!  Blessings, Tina

Tuesday, March 13, 2018

SIP #141 - Sketch Challenge with SU This Little Piggy

Hello and Happy Tuesday!  I hope you had a wonderful weekend and that your week is off to a fabulous start.  It was a messy rainy softball weekend for us.  We drove to Chattanooga to watch our sweet Taylor Rose play ball.  She loves softball so much and is really improving every year!  This was her first tournament this season and had a really good start!  Of course after my hubby, my kids and grandkids, scrapbooking and card making are definitely filling up my spare time.  This  week I'm back over at Stamp, Ink, Paper with a Design Team Card for this week's challenge.  

What a fun sketch right?  So many possibilities with this one!  I decided to finally use a stamp set that had never been inked up... This Little Piggy by Stampin' Up!  I've seen so many adorable cards with it so it's hard to believe I've never used it!


I stamped my adorable flying pig with SU Archival Black Ink onto Bristol Smooth Cardstock.  I love Bristol Smooth for light watercoloring where you aren't saturating the cardstock too much!  I used a watered down TH Distress Oxide in Spiced Marmalade and Picked Raspberry for my pig.  The wings were pretty watered down so they were a pale pink.  After the wings dried I used some Clear Wink of Stella to add some glittery shine to them.  I also used some watered down TH Peacock Feathers for the sky.. it was a very light wash.  After everything was dry I used SU Layering Square Framelits to cut it out as well as a black scallop tap and a larger layer of Powder Pink.  I used one of the Tutti-Frutti Cards as my card base.  I stamped the sentiment on the bottom with my Stamparatus to make sure that I got a good dark impression.  I have to tell you that I LOVE my Stamparatus.  At first I was a bit skeptical since I already had a Misti that I used most all of the time.  There are so many cool things you can do with the hinged lid that makes it an awesome value.  The stamping plates on the top and side are also very thick and make it easier to get a good dark stamped image.

Thanks so much for stopping by!  Blessings, Tina

Tuesday, February 20, 2018

SIP #138 Card Maker's Choice with My Monthly Hero February 2018 Kit

Hello and Happy Tuesday!  Jeff and I had a wonderful anniversary weekend and honestly I hated for it to end.  But... all good things must come to an end and so do weekends! lol  Monday was back to work as was Tuesday but I did have a little crafty time because as usual Tuesday means it's time for another Stamp, Ink, Paper Design Team project!  This week is my very favorite challenge of all challenges..... Card Maker's Choice!  I have to chuckle at the Challenge Graphic since it says Make a card using your favoirte stamp set, ink colors and paper.  I mean seriously can anyone have a favorite?  I love them ALL!!  


Well I do have a favorite new set because I just received the February Hero Arts My Monthly Hero Kit and since Jeff and I love birds.. it's going to be a favorite for sure!


Since these birds are mostly sihouettes and not a lot of stamp detail, I decided to use the Baby Wipe Technique to achieve the muted colors.  I folded up some baby wipes and dotted on a few reinkers and used it as a stamp pad.   I love the blue and greens achieved in using this technique.  For the front panel, I used a piece of watercolor paper and used the distress ink smooshing technique to achieve the background.  The distress ink colors were Picked Raspberry, Peacock Feathers, and Mustard Seed.  It's a bit hard to see the yellow in the photograph since it's pretty light but in person it really looks pretty.  I stamped the  "Sending You Sunshine" sentiment from the kit in the upper right corner using SU Crushed Curry Ink.   I added the panel to one of the Dark Brown Woodgrain Card bases that was in the kit.  The cool bird's nest was from a die in the kit and was cut out in Crumb Cake cardstock and I sponged some Crumb Cake Ink onto it to add a little dimension and interest.  The limb was inked with markers so that I could achieve the green and brown exactly where I wanted them.  I used the coordinating die to cut out the limb and adhered it to the front panel with Tombow Multipurpose Glue.  I also adhered my bird's nest at the very top and very bottom with Tombow, allowing the middle slit to open so the birds could be tucked into the nest.  The bird on the left side as glued with Tombow and the bird on the right was adhered with a Dimensional.  I finished this with three SU Glitter Enamel Dots in Yellow.  This was fairly simple but so pretty.

Thanks so much for stopping by!   Blessings, Tina

Wednesday, February 7, 2018

PCC #279 Inspiration Challenge with Stampin' Up! Beautiful Peacock

Hello and Happy Hump Day!  What a week it's been so far for me.. work week that is.  I've been working a lot of hours over the last month or so and this old gal is getting tired! lol   I've told myself that I'm retiring in 4 years.. I hope I haven't been fooling myself.  I really need more crafting time!

This week over at Paper Craft Crew we have an Inspiration Challenge.  What do you think of when you see this Challenge Graphic??


So when I saw the Challenge Graphic, the first thing I thought of was Feathers.. but I didn't really have a current feather stamp and didn't want to pull out something retired.  One of my new resolutions is to try my best to use current product!  As I was looking through some of my stamp sets I realized that the Peacock would work perfectly for this one!  


I learned so many things while making this card.. lol  First of all, I realized that if I had stamped the Peacock higher I could have had it standing on the "celebrate" die cut.. that would have been awesome.  Also, I realized that since I didn't stamp it that way and since I wanted to sponge the bottom, I should have sponged prior to embossing the bottom portion because the Smoky Slate ink really did make the gold embossing a little dull.  I tried to wipe it with a paper towel to remove the ink sitting on the embossed part but it didn't really do a great job.  So .. you have the awesome opportunity to learn from my mistakes.  

Thanks so much for stopping by.  Blessings, Tina

Below is a list of the items used.  Both the Beautiful Peacock and Celebrate you Thinlit Dies are Free Sale-a-bration Items that you can earn with a purchase!


Product List
<!-------- TAMS End -------

Tuesday, February 6, 2018

SIP #136 - Cabin Fever with Concord & 9th Sunshine Turnabout Stamp

Hello and Happy Tuesday!  I sure hope your week is off to a wonderful start!  There are sooo many sick people here in Tennessee!  One of my best friends has the flu and some of the schools have even closed for a few days because of sickness and especially the flu!  I hope you are staying well.. washing your hands and trying to stay away from sick people.  I know that's easier said than done!  This week's challenge over at Stamp, Ink, Paper is one I'm really feeling.. Cabin Fever!  We are all ready for Spring I think and ready to thaw out!  


So when I think of Cabin Fever, I think of getting outside in Sunshine.. so that brought me to a fun stamp and die set by Concord & 9th that I have hardly used.. Sunshine Turnabout!  


I used Stampin' Up Inks to ink up the fun turnabout stamp in Peekaboo Peach, Daffodil Delight, and the retired Strawberry Slush in both full strength and stamped off.  I used some circle dies to cut out my Sunshine rays.  The center was cut from Peekaboo Peach Cardstock.  I stamped the sentiment "you make everything shine" in Peekaboo Peach Ink twice and then stamped versamark over it and clear heat embossed it.  Since I felt like the embossed sentiment looked more orange than peach, I used a strap piece of SU Pumpkin Pie cardstock to cut out the scallop to surround the circle.  The flowers were stamped on Whisper White with the same colors that I used for my turnabout stamp and the leaves were stamped in SU Wild Wasabi.  I used the coordinating dies to cut out the flowers and leaves and arranged them around the sentiment.   I really felt like this stamped panel was calling for a square card so I cut a piece of Thick Whisper White Cardstock 8 1/2 " 4 1/4" and scored it at 4 1/4" for a small square card.  I cut a piece of watercolor look pink patterned paper from Altenew 4 1/4" x 4 1/4" and used Tombow to adhere it completely to the front of my card base.  I ran a piece of white organza ribbon across the front and tied it in a bow on the far left of the card.  I attached my circle with Dimensionals over the ribbon. Two of the flowers had glittered enamel dots by Stampin' up! as centers.  The other flowers had Lucy's Little Things Rainbow Jewels as centers.  I finished the card off by adding a few more of the Rainbow Jewels onto the card front with Ranger Multi Medium Matt Adhesive.   I'm loving the square card.. I see more of these in my future!

Thanks so much for stopping by!  Blessings, Tina