Hello and Welcome to A Paper Pumpkin Thing July 2017 Blog Hop! Do you love card kits? I know I do! The Paper Pumpkin Kit is one of my favorites! Unlike most of the Bloggers on this hop, I am not a Stampin' Up! Demonstrator but I am a lover of all things Paper Pumpkin! We have such a wonderful group of cardmakers on this Hop that love to inspire you! If you landed here from Lori Mueller's fabulous blog, thanks so much for continuing on! If you started with me, please make sure to hit the next button at the end of the post for lots of wonderful inspiration!
I decided to start off with a super simple card. I'm learning to really enjoy some white space on cards and this was a perfect example of how less can be more!
I used the heart cut out panel from the kit but cut it down a bit until it measured 3 7/8 x 5 1/8". I added to the back of the heart a piece of Delightful Daisy DSP . I then mounted the panel onto a 4 x 5 1/4" piece of Tranquil Tide Cardstock which was mounted onto an A2 cardbase made with Powder Pink Cardstock. I pushed the "love" wood element from the kit into my Tranquil Tide Ink Pad to coat it with the Ink. I had to do this 3 times to get the coverage that I wanted. I used my Fine Tip Glue Pen to adhere the wooden element. I stamped the "you" from the stamp set in Tranquil Tide to finish this one off. Such a pretty but simple card!
My next project was also super easy! If you've never made an Easel Card I have instructions on a previous post.. just click here!
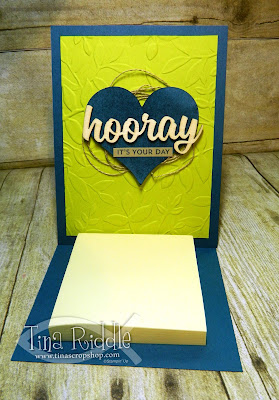
I kept this one super simple. I really think the Lemon Lime Twist Cardstock embossed with the Layered Leaves Dynamic Textured Impressions Embossing Folder was so pretty that I didn't want to take away from it too much. My Easel Card Base was made of Dapper Denim Cardstock. After adding the embossed 5 x 3 3/4" layer to the front of it, I added some Linen Thread with Stampin' Dimensionals. The used the ink direct to paper technique to ink up in the heart in the kit with Dapper Denim Ink. I adhered the "hooray" wood element from the kit with my fine tip glue pen. I stamped the "it's your day" sentiment from the kit in Dapper Denim Ink onto a scrap piece of Crumb Cake Cardstock. Finally I added a Post It Note Pad to the bottom of the Easel Card.
I hope you've enjoyed my card and project. Next up is the Amazing Carolynn Sander's blog. Just click the Nest button and you'll be there!
If case you've lost your way, here is a list of all of the Bloggers on this Month's hop!
- Sara Levin
- Lori Mueller
- Tina Rackley Riddle - That's Me!
- Carolynn Sander
- Jennifer Hill
- Rick Adkins
- Kelly Acheson
- Dena Rekow
- Kimberley Morris
- Maria Willis
- Cindee Wilkinson
- Megan Thompson
- Cathy Caines
- Andrea Tracy-Tucker
- Pam Staples


Great projects Tina! I love your use of white space on the first card! And your easel turned out awesome! 💖
ReplyDeleteI really like the Dapper Denim and Lemon Lime Twist color combination! Thanks for sharing :-D
ReplyDeleteFirst card is elegant, but simple. Then your second project, watch out, stunning colors together.
ReplyDeleteWell I have never made an easel card so I should get started!! Love both projects!
ReplyDeleteTina your card is gorgeous! That DSP is perfect for behind the cutout. I've never made an easel card...Yours is so pretty I'm thinking that I should give it a go.
ReplyDelete-Maria.
Cute cute cute projects as always Tina
ReplyDeleteThat's a nice combo of colors. It's very different...
ReplyDelete477CCB4CCB
ReplyDeletehacker arıyorum
hacker kirala
tütün dünyası
-
-