Showing posts with label CAS. Show all posts

Tuesday, June 16, 2020

The Spot Challenge #115 - Clean And Simple Wedding Card

Hi There!  Hope you are having a great day!  Today is my birthday so ... Yay me!  I honestly don't eat a lot of sweets now as I've been trying to take off a little weight but today I'm eating cake!    Well since it's Tuesday, it's time for another challenge over at The Spot Creative Challenge Blog.  This week's challenge is NOT easy for me because it's a Clean and Simple challenge.  CAS is not really my style although I absolutely LOVE when other Card Maker's create CAS Cards!


Of course the Clean part of CAS is always about leaving some white space.. why is that so hard?


I used the beautiful Floral Essence Stamp Set as my primary stamp set.  And because it is hard for me to stick with just one stamp set.. I added a few little stamped off splatters from the Forever Fern Stamp Set.  I'm so happy that this stamp set carried over to the new 2020 - 2021 Annual Catalog.  These floral images are so pretty and simple to create.  This is really a #simplestamping card as well since the only die I used was the stitched rectangle die which could easily been omitted with simple layering.  A list of the products used today will be listed below if interested.  Have a blessed day!  Tina


Product List

Tuesday, September 6, 2016

SIP Challenge #64 Clean & Simple - Less is More!


Hello and Happy Tuesday once more. Lately it seems like my Tuesday Blog Posts are the only ones I have time to do!  Well here I am again with the Stamp, Ink, Paper Design Team and let me tell you this is one that is wayyyyy outside my comfort zone but I threw caution to the wind and tried to make a Clean & Simple - Less is More card.  Make sure you go over to the SIP Challenge Blog and link up one of your own if you are feeling brave.. lol  


So let me start off my telling you that I absolutely LOVE stitched cards!  Even just little stitches here and there add so much interest!  I even bought a little Jenome sewing machine to stitch on them. I seriously have yet to learn to thread.  Seriously.. don't judge!  lol    Well since I so wanted stitching, I decided to use my black marker to create a few.  Here's my card and I really ended up loving it even though this is not a simple style for me at all!


For this card I decided to use one of my favorite Unity Stamp Co. Kits of the Month called "A Summer Story".  This kit was from May 2016 and has so many beautiful images!  I started off with a Whisper White Thick card base that measured 11" x 4 1/4".  I scored it at 5 1/2" for a top folding card base.  Then on a scrap piece of Whisper White Cardstock, I stamped my treat cup image with Memento Luxe Tuxedo Black Ink and then heat embossed it with clear embossing powder.  I used my copics to color in my treat cup and then fussy cut it out.  I tore off a piece of Stampin' Up! Playful Palette Designer Washi Tape and adhered it to the lower left side of my Whisper White Heavy weight Cardstock base.  I used my Faber-Castell black medium tip marker to draw in some faux zig zag stitching.  Since the color of the cup background looked so much like Kraft.. I die-cut a circle of Kraft to mat the punched 2 1/2" circle of Blushing Bride cardstock for my sentiment.  I stamped the sentiment with Memento Luxe Tuxedo Black Ink and clear embossed it onto the bottom portion of the circle of Blushing Bride.  I used my trimmer to cut a straight edge on the top of both of my circles and then layered them with Fast Fuse and used more Fast Fuse to adhere them to the upper right portion of my card.  I added three black candy dots and then decided to add a little shimmer by adding Clear Wink of Stella to the whipped cream.  I also added a layer of Glossy Accents to my hearts on my cup.  Here's a better look at the shine...


And that my friends was how easy this card came together!  Why don't I make more super easy cards???  lol  I think I try to overthink most of them!

Thank you so much for stopping by!  Blessings, Tina


Tuesday, May 10, 2016

SIP Challenge #47 - One Element Wonder

Hello!  What a wonderful weekend I had on Mother's Day Weekend!  I was able to see my daughter and two of my granddaughters on Saturday.  Taylor, my 6 year old granddaughter had a Softball Tournament in Dayton, TN which is pretty close to where I live so I was able to go watch her play.  She is such a joy.  I wish I could have stayed for the whole tournament and especially since they won!  Here's a picture of her with her trophy!  She recently lost her two front teeth.. lol  Isn't she just adorable! :)


After a fun Saturday, I was able to spend Mother's Day with my son and his sweet girlfriend, Kaci!  She is a fabulous cook and made Chicken Parmesan, Pasta and meatballs with her awesome Marinara, Roasted Garlic Bread, and we ended it with Brownies and Ice Cream!  Does that sound delicious or what??  Oh my.. I was so full I came straight home and took a 2 hour nap!  lol

Well, back to the weekly business.. I'm back over at Stamp, Ink, Paper today with my card for a One Element Wonder Challenge.  
I can tell you right now that clean and simple is NOT my go to style.  I absolutely adore it but it doesn't come easy for me.  When I start adding to a card, I have a hard time stopping!  lol  Here's what I came up with for my One Element Wonder and this is about as CAS as I get...


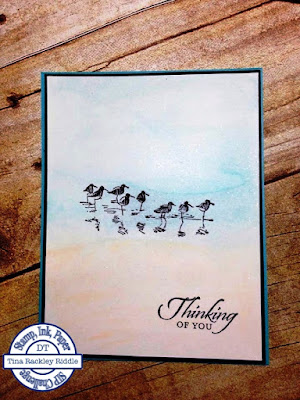
I sure wish I could have taken a better picture because this is much more beautiful that the picture suggests.  I did a watercolor wash of Sahara Sand, and Tempting Turquoise onto a 4" x 5 1/4" piece of Watercolor Paper.  I used my heat tool to dry it and then stamped the Seabird image in Stampin' Up! Black Archival Ink.  I used the same ink to stamp my greeting on the bottom right of the front panel. But here's where it gets super beautiful and I just counldn't get a picture that shows it.. ugh.. I sprayed that panel with some Glitter Dust Spray and it is Ah-mazing!!  Once that dried, I mounted the front panel onto a piece of 4 1/8 x 5 3/8" piece of Basic Black cardstock with Fast Fuse.  Next I mounted that onto an 11" x 4 1/4" piece of Tempting Turquoise cardstock that was scored at 5 1/2".  I hope you'll head over and check out our challenge and link up a One Element Wonder card of your own! 

Here are the Stampin' Up! Products that I used:

Wetlands Stamp Set
Black Archival Ink
Tempting Turquoise Ink
Sahara Sand Ink
Aqua Marker
Watercolor Paper
Basic Black Cardstock
Tempting Turquoise Cardstock
Fast Fuse Adhesive


Non - Stampin' Up Products used:

Foam Tape (Amazon)
Glitter Dust Spray (Amazon)

 Thanks so much for stopping by!  Blessings!  Tina

Tuesday, November 24, 2015

SIP Challenge #24 Color Challenge - Peaceful Pines

Hello and Happy Tuesday before Thanksgiving!  Do you have your meal all planned out yet?  I'm super excited to be going to my Son and his girlfriend's home for Thanksgiving.  She is an awesome cook and that leaves less for me to do!  I spent way too many years cooking the entire Thanksgiving dinner so this is definitely been a blessing! 
 
Well since it Tuesday, that means another Challenge over at Stamp, Ink, Paper!
 
 
http://stampinkpaper.com/?p=653
 
 
This week I had a challenge for myself!  Do you ever challenge yourself to try something different?  I really tend to overthink cards and make them more complicated than they should be so my challenge was to do something simple and have a lot of white space.  That should be easy but for me...not so much!  lol   I'm still a work in progress!
 

On this  card, I started with an A2 Basic black card base.  I added a piece of 5 1/4" Watermelon Wonder Dotted Lace Trim on both the top and the bottom of my card base with snail adhesive.  I stamped my trees from the Peaceful Pines set in Cucumber Crush onto Whisper White cardstock.  The stars on the trees as well as the "Tis the Season" sentiment were stamped in Watermelon Wonder.  I tore a couple of pieces of Whisper White Cardstock for the snowbanks and glued onto the bottom of the top layer.   I added a layer of Frosted Lace Stickles to the torn edges to add some definition on the snow banks and then attached the top layer to the Basic Black and lace base. 
 
That was it!  I had more white space on this card than I have ever had.  Again.. I'm a work in progress but I'll get there!  lol
 
Thanks for stopping by!  Have a wonderful day!  Blessings, Tina